If you have built a few book nook kits, sooner or later a dangerous thought may enter your head:
Could I design and build one myself?

I had built plenty of commercial book nook and miniature kits, but I had never designed one. I don’t consider myself particularly artistic, I had no experience designing miniature buildings, and I certainly wasn’t sitting in a workshop surrounded by laser cutters and sophisticated modelling equipment.
What I did have was experience building other people’s designs.
So I decided to find out whether an ordinary book nook builder could make the jump from following instructions to creating something completely original.
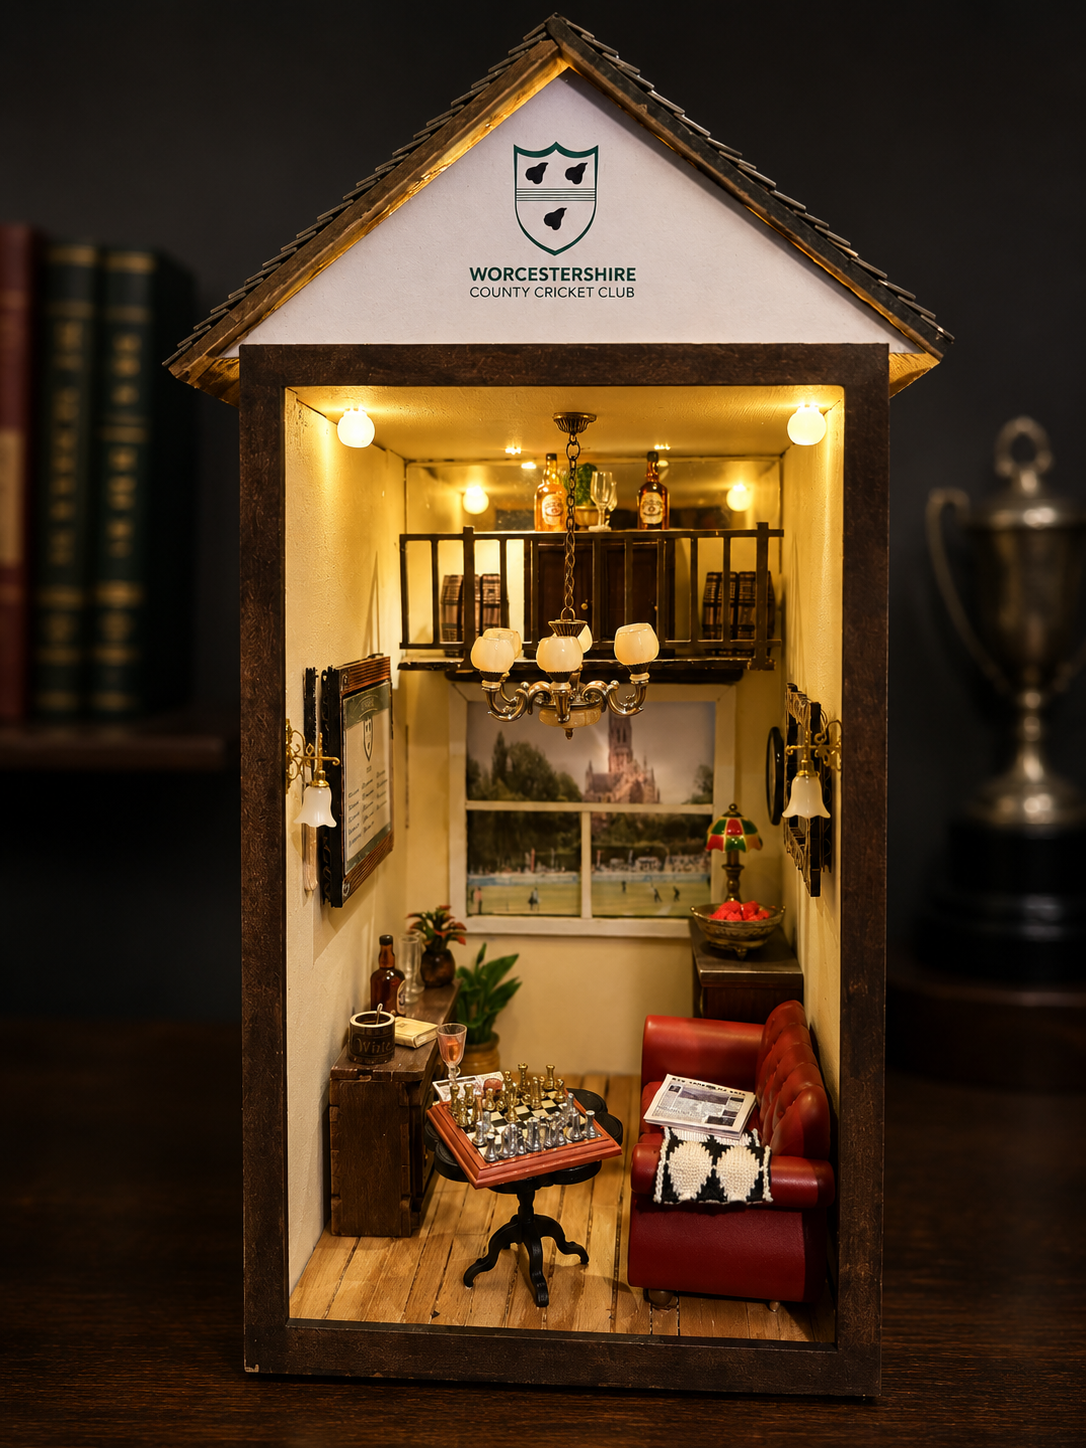
My first custom build became a miniature Worcestershire County Cricket Club pavilion, created as a gift for my father-in-law, a lifelong Worcestershire cricket supporter.
It wasn’t perfect. In fact, some of the mistakes I made are probably more useful to someone contemplating their first custom book nook than the things that went right.
This guide takes everything I learned from that first build and turns it into a practical process you can follow to design and build your own.
Step 1: Don’t Start With a Book Nook — Start With an Idea
My first question wasn’t “What materials should I use?” It was “What should I build, and who should I build it for?”
My father-in-law was 93. He and his late wife were passionate cricket supporters and life members at Worcestershire County Cricket Club. They regularly visited New Road in Worcester and even spent six weeks travelling around Australia visiting Test grounds.
That gave the model a purpose. I decided to create my interpretation of a traditional Worcestershire cricket pavilion.
Your inspiration could be a favourite book, a real building, a remembered street, a holiday destination, a pub, railway station, shop, fantasy world, historical scene or somewhere that does not exist at all.
Don’t begin by asking “What can I make?” Ask “What would I love to see when I look inside this box?”
Step 2: Visualise the Finished Scene
Before building anything, I spent around two weeks exploring different ideas and using AI to help visualise them. Eventually I produced this concept image of the cricket pavilion I wanted to create.

The finished model looked very different, and that’s absolutely fine. A concept image is there to help answer questions: What might the room look like? Where should the main features go? What atmosphere do I want? Where should the viewer’s eye be drawn?
You could use AI, photographs, sketches, reference images, architectural drawings or simply pencil and paper. You are not creating engineering drawings yet. You are discovering what you want to build.
Step 3: Choose Your Size and Scale Together
There is no single best scale for a custom book nook. The two most useful starting points are 1:12 and 1:24, and each solves one problem while creating another. The important thing is to choose the scale, enclosure and scene together.
My Worcestershire pavilion was approximately 1:24 scale, but that was not a scale I deliberately chose at the start. It was dictated by the Calico Crafts shell I bought. That kept the finished model compact, but I quickly discovered the downside: there are far fewer ready-made accessories at 1:24 than at traditional 1:12 dolls-house scale.
| 1:12 scale | 1:24 scale | |
|---|---|---|
| Accessory choice | Excellent – a huge dolls-house market | More limited; you may need to search, adapt or make items |
| Furniture availability | Excellent | Reasonable, but harder to source |
| Ease of working | Larger pieces are easier to handle and detail | Smaller pieces require more precision |
| Finished footprint | Much larger | Far more compact |
| Traditional book-nook proportions | Can become large very quickly | Usually better suited to a narrow bookshelf display |
| Best reason to choose it | Maximum choice of ready-made components | Compact size and book-nook format |
Choose 1:12 if you want the widest possible choice of ready-made furniture, doors, windows, lighting and decorative accessories, and you are happy for the finished project to have a larger footprint. Many 1:12 shells are sold as room boxes rather than conventional narrow book-nook shells.
Choose 1:24 if you want something closer to conventional book-nook dimensions, have limited display space, or are prepared to make, adapt, harvest or hunt harder for suitable miniature components.
At the same proportions, a 1:24 model is half the width, half the height and half the depth of its 1:12 equivalent. That is why a scene that fits comfortably into a conventional book-nook shell at 1:24 can become a substantial room box at 1:12.
What I learned: I would not choose the scale in isolation. Decide what you want to build, how large you are prepared for it to be, what enclosure you can obtain, and how much of the interior you intend to buy rather than make.
Step 4: Give Yourself a Box to Work Inside
For my first custom build I made one decision that simplified things enormously: I didn’t build the outer shell from scratch.

I bought a flat-packed XL MDF book nook shell from Calico Craft, measuring approximately 140 mm wide × 180 mm high × 230 mm deep.
For your first custom book nook, my recommendation is simple: buy a ready-made shell. Trying to create perfectly straight, square walls from separate sheets adds an unnecessary engineering problem. Using a shell is not cheating; it lets you concentrate on the scene that makes the project yours.
And do not restrict your searches to “book nook supplies”. Dolls-house, diorama, model railway, architectural modelling and miniature-making suppliers can all provide useful materials and components.
Step 5: Prototype and Dry Fit Before You Commit
If you are creating major internal walls or structures, mock them up first in cheap cardboard. You are testing wall positions, doorways, windows, floor levels, major furniture, viewing angles and sight lines — not making something pretty.
Then dry fit the real components before gluing. This is one of the habits from commercial kit building that becomes even more important when there are no instructions.

Put your phone where the viewer’s eye will eventually be and take a photograph. Can you see the intended centrepiece? Does something block the view? Does the room feel too crowded? Moving cardboard takes seconds. Moving permanently glued MDF is rather more entertaining.
Step 6: Think in Layers and Create Depth
A convincing book nook does not need enormous physical depth. It needs the illusion of depth. Think in three layers: FOREGROUND → MAIN SCENE → BACKGROUND.

That tiny separation between window and photograph helped the background feel less like a flat printed image. Matte photo paper also reduced reflections.
Step 7: Plan Your Lighting — and Especially Your Wiring
If I could underline one section of this guide in red, it would be this one: work out your lighting before permanently assembling the model.

For a first custom build, I would reuse the complete lighting system from an inexpensive book nook or miniature kit. You start with LEDs, wiring, power supply and often a switch or touch sensor that you already know work together. I did exactly that here. There is a separate guide to harvesting a cheap kit for custom-build parts.
The harder problem is often not lighting the model, but hiding the wires. Decide the routes before gluing walls, floors or ceilings into position. Consider false walls, a false floor, ceiling voids, channels, furniture or architectural features that can conceal wiring while leaving the battery compartment, switch and connections accessible.
I had not planned sufficiently well where the battery compartments would live, so they ended up attached to the back. It does not spoil the model from its normal viewing position, but it taught me to decide in advance where the LEDs, wires, switch, battery box and future access points will be.
Step 8: Floors, Walls and Everyday Materials


Before assembling my shell, I primed the MDF, painted the interior and prepared the flooring. For the cream walls I mixed approximately 20 parts white acrylic paint with one part ochre.
The floorboards were approximately 5 mm strips of basswood stained teak. I spent a great deal of time trying to cut them to roughly identical sizes. Only afterwards did I realise that ordinary wooden lollipop sticks or coffee stirrers could have made the job much easier.
Before manufacturing a miniature part from scratch, search how other model makers have solved the same problem. Lollipop sticks, coffee stirrers, cocktail sticks, matchsticks, card, packaging and jewellery findings can all become useful modelling materials. Ask not only “How can I make this?” but “What everyday object already looks like this at miniature scale?”
The slight variations and gaps in my floorboards actually suited an old-fashioned pavilion. Perfect isn’t always realistic.
Step 9: You Don’t Have to Make Everything
Creating your own book nook does not mean scratch-building every chair, bottle and light fitting. There are four perfectly legitimate approaches: MAKE IT, BUY IT, MODIFY IT or HARVEST IT.

My pavilion included a sofa, table and chess board from Rolife’s Catherine’s Living Room; drinks cabinet, barrels and bottles from another miniature kit; and a purchased dolls-house chandelier and other accessories. At 1:24, finding suitable pieces was one of the harder parts of the project.
A custom book nook does not have to contain 100% custom-made components. The design is what makes it yours.
Step 10: Expect the Engineering to Fight Back
The most difficult part of my first custom build was the roof. I wanted a traditional tiled appearance and used hundreds of miniature 1:24 slate-grey roof tiles attached individually to basswood.

There was not enough surface area between the roof and the facades to create the strong joint I needed, and I had not made the top of the facade an exact 90-degree angle. I eventually solved the structural problem with small L-shaped plastic brackets.
If I were doing Custom Build Number One again, I would keep the roof simple. A rectangular false roof or decorative fascia over the original shell can give a convincing finished exterior without creating a second structural project. I would save a pitched roof covered with hundreds of individual tiles for a later build.
When you assemble a commercial kit, you discover whether the manufacturer’s engineering works. When you design your own book nook, you discover why engineering matters.
Step 11: Check Everything Before Final Assembly

Before committing to glue, check corners, wall alignment, roof fit, flooring, furniture positions, lighting, cable routes and viewing angles. Ask repeatedly: If I glue this now, can I still reach everything behind it?
Step 12: Accept That the Finished Model Won’t Match the Original Idea
My finished Worcestershire pavilion looked considerably different from my original AI visualisation. That was not failure. The concept gave me somewhere to start; the physical build then introduced reality: available materials, scale, structural limitations, miniature availability, lighting, dimensions and my own abilities.


The design evolved. That’s not something going wrong. That’s designing.
Where to Buy the Parts for a Custom Book Nook
One of the surprises of a scratch build is that there is no single shop containing everything you need. I found myself shopping across the worlds of book nooks, dolls houses, model railways, dioramas, architectural modelling and ordinary craft supplies.
The most important search term is often the scale. Searching for “miniature chair” may produce almost anything; searching for “1:24 miniature chair” or “1:12 dolls house chair” immediately narrows the field. Always check the stated dimensions as well as the advertised scale before buying.
| What you need | Where I would look first | Useful search terms |
|---|---|---|
| Book nook shell / enclosure | Specialist MDF and dolls-house suppliers | blank book nook shell, MDF book nook box, room box |
| Furniture and accessories | Dolls-house suppliers, miniature marketplaces and donor kits | 1:24 furniture, half-scale dolls house, 1:12 miniature furniture |
| Wood and structural material | Model shops, craft suppliers and architectural modelling suppliers | basswood sheet, basswood strip, birch plywood, model timber |
| Windows and glazing | Model-making suppliers and clear packaging material | clear acrylic sheet, thin Perspex, model glazing |
| Flooring and wall finishes | Dolls-house suppliers, craft shops and printable materials | miniature flooring, dolls house wallpaper, brick paper, coffee stirrers |
| Lighting | Miniature suppliers or a cheap donor book nook kit | miniature LED lights, dolls house LED, book nook lighting kit |
| Tiny decorative details | Jewellery-making, nail-art, model railway and craft suppliers | miniature findings, micro beads, model scenery accessories |
For my pavilion, the ready-made MDF shell came from Calico Craft. The roof tiles came from a specialist miniature supplier, while some furniture and fittings came from existing commercial kits and inexpensive online purchases. That mixture turned out to be much more practical than trying to source everything from one place.
Do not overlook donor kits. A cheap kit can provide LEDs, switches, battery boxes, wiring, furniture, plants, printed materials and dozens of small decorative pieces for less than buying every component separately. If you already have abandoned or damaged kits, they can become a very useful parts library rather than waste.
Before ordering anything, make a simple parts list under five headings: STRUCTURE → ELECTRICS → SURFACES → FURNITURE → DETAILS. Mark each item as BUY, MAKE, MODIFY or HARVEST. It prevents the enjoyable but expensive habit of buying attractive miniatures that later turn out to be the wrong scale or have nowhere to go.
A Sensible Starter Shopping List
- A ready-made MDF shell or room box
- Basswood sheet and strips, plus a few coffee stirrers or lollipop sticks
- Thin clear acrylic or Perspex for glazing
- Acrylic paints, brushes and fine sandpaper
- Your preferred wood/PVA-type craft glue plus a stronger adhesive where the structure requires it
- A proven miniature lighting system or donor kit
- Cardboard for prototypes and templates
- A steel rule, craft knife, cutting mat, small square and clamps
- Only the furniture and decorative items required by your plan
You do not need to buy an entire miniature workshop before starting. Let the project tell you which specialist tools and materials you actually need. That keeps the first build affordable and, more importantly, keeps the emphasis on solving one design problem at a time.
What My First Custom Build Taught Me
After building so many commercial kits, I thought I understood book nook construction pretty well. Building one myself changed my perspective.
A manufacturer is not simply designing something attractive. They have to think about scale → structure → tolerances → assembly order → wiring → accessibility → materials → strength → sight lines → lighting → manufacturability.
When you follow their instructions, most of those decisions are invisible. When you build your own, suddenly they are your decisions. That is when you begin to understand just how much engineering goes into a really good book nook.
Your First Custom Book Nook Workflow
IDEA → STORY OR LOCATION → CONCEPT / REFERENCE IMAGES → CHOOSE ENCLOSURE & SCALE → ROUGH SKETCH / PROTOTYPE → CHECK SIGHT LINES → PLAN LIGHTING, POWER & WIRING → CHOOSE MATERIALS → PREPARE SHELL → FLOORS & WALLS → INSTALL ELECTRICS → MAIN STRUCTURES → FURNITURE → DETAILS → DRY FIT → FINAL LIGHTING TEST → FINAL ASSEMBLY → YOUR FIRST CUSTOM BOOK NOOK
Do You Need a 3D Printer or Laser Cutter?
No. They are useful tools and open up enormous possibilities, but they are not prerequisites. My first custom build was created largely from readily available materials, purchased miniature components, harvested kit parts, printed images, basswood, an MDF shell, paint, glue and a great deal of trial and error.
Technology can make custom building easier. It is not what makes something creative. If you are moving further into custom work, our essential tools guide explains which tools become useful as your builds become more ambitious.
Finally: Don’t Try to Compete With Commercial Kits
A commercial book nook may have been created by professional designers and engineers, prototyped repeatedly, refined, laser cut and professionally printed. You are making your first one.
Something will not fit. Something will have to be remade. A wiring route may turn out to be behind something you have just glued permanently into position. That is part of it.
My first custom build was not perfect. But when I finished it, there was not another one like it anywhere in the world.
And that is something no commercial kit can give you.
Copyright Book Nook Workshop 2026 – All rights reserved. (David Richards)
Leave a Reply