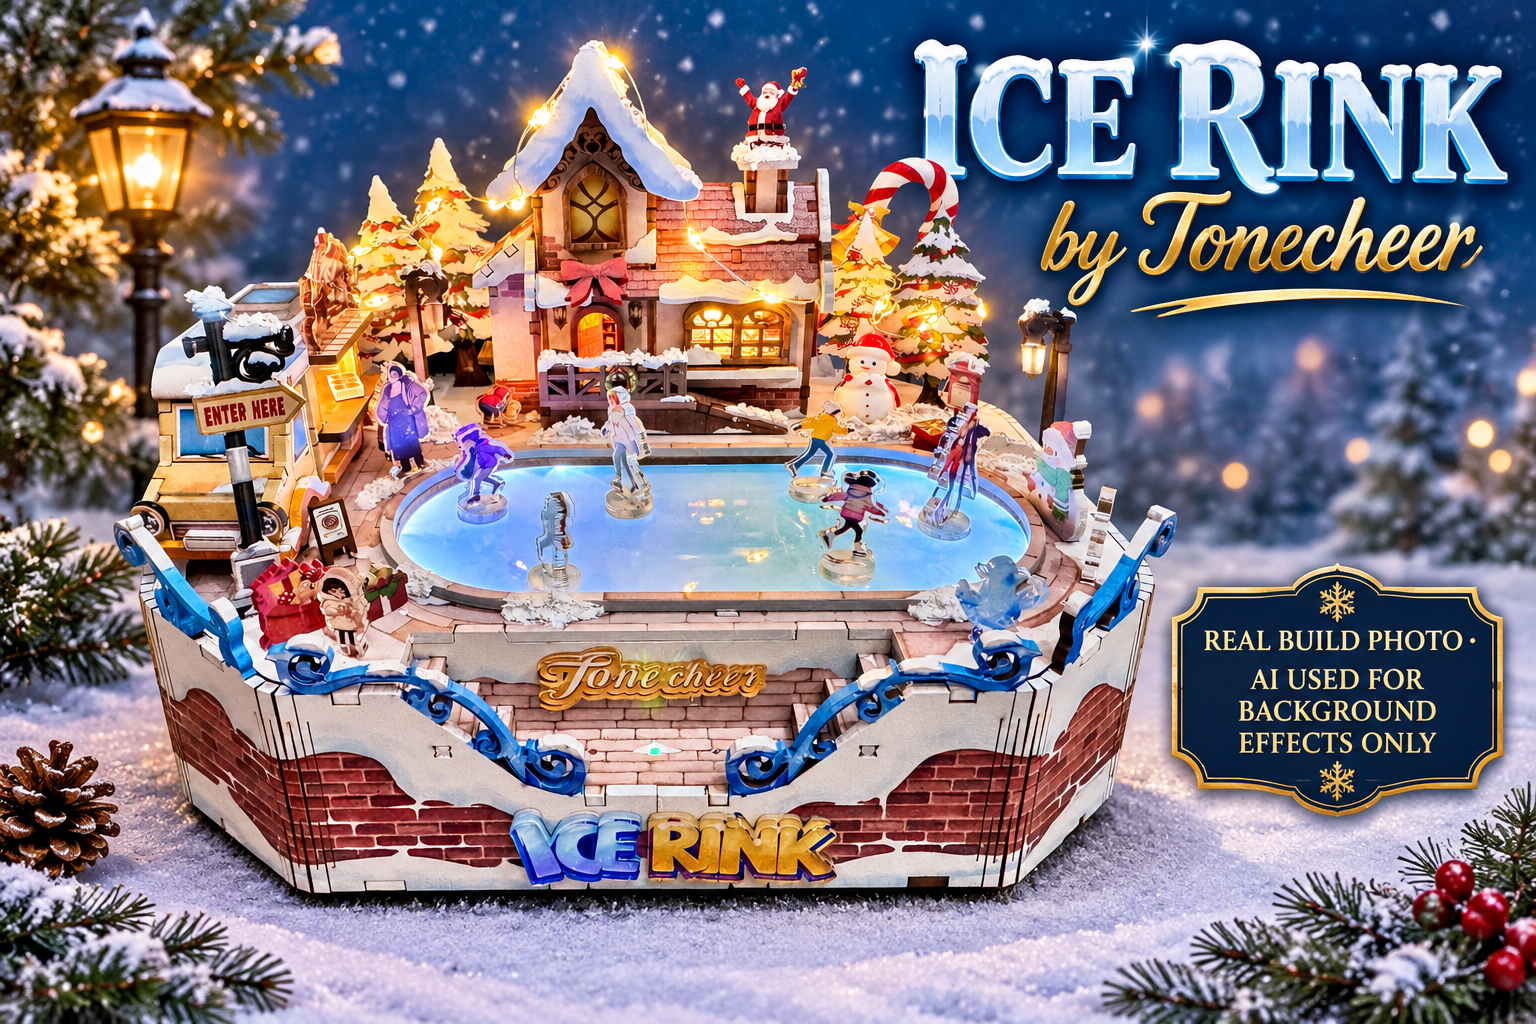
“A slippery little build that looks great.”
Built and reviewed by: John A MacInnes. Build number 77, October 2026.
Tonecheer Ice Rink: A Winter Wonderland on Ice.
Shortened review – 500 words.

Build 77 · Model TQ079 · 253 pieces · Recommended age 14+
There are few things that capture the magic of winter quite like an ice rink. The glistening ice, the skaters attempting to look as though they know exactly what they’re doing, and the occasional spectacular demonstration of gravity doing what gravity does best. It’s a scene that lends itself to the miniature world, provided the manufacturer can capture a little festive charm without leaving the builder skating on thin ice.
Tonecheer’s kit offers something different from the bookshops, street scenes and miniature rooms that regularly find their way onto my workbench. With the rink, surrounding details, lighting and moving skaters, there’s plenty here to examine beyond simply sticking bits of wood together.
The kit contains 253 pieces, using 2.5mm MDF boards alongside printed components, magnets, a motor, LED lighting and associated wiring. It is an ambitious little scene, with the moving elements intended to give the finished model more life than a static display.
Assembly brings together the wooden structure, rink details and lighting components. The magnets and motor are central to the movement, so care during installation is important. This is not the sort of build where you want to force a part into place and hope for the best; check alignment as you go, and make sure the moving pieces have the clearance they need before closing everything up.
Once illuminated, the rink takes on a warmer, more inviting appearance, helping the scene feel like a winter attraction rather than a collection of MDF parts. The combination of lighting and movement is the kit’s main selling point, and when the elements work together they add considerably to the finished display.
There are, however, a few niggles. The music and speaker arrangements do not quite deliver the consistency you might expect, and one of the motorised skaters proved noisier than it ought to be. Moving parts bring extra expectations: the mechanism should enhance the scene, not become the main thing you hear. Check the moving components and wiring during assembly, as access can become more awkward once the structure is complete.
There was also a personal reason for choosing this kit. My daughter is a licensed UK figure skating coach, so an ice rink miniature felt almost tailor-made for her. It was not simply another model; it was a gift connected to something she knows and loves. That made the finished scene meaningful, and gave me an extra reason to want the skaters and rink to look their best.
Overall, Tonecheer has chosen an appealing subject and packed a lot into a compact build. The combination of lighting, movement and winter atmosphere gives it plenty of character, although the noisy skater and inconsistencies with the sound prevent it from being entirely smooth skating. For anyone who enjoys a miniature with mechanical interest, it is an engaging project. And in my case, knowing who it was being built for made the effort worthwhile — even if I was left wishing I’d brought along a pair of skates.
Full review – introduction:

Tonecheer is the manufacturer behind this particular kit, and the subject immediately caught my attention. Most of my builds tend to involve bookshops, street scenes and miniature rooms, so an ice rink offers a welcome change from the usual shelves, shopfronts and tiny pieces of furniture. It also promises something a little different from the building experience itself, which is always welcome when you have a stash of kits looking at you as though they’re waiting for their turn.
There’s a personal reason for this choice, too. My daughter is a licensed UK figure skating coach, and I’d been asked to make something for her. That made the Ice Rink an obvious contender. Finding a kit that connects with someone’s own interests makes the finished model that bit more special, although it also introduces a slight complication: you now have a personal interest in making sure it turns out well. No pressure, then!
As regular readers will know, I’m not one to judge a kit solely by its promotional photographs. Those pictures have a habit of making everything look wonderful, usually without showing the builder wrestling with a reluctant component or wondering whether a particular piece was designed to fit quite the way the manufacturer intended. I prefer to reserve judgement until I’ve had the opportunity to get stuck in.
So, with Tonecheer’s Ice Rink on the workbench and a particularly good reason to do it justice, it’s time to see what this one has to offer. Let’s hope the finished result brings a smile to my daughter’s face — and that the only skating mishaps are confined to the miniature world.
Bought direct from the Tonecheer site and priced at $37.99 which equates to roughly £29-£32 Sterling.
Book Nook Workshop has a discount available for members to use, available here:
The inspiration behind Ice Rink:

Tonecheer has taken a rather different approach with Ice Rink, opting for a miniature winter scene that combines figure skating, warm lighting and music in a decorative wooden model. According to the manufacturer, the idea is to capture the peaceful charm of a winter’s day, with a snowy setting and the welcoming glow of lights. It’s a rather appealing concept, particularly for anyone who enjoys miniature scenes with a little atmosphere rather than simply another building to add to the collection.
The kit is more than a static display piece, too. Tonecheer describes it as a rotating music box, with a built-in light and a musical element intended to complement the winter setting. The manufacturer’s promotional material refers to a snowy village, a glowing winter scene and skating as the inspiration behind the design. There is even a little musical accompaniment to look forward to, although the product information is inconsistent about its exact title: the main description mentions The Skater’s Waltz, while the specifications list Waltz of the Snowflakes (Excerpt).
What particularly interests me is how the moving parts, lighting and scenery will work together. With a miniature skating rink, movement is an obvious attraction, but it needs to feel like a natural part of the scene rather than a mechanism bolted on simply because it can be. The lighting also has a job to do, helping to create that wintry atmosphere without overwhelming the details. Get those elements right and the result could be something that catches the eye even when the music has stopped.
Of course, the manufacturer’s description and the finished photographs can only tell us so much. The real test will be whether the components come together to create a convincing little winter scene, whether the rotating mechanism works as intended, and whether the music and lighting add something worthwhile to the experience. That’s what we’ll discover as the build progresses.
A closer look at the contents:

The first thing to establish is exactly what we are dealing with here. Tonecheer’s Ice Rink is a 3D wooden model kit comprising 253 pieces, with a finished scene that combines the skating rink with lighting and musical elements. It’s a rather different proposition from the architectural book nooks that have occupied my workbench recently, and I’m interested to see how Tonecheer has approached a miniature scene built around movement, music and a little winter magic.
Opening the box reveals four full-size MDF boards and a further six smaller, quarter-size boards, all made from 2.5mm MDF. That is a reasonable amount of material to work through, although the number of pieces alone doesn’t tell us how demanding the build will be. What matters more is how accurately everything has been cut, how well the components fit together and whether the instructions make the assembly process straightforward. Those are questions that will have to wait until we start putting the kit together.
There is also a substantial acrylic panel, complete with a protective safety film. Keeping that film in place until the panel is needed should help protect the surface from scratches during assembly. Given the nature of an ice rink, the transparent element is likely to be an important part of the finished appearance, so it will be interesting to see how effectively it contributes to the overall effect.
The smaller components are supplied in a selection of bags and include screws in various sizes, bolts, plastic shims, and magnets measuring 8mm and 3mm. Tonecheer has also included a small screwdriver, which is a useful addition for anyone who doesn’t already have suitable tools to hand. The magnets and shims suggest that careful positioning will be important in at least some parts of the assembly, although I’ll reserve judgement on their precise purpose until I reach those stages of the instructions.
The box also contains various stickers and a selection of printed card pieces. These should provide some of the decorative finishing touches, but the real test will be how well they fit into the finished scene and whether they look convincing at this scale. There is also a small piece of wax, another familiar accessory in wooden model kits, which may prove useful during assembly where specified by the instructions.
Of particular interest are the USB cable and the lighting rig. With illumination and music forming part of the appeal of this model, the electrical components will play an important role in the finished result. The lighting needs to enhance the scene rather than simply provide a source of illumination, while the musical and moving elements will need to work reliably if the model is to deliver the atmosphere promised by the promotional material. I’ll be looking at how these components are installed and how straightforward the process proves to be as the build progresses.
Overall, the contents appear to provide a varied selection of materials and components, from the MDF structure and acrylic panel to the smaller fixings, printed details and electrical equipment. There is certainly more here than a handful of wooden pieces and a pot of glue, although a well-stocked box is only part of the equation. With everything unpacked and accounted for, the next step is to examine the instructions and familiarise myself with the components before construction begins. The 253 pieces promise a rather different building experience from a conventional book nook, and I’m keen to discover whether Tonecheer has made the process as enjoyable as the finished winter scene looks in the photographs.
The instruction manual:

The instruction manual supplied with Tonecheer’s Ice Rink comes in the form of an A5 booklet, with the build broken down into a series of illustrated steps. Most of the illustrations are in black and white, although colour is used in certain sections to help identify the components required at different stages. It’s a sensible approach, particularly when you are dealing with 253 pieces and need to distinguish one small component from another without resorting to guesswork.
At the front of the booklet, you’ll find a lighting diagram, a parts list and a separate reference showing the individual boards. Having these available before starting the build is useful, as it gives you the opportunity to familiarise yourself with the components and identify anything you might need to locate during assembly.
I always think a few minutes spent getting acquainted with the manual before reaching for the first piece of MDF can save a fair bit of head-scratching further down the line.
The layout is generally well organised, with the construction divided into manageable stages. There are also helpful warnings printed in red ink, drawing attention to particular steps where a little extra care is required. These are worth paying attention to.
When a manufacturer goes to the trouble of flagging a section as requiring particular care, it is probably best not to charge ahead regardless and hope for the best. That sort of approach has a habit of coming back to bite you.
There is, however, one potential drawback. Being an A5 booklet, space is naturally limited, and some pages contain as many as three separate assembly sections. This means the illustrations can become quite small, and anyone who struggles with fine detail may find themselves reaching for a magnifier.
The drawings themselves are clear, but clarity and size are two different things. A perfectly good illustration can become considerably less helpful when you have to peer at it from a couple of inches away.
One detail worth knowing before you begin concerns the part numbers. If a number appears inside a black circle, it refers to a board or an acrylic component. It is a small distinction, but one that could save some confusion when you are trying to identify the correct piece.
It is always worth understanding the manufacturer’s numbering system before you start removing parts from the boards. This caused me some confusion but more about what it was later.
Overall, Tonecheer has provided a well-structured manual with a useful parts reference, a lighting diagram and warnings to highlight areas requiring extra attention. The small format is my main reservation, particularly for those of us who prefer our instructions large enough to read without an optical aid. Nevertheless, the organisation looks promising, and the real test will be how well the illustrations guide us through the actual assembly process.
And this brings us to one of the first issue in the manual. The instruction manual is generally perfectly usable, but there are a few areas where I think Tonecheer could make some small changes to remove unnecessary confusion. I managed to work out what was required, but I can see less experienced builders scratching their heads over something that really shouldn’t need a second thought.
Take page 34, section 5-1, for example. This is the stage where the rink is fitted to the base unit, part A1. The illustration shows the green and blue tenons, identified as I3, which fit into the corresponding mortises in the base.
So far, so good. Except Tonecheer has chosen to colour some of these tenons green and the others blue. And why, exactly? Well, that is the problem, because when you see two different colours used in an assembly diagram, the natural assumption is that there must be a reason for it. Perhaps the green ones go in particular holes and the blue ones somewhere else? Perhaps they have different functions? You start looking for a pattern, convinced that you are missing something important.
You’re not.
The tenons are identical, and every one of them will fit into any of the mortises. There is no special significance to the colours whatsoever. They could all have been shown in the same colour, and the illustration would have been considerably less confusing.
Now, I appreciate that this isn’t exactly a major engineering failure, and it certainly didn’t stop me progressing with the build. But that rather misses the point. Instructions are supposed to make assembly easier, not leave you wondering whether the manufacturer has introduced a colour-coded system that exists only in the illustrator’s imagination.
My suggestion to Tonecheer would be simple: if components are interchangeable, show them in the same colour unless there is a genuine reason to distinguish between them. It would make the diagram clearer, remove an unnecessary question from the builder’s mind and help those who are less familiar with these kits to proceed with confidence.
Sometimes, the best improvement to an instruction manual isn’t adding more information. It’s removing something that serves no useful purpose in the first place.
The printed boards:


The first thing to notice about Tonecheer’s Ice Rink is that it takes a rather different approach to the printed boards than some of the more elaborate book nooks I have built recently. There is very little printing on the MDF sheets, and that is not necessarily a criticism
A good proportion of the components will be concealed within the motorised base, so there would be little point in spending time and money printing surfaces that nobody is ever going to see once the model is assembled.
What printing there is, however, is perfectly acceptable. The coloured elements are crisp, with no obvious overprinting, blurred details or colours straying beyond where they should be. That might sound like a fairly modest achievement, but getting the basics right matters.
There is little more frustrating than discovering that an otherwise decent kit has been let down by poor printing, particularly when the finished appearance depends on those details looking convincing.
The colours themselves are well suited to the subject. This is, after all, a festive winter scene, and the palette used gives the model the right sort of seasonal feel. There is no need for an explosion of colour across every available surface; the important thing is that the printed elements complement the ice rink and its surroundings rather than compete for attention. From what I can see on the boards, Tonecheer has kept things sensible.
The laser-cutting also deserves a mention. The components appear neatly defined, and there is nothing immediately obvious to suggest that I am going to spend half the build cleaning up untidy edges or trying to rescue pieces that have not been cut properly. Naturally, the real test will come when the parts are removed from the boards, but there is nothing at this stage giving me cause for concern.
It is worth remembering that not every kit needs to rely on highly detailed printing to make an impression. With Ice Rink, much of the interest lies in the assembled scene, the moving elements and the lighting rather than elaborate artwork printed across every piece of MDF. The less visible structural components simply need to do their job, while the more prominent details need to look right when everything comes together.
Overall, there is little to complain about here. The printing is limited, but what is present is clean, clear and appropriately coloured for a festive skating scene. I would not put these boards in the same category as a kit where the printing itself is a major selling point, but that would be missing the point of this particular design.
The real interest lies in how all these components work together once the build begins, and that is where Tonecheer will ultimately have to deliver.
One thing I do like is that some of the parts have markings on the reverse showing you where the cables should be routed. It’s a small detail, but a useful one, particularly for anyone who hasn’t built a kit with this much wiring before.
Anything that removes a bit of guesswork and helps keep the wiring neat is worth having. It’s not exactly rocket science, but it’s the sort of thoughtful touch that can make life considerably easier for the less experienced builder. Well done, Tonecheer. Sometimes it’s the little things that make all the difference.
One other thing I did notice was some very slight scorching around a few of the laser-cut edges, where the laser has entered or exited the board. Now, before anyone starts worrying, these marks really are barely noticeable, and I suspect most builders would never give them a second glance.
Unfortunately for manufacturers, I have a habit of examining every component as though I’m conducting a forensic investigation, so even the smallest details get recorded in my reviews. The marks are most noticeable on the accordion-style pieces that enclose the base, and while they are worth mentioning, they certainly haven’t detracted from my overall impression of the kit.
In fact, those pieces deserve a compliment of their own. Considering the circumference they have to cover, they are exceptionally well manufactured, fitting together neatly and sitting perfectly in place. Getting curved or accordion-style sections like these to fit properly can sometimes be a bit of a challenge, so credit where it’s due: Tonecheer has done a cracking job here.
The lighting and electronics:
Now, this is where Tonecheer has clearly decided that an ice rink deserves rather more than a couple of lights and a battery box. The electrical components supplied with Ice Rink appear to be more than adequate for the job, and there is quite a bit going on here. Alongside the printed circuit board (PCB) and a battery pack that takes three AAA cells, the board itself has a USB C plug and a supplied cable for this in order it can be run off a battery pack or mains adaptor. We have a speaker for the musical element, a touch sensor, a motor to drive the cogs and turn the skaters, and a selection of lighting components.
The lighting itself consists of two warm-white LED strips, each carrying eight LED chips, together with a chain of miniature LED string lights and two additional LED heads. That is a fairly comprehensive arrangement for a model of this size, and it should give Tonecheer plenty of scope to illuminate the scene from different positions. The warm-white colour is a sensible choice for a festive setting, providing a softer glow than harsh, cool lighting and helping to create the sort of atmosphere you would expect from a winter skating scene.
What makes this kit particularly interesting is the combination of lighting with the motorised and musical elements. The motor drives the cogs that turn the skaters, while the speaker provides the soundtrack. This means the electronics have a rather more important role than simply making the finished model light up. They are responsible for bringing the whole scene to life, and the way these elements work together will have a significant bearing on the finished result.
All the components are fitted into one large JST connector, which should help simplify the overall arrangement by bringing the various connections together in a single plug. That sounds promising, although I will reserve judgement on just how straightforward the installation proves to be until I get to that stage of the build. As anyone who has worked with miniature lighting knows, having the components supplied is one thing; fitting everything neatly into the available space is quite another.
The three-cell AAA battery pack is also worth noting. It provides a self-contained power source for the system, although I will be keeping an eye on how accessible the battery compartment remains once the model is assembled. There is little point in having a lovely illuminated music box if changing the batteries later turns into a major dismantling exercise.
As always, I would recommend testing the electrical components before beginning construction. It is a simple precaution that can save a considerable amount of frustration later, when access to individual connections may be restricted by the surrounding structure. With a motor, music and several different lighting elements involved, it makes sense to establish that everything is working before it disappears inside the model.
Overall, Tonecheer appears to have provided a suitably comprehensive electrical package for Ice Rink. The combination of LED strips, miniature string lights, additional LED heads, a motor, speaker and touch sensor should offer considerably more than basic illumination. Whether the lighting creates the right festive atmosphere, the music complements the scene and the skaters rotate smoothly remains to be seen, but the ingredients certainly appear to be there. Now, the challenge is to get everything installed without turning the workbench into an electrical engineering department.
The build so far:


Well, I have to say, Tonecheer are making a rather good impression so far, and the build itself is doing nothing to spoil that. I am still in the relatively early stages, but the manufacturing quality is proving encouraging, and the components are behaving themselves rather nicely. There is always something reassuring about starting a new kit and finding that the manufacturer has taken the trouble to get the basics right.
The laser cutting deserves particular mention. The MDF pieces are coming away from the boards cleanly, without any unnecessary wrestling or the sort of force that leaves you wondering whether you are removing a component or performing minor surgery. So far, I have found very little to complain about in the way the pieces have been prepared, and that makes a considerable difference to the building experience. Nobody takes up this hobby because they particularly enjoy spending half an evening sanding rough edges and tidying up poorly cut components.
Of course, with Ice Rink, a fair proportion of the MDF is destined to disappear inside the motorised base, so we are not dealing with the same emphasis on decorative surfaces as we might find in a highly detailed book nook. Nevertheless, the quality of the cutting matters just as much. These components need to fit together properly, particularly where the cogs and motor are concerned. A little inaccuracy in the wrong place can quickly turn a straightforward assembly into an exercise in frustration.
The instructions have also been proving useful, with the build broken down into manageable stages. The illustrations are generally clear enough to follow, although the small A5 format means I am occasionally having to look a little more closely at the details. That is something I mentioned when examining the manual, and it remains my main reservation. Still, there is a difference between having to peer at a small illustration and being left completely baffled by what the manufacturer expects you to do. However, in step 2.2 on page 24, this threw me as it refers to an item marked A1, which is a sticker, and A18, a round section with two mortises on it. but beside the part shows L18 and L10.
I read that as being parts, and when consulting the front of the manual, the parts list clearly shows A1 as a sticker sheet, and A18 as the acrylic sheet. It might have made more sense to have used a letter of the alphabet, not already being used for the boards.
But quite why these pieces had two differing numbers (L10 and 18) is a mystery, as they are identical.
The instruction manual is generally perfectly usable, but there are a few areas where I think Tonecheer could make some small changes to remove unnecessary confusion. I managed to work out what was required, but I can see less experienced builders scratching their heads over something that really shouldn’t need a second thought.
Take page 34, section 5-1, for example. This is the stage where the rink is fitted to the base unit, part A1. The illustration shows the green and blue tenons, identified as I3, which fit into the corresponding mortises in the base.
So far, so good. Except Tonecheer has chosen to colour some of these tenons green and the others blue. And why, exactly? Well, that is the problem, because when you see two different colours used in an assembly diagram, the natural assumption is that there must be a reason for it. Perhaps the green ones go in particular holes and the blue ones somewhere else? Perhaps they have different functions? You start looking for a pattern, convinced that you are missing something important.
You’re not.
The tenons are identical, and every one of them will fit into any of the mortises. There is no special significance to the colours whatsoever. They could all have been shown in the same colour, and the illustration would have been considerably less confusing.
Now, I appreciate that this isn’t exactly a major engineering failure, and it certainly didn’t stop me progressing with the build. But that rather misses the point. Instructions are supposed to make assembly easier, not leave you wondering whether the manufacturer has introduced a colour-coded system that exists only in the illustrator’s imagination.
My suggestion to Tonecheer would be simple: if components are interchangeable, show them in the same colour unless there is a genuine reason to distinguish between them. It would make the diagram clearer, remove an unnecessary question from the builder’s mind and help those who are less familiar with these kits to proceed with confidence.
Sometimes, the best improvement to an instruction manual isn’t adding more information. It’s removing something that serves no useful purpose in the first place.
Tip of the Day: Don’t get your magnets in a twist!

Right, this is one part of the build where you really do need to pay attention, because getting it wrong could leave you with a skating rink where the skaters are about as mobile as the audience.
The Ice Rink uses magnets to make the skaters move around the surface, with Tonecheer supplying two sizes: 3mm magnets for the bases of the skaters and 8mm magnets for the cogs in the lower section of the model. The magnets interact through the rink surface, allowing the movement of the mechanism underneath to be transferred to the skaters above. Clever stuff, provided you get everything the right way round.
And there’s the catch.
Magnets have polarity, which means they need to be fitted in the correct orientation to attract each other as intended. Tonecheer recommends marking the appropriate sides with a pen before installation, and I would strongly suggest you follow that advice. These are tiny neodymium magnets, and despite their size, they have a remarkable talent for finding each other. Put two of them anywhere near one another and they can snap together with the enthusiasm of a couple of long-lost relatives at a family reunion.
The problem is that if you fit them the wrong way round, the magnetic arrangement won’t work as intended, and your skaters may refuse to perform. You can imagine the scene: the motor is running, the cogs are turning, everything appears to be doing precisely what it should, and the skaters are standing there as though they’ve just been told the ice rink is closed for maintenance.
So, take your time with this one. Identify the correct orientation, mark the magnets, check them again, and only then fit them into place. Don’t rely on memory, guesswork or the hope that the magnetic gods will take pity on you. They have other things to worry about.
Getting this right is essential. It’s a small job, but make a mistake here and you could end up having to dismantle parts of the build to put it right. And nobody wants to discover that their first attempt at choreographing an ice-skating routine has resulted in a rather expensive lesson in the laws of magnetism.
You’ve been warned!
Tip of the day No. 2: Keep those cogs in check!
Right, time to turn our attention to the moving parts, because there is little point in having a motorised skating rink if the mechanism underneath decides it would rather sit there making an irritating noise than actually do its job.
Pay particular attention to the cogs shown on pages 27 and 28 of the instructions. Make sure every one of them is firmly seated in its correct position. If even one is sitting slightly out of place, there is a good chance the teeth won’t mesh properly with the cog driven by the motor, which in turn drives the two larger cogs. And when the teeth aren’t engaging as they should, you can hardly expect the whole mechanism to run smoothly.
This is one of those stages where a quick visual check is well worth the effort. Make sure everything is sitting where it should before moving on. You don’t want to discover later that one slightly misplaced cog has turned your lovely little skating scene into a mechanical protest.
The other thing to watch is lubrication. The yellow-coloured areas shown in the instructions indicate the surfaces that need to be lubricated. This is important because you have wooden components moving against one another, and wood-on-wood friction is hardly a recipe for smooth, quiet operation. Leave everything dry and you could end up with excessive noise, unnecessary resistance and a mechanism that sounds as though it is grinding its way through a particularly difficult day.
Tonecheer supplies a small piece of wax for this purpose, which should help reduce friction on the designated surfaces. Personally, I prefer to use a multipurpose synthetic grease, applied with a small paintbrush. That allows me to work the lubricant directly onto the teeth of the cogs, rather than smearing it about and hoping it finds its way to where it is needed.
Whichever method you choose, don’t go slathering lubricant over every available surface. Concentrate on the areas identified in the instructions, and use only a suitable lubricant in a controlled amount. The aim is to help the mechanism move freely, not to turn the inside of the base into a miniature greasy spoon.
Get the cogs seated properly and give the specified contact surfaces a little attention, and you stand a much better chance of having a mechanism that runs smoothly. Your skaters should be gliding around the rink, not providing the soundtrack to a small mechanical breakdown.
Tip of the Day No. 3: Test those magnets before reaching for the glue:

Remember what I said about getting the magnet polarities right? Well, here is a simple way to check before you commit yourself to something you might later regret.
When fitting the 8mm magnets into part A9, don’t glue them in place straight away. I wanted to be absolutely certain that I had marked the polarities correctly, so I came up with a quick little test. It takes seconds, and it could save you a considerable amount of grief later.
Take one of the 8mm magnets and place it in its recess in A9, but leave it loose. Now take one of the skaters, which should already have its smaller magnet fitted into the base, and bring the two together.
If the magnets attract and stick to each other, bingo! You have them the right way round. If they repel each other instead, you’ve found the problem before it becomes permanent. Simply turn the 8mm magnet over, test it again, and once you’re satisfied that the polarity is correct, you can glue it into position.
Simple, isn’t it? No complicated equipment, no guesswork and no need to consult someone with a degree in magnetic engineering. Just use one of the skaters to check that the magnets are attracting before you reach for the adhesive.
Trust me, this is one of those little checks that is well worth doing. Once those magnets are glued in place and the mechanism is assembled, correcting a mistake could mean taking things apart again. And dismantling a perfectly good build because you couldn’t resist reaching for the glue thirty seconds too early is nobody’s idea of an enjoyable afternoon.
Test first, glue second. Your skaters will thank you for it — although, being miniature figures, they probably won’t be putting in a formal request.
Tip of the Day No. 4: Don’t stick your LEDs in a sticky situation:

When you reach page 34, steps 5-1 and 5-2, you’ll be installing the LED chip strips around the ice rink. Now, this is one of those jobs where it pays to take a moment to check what you’re doing before committing yourself, because getting the strips the wrong way round rather defeats the object of having them in the first place.
First, make sure the LEDs are facing inwards towards the rink. That’s where you want the light to go, after all, rather than illuminating the surrounding furniture or providing an unexpected light show for the inside of the base.
Here’s another little tip: leave the self-adhesive backing on the LED strips. You might be tempted to peel it off and stick everything down immediately, but resist that urge. The supplied parts A5 are used to secure the strips in position, so there’s no need to expose the adhesive. Remove that backing unnecessarily and you could find yourself wrestling with a strip that sticks to everything except where you actually want it. And life’s too short for that sort of nonsense.
There is a small cut-out to help you get the strip started. I found it easiest to work along a section at a time, positioning the strip carefully and locking it into place with the supplied A5 parts as I went. This gives you much better control over the installation and helps keep everything sitting where it should.
Once the strips are fitted, simply follow the remaining instructions for installing the other LEDs and tidying up the wiring.
The secret here is not to rush. Check the direction of the LEDs, leave the adhesive backing alone, and secure the strips a section at a time. Get it right now and you can move on with the build. Get it wrong, and you may find yourself inventing a few new words while trying to put it right!
Warning: Make sure you get the ice the right way up:

Right, pay attention, because this is one of those stages where the instructions could do with being a little more helpful. Turn to page 34, step 5-1, where you’ll be fitting the rink surface, and make absolutely certain you have it the correct way round before you start securing anything in place.
The acrylic has a printed side, which is matte in appearance. Once you peel away the protective film from the opposite side, you’ll find that the clear acrylic has a rather different finish. Think ice, and you’ll get the idea. The important thing is to identify which side is which before installation, because the orientation matters.
When the base unit, A1, is turned over, you want the clear acrylic side facing upwards, with the printed surface underneath it. This allows the LED strips to illuminate the ice surface properly, rather than leaving you wondering why the lighting doesn’t look quite as it should.
Now, you would think that something this important would be made perfectly obvious in the manual, wouldn’t you? A clear illustration showing the correct orientation, perhaps, or even a simple warning in red to make sure you don’t fit the surface upside down. Unfortunately, the instructions leave rather too much room for interpretation.
Go on, ask me how I know this is a part of the build that could be much better explained in the manual!
Let’s just say that this is advice born of experience, and leave it at that. The last thing you want is to discover you’ve fitted the rink surface the wrong way round after everything has been assembled. Correcting it at that point is likely to be considerably less entertaining than getting it right first time.
So, before you fit the rink surface, check the matte printed side, remove the protective film, identify the clear side and make sure the printed surface will sit underneath the acrylic when A1 is turned over. Take a moment to double-check the orientation, because this is one stage where a little extra care will save you a great deal of unnecessary grief later.
You’ve been warned. Learn from my experience, and let the skaters glide on a properly illuminated rink rather than leaving you skating around the workbench trying to put things right.
Customisation:

There isn’t a huge amount of customisation needed with Ice Rink, and I have to say that is quite refreshing. Sometimes a kit comes along that practically begs you to get the paints out and start making improvements before you’ve even finished the first stage. This one is reasonably well presented as it stands, although that doesn’t mean I haven’t spotted a few opportunities to put my own stamp on it.
One thing that caught my eye during my initial read-through of the instructions was the little chain of fairy lights. The beads are supplied in warm white, but I immediately wondered whether they might benefit from a splash of colour. After all, this is a festive scene, and coloured fairy lights wouldn’t exactly be out of place. I haven’t ruled out making that change, although I wanted to see how everything looked once the lighting was installed before deciding whether it was worth the effort.
There’s also plenty of scope for adding a little extra snow, and I can see the possibility of replacing the flat, two-dimensional trees with some proper three-dimensional models. That would give the scene a little more depth and help bring the winter setting to life. These are ideas rather than essential improvements, though, and I don’t intend to start changing things simply for the sake of it.
I also considered replacing the single LED head inside the little building with a filament bulb in a warm orange or yellow. I thought that might give the interior a more convincing glow, particularly against the winter setting. However, after trying it out, I decided it really wasn’t necessary. The original lighting does the job perfectly well, so there seemed little point in creating extra work when the result wasn’t going to offer a worthwhile improvement. Even I can occasionally resist tinkering with something that doesn’t need fixing!
There is, however, one area where I felt a change was definitely worthwhile. Tonecheer supplies a black-and-white paper illustration to sit behind the windows of the little cabin, which doubles as the skate-hire building. Unfortunately, I found these rather disappointing. Instead of adding to the appearance of the finished model, they did very little for it and, in my opinion, actually detracted from the overall effect.
Fortunately, I had a couple of sheets of transparent stained-glass film in my stash, so I cut these to size and used them instead. The difference was worth the effort, giving the windows a much more attractive appearance and adding a little extra character to the building. It’s a simple modification, but one that I think improves the finished result considerably.
Tonecheer, if you’re reading this, that printed window insert really does need some attention. The rest of the kit has plenty going for it, so why let yourselves down with something that could be improved relatively easily? A better-quality illustration, or even a more attractive printed window design, would be a welcome improvement in future versions.
Overall, customisation is very much a matter of personal preference with Ice Rink. There are opportunities to add extra snow, introduce more realistic trees or experiment with the fairy lights, but none of these changes is essential. The window inserts, on the other hand, were something I felt deserved a little intervention. After all, there’s a difference between improving a kit because you can and improving it because something genuinely needs attention. And I think this one falls firmly into the latter category.
The final stage – base coverings, trees and decorations.

Another little detail worth mentioning is the festive trees, which appear on page 44, step 10-2. These are flat, two-dimensional pieces, and my first thought was to replace them with more traditional three-dimensional trees. However, having had a closer look, I decided the supplied ones were perfectly acceptable after all.
What makes them rather better than your average flat tree is that they are printed on both sides. One side has a relatively simple green-and-white design, while the reverse features a much more traditional Christmas tree, complete with baubles, ribbons and all the usual festive trimmings. It’s a neat little touch from Tonecheer, giving you the option of choosing which appearance works best for your scene without having to reach for the glue or start modifying anything.
I did briefly consider adding some of my own miniature baubles, but with the fairy-light chain still to be installed, I wondered whether that might be pushing things a little too far. There is a fine line between a nicely decorated Christmas scene and something that looks as though the entire contents of the decorations cupboard have been emptied over it. Even I have to exercise some restraint occasionally!
I’m still undecided about what to do with the fairy lights. Leaving them in their original warm white would certainly be the simplest option, but I am tempted to add a little colour using pens or coloured UV resin. Multicoloured lights would give the scene a more traditional festive feel, although I don’t want to end up with something that looks too busy. I’ll make that decision once I can see how everything looks together.
I am also very likely to add some snow paste to enhance the winter setting. A little extra texture should help bring the scene to life, particularly around the tree bases to anchor them into the scene and other suitable areas like the tops of railing, signs, lampposts, postbox and the lodge building. As always, the trick will be knowing when to stop.
One thing I did consider was rounding off the edges of the flat tree pieces to soften their appearance. However, that simply wasn’t practical here. There are too many sharp angles and intricate shapes, and sanding them down would risk losing the very details that make the trees look the way they do. Sometimes you have to accept that a particular modification isn’t worth the effort, especially when the original parts are perfectly serviceable, and once the edges are coloured they look pretty good to me.
So, for now, the trees are staying as supplied. Tonecheer has done a decent job with these, and the double-sided printing gives them more versatility than I initially expected. Whether the fairy lights eventually get a colourful makeover remains to be seen, but at least I’ve resisted the urge to dismantle the trees in pursuit of an improvement that might not improve anything at all!
A word of warning when fitting the four accordion-style base pieces: take your time, because these little blighters are remarkably easy to overstretch, and once you’ve gone too far, you’re in a world of trouble! They need to flex enough to fit into position, but apply too much force and they can stretch beyond the point of no return. And here’s the really cheery bit: there are no spares in the kit, so break one and you could have a problem on your hands. Ease them into place gently, work patiently, and resist the temptation to force anything. This is definitely a case of slow and steady winning the race, because you really don’t want to discover just long a wait you may have for a replacement accordion section shipping from China!
My Thoughts:

Well, Tonecheer’s Ice Rink has certainly given me something a little different to work on, and I have to say, there is plenty to like about this little festive scene. It’s not trying to be an elaborate book nook packed with architectural detail, nor does it need to be. The appeal here lies in the combination of the skating rink, the moving figures, the music and the lighting, all coming together to create something that should look rather lovely on display.
There is also a personal reason why I was keen to build this one. My daughter is a licensed figure skating coach, so when I was asked to make something for her, Tonecheer’s Ice Rink seemed an obvious choice. It makes a change to build something with such a direct connection to the person who will eventually receive it, and naturally, I want the finished model to do the subject justice. That does, however, mean I have a slightly greater interest than usual in getting those little skaters to behave themselves!
The kit is generally well presented, the laser-cut components have made a good impression, and there are some thoughtful touches along the way. The instruction manual could do with a few improvements, though, particularly where the orientation of the rink surface and the fitting of the magnets are concerned. These are not particularly complicated tasks, but clearer illustrations would save builders from unnecessary head-scratching.
The motorised mechanism also requires a little patience, and I’ve spent more time than I would have liked investigating a persistent noise from one of the skaters. That has been frustrating, particularly when the other figures move as they should, but it has also reminded me that getting a kit assembled is only half the story; everything needs to work properly once it’s finished.
I have made a few small changes of my own, most notably replacing the rather disappointing printed window inserts with stained-glass film. I’ve also added some extra snow to enhance the three-dimensional effect and decided against colouring the fairy lights, which I think was the right decision. Nothing too radical, mind you. Sometimes a little customisation is all that’s needed, and there’s no point changing things simply for the sake of it.
Overall, Ice Rink has plenty going for it, and I can see it making a rather attractive addition to the Christmas decorations. The build itself has been enjoyable, with some nice touches from Tonecheer, although the instructions could certainly do with a little attention in places. I’m particularly pleased with the stained-glass film in the little cabin, even if I do think Tonecheer needs to have another look at those printed window inserts. They really don’t do the rest of the kit any favours.
Another nice little touch from Tonecheer is the inclusion of optional decorative pieces, giving you a choice over how you finish the scene. For example, you can opt for snowbanks or swap them for snowmen, while there are alternative little details such as a wrapped parcel for the postbox. These might seem like minor things, but they give you the opportunity to steer the finished model towards the look you prefer, whether that’s a more traditional, formal winter scene or something a little more whimsical and playful. I rather like that approach. We all have our own ideas about how a miniature should look, and having a few choices without having to make or buy additional parts is a welcome bonus. It’s not something you see all that often from kit manufacturers, so credit to Tonecheer for allowing builders a little freedom to make the finished scene their own.
The biggest frustration has been that one troublesome skater, which has turned out to be rather less graceful on the ice than I would have liked. I’m still working on getting that sorted, because I want this one to be right. After all, I’m making it for my daughter, and I would rather hand over a skating rink than a miniature mechanical breakdown. I suspect a licensed figure skating coach would be rather better qualified than me to judge the skating, but I’d at least like all the figures to make it around the rink without sounding as though they’re in need of a mechanical overhaul.
There’s still plenty to like about this kit, and once that last skater is gliding around as it should, I think it will make a lovely festive display and, more importantly, a rather personal gift. Now, if you’ll excuse me, I have a skater to sort out. Apparently, even miniature figure skating comes with its fair share of drama!
Pros
- A festive design that offers something a little different from the usual book nook.
- 2.5mm MDF components with clean laser cutting.
- Motorised skating mechanism adds movement and interest.
- Warm-white LED strips, miniature fairy lights and additional LED lighting.
- Built-in music adds to the festive atmosphere, but perhaps a well-known tune would have been more preferential.
- Double-sided Christmas trees give you a choice of appearance.
- Helpful cable-routing markings on some components.
- Generally straightforward assembly, with a few useful touches for builders.
Cons
- The A5 instruction manual can make some illustrations rather small.
- Certain steps need clearer diagrams, particularly magnet polarity and the orientation of the acrylic rink surface.
- Some colour coding in the instructions is unnecessary and potentially confusing.
- The printed black-and-white window inserts are disappointing and detract from the finished appearance.
- The problems with one particular skater, even after opening, checking and reseating its magnet.
And now for the video:
Image gallery:


Leave a Reply