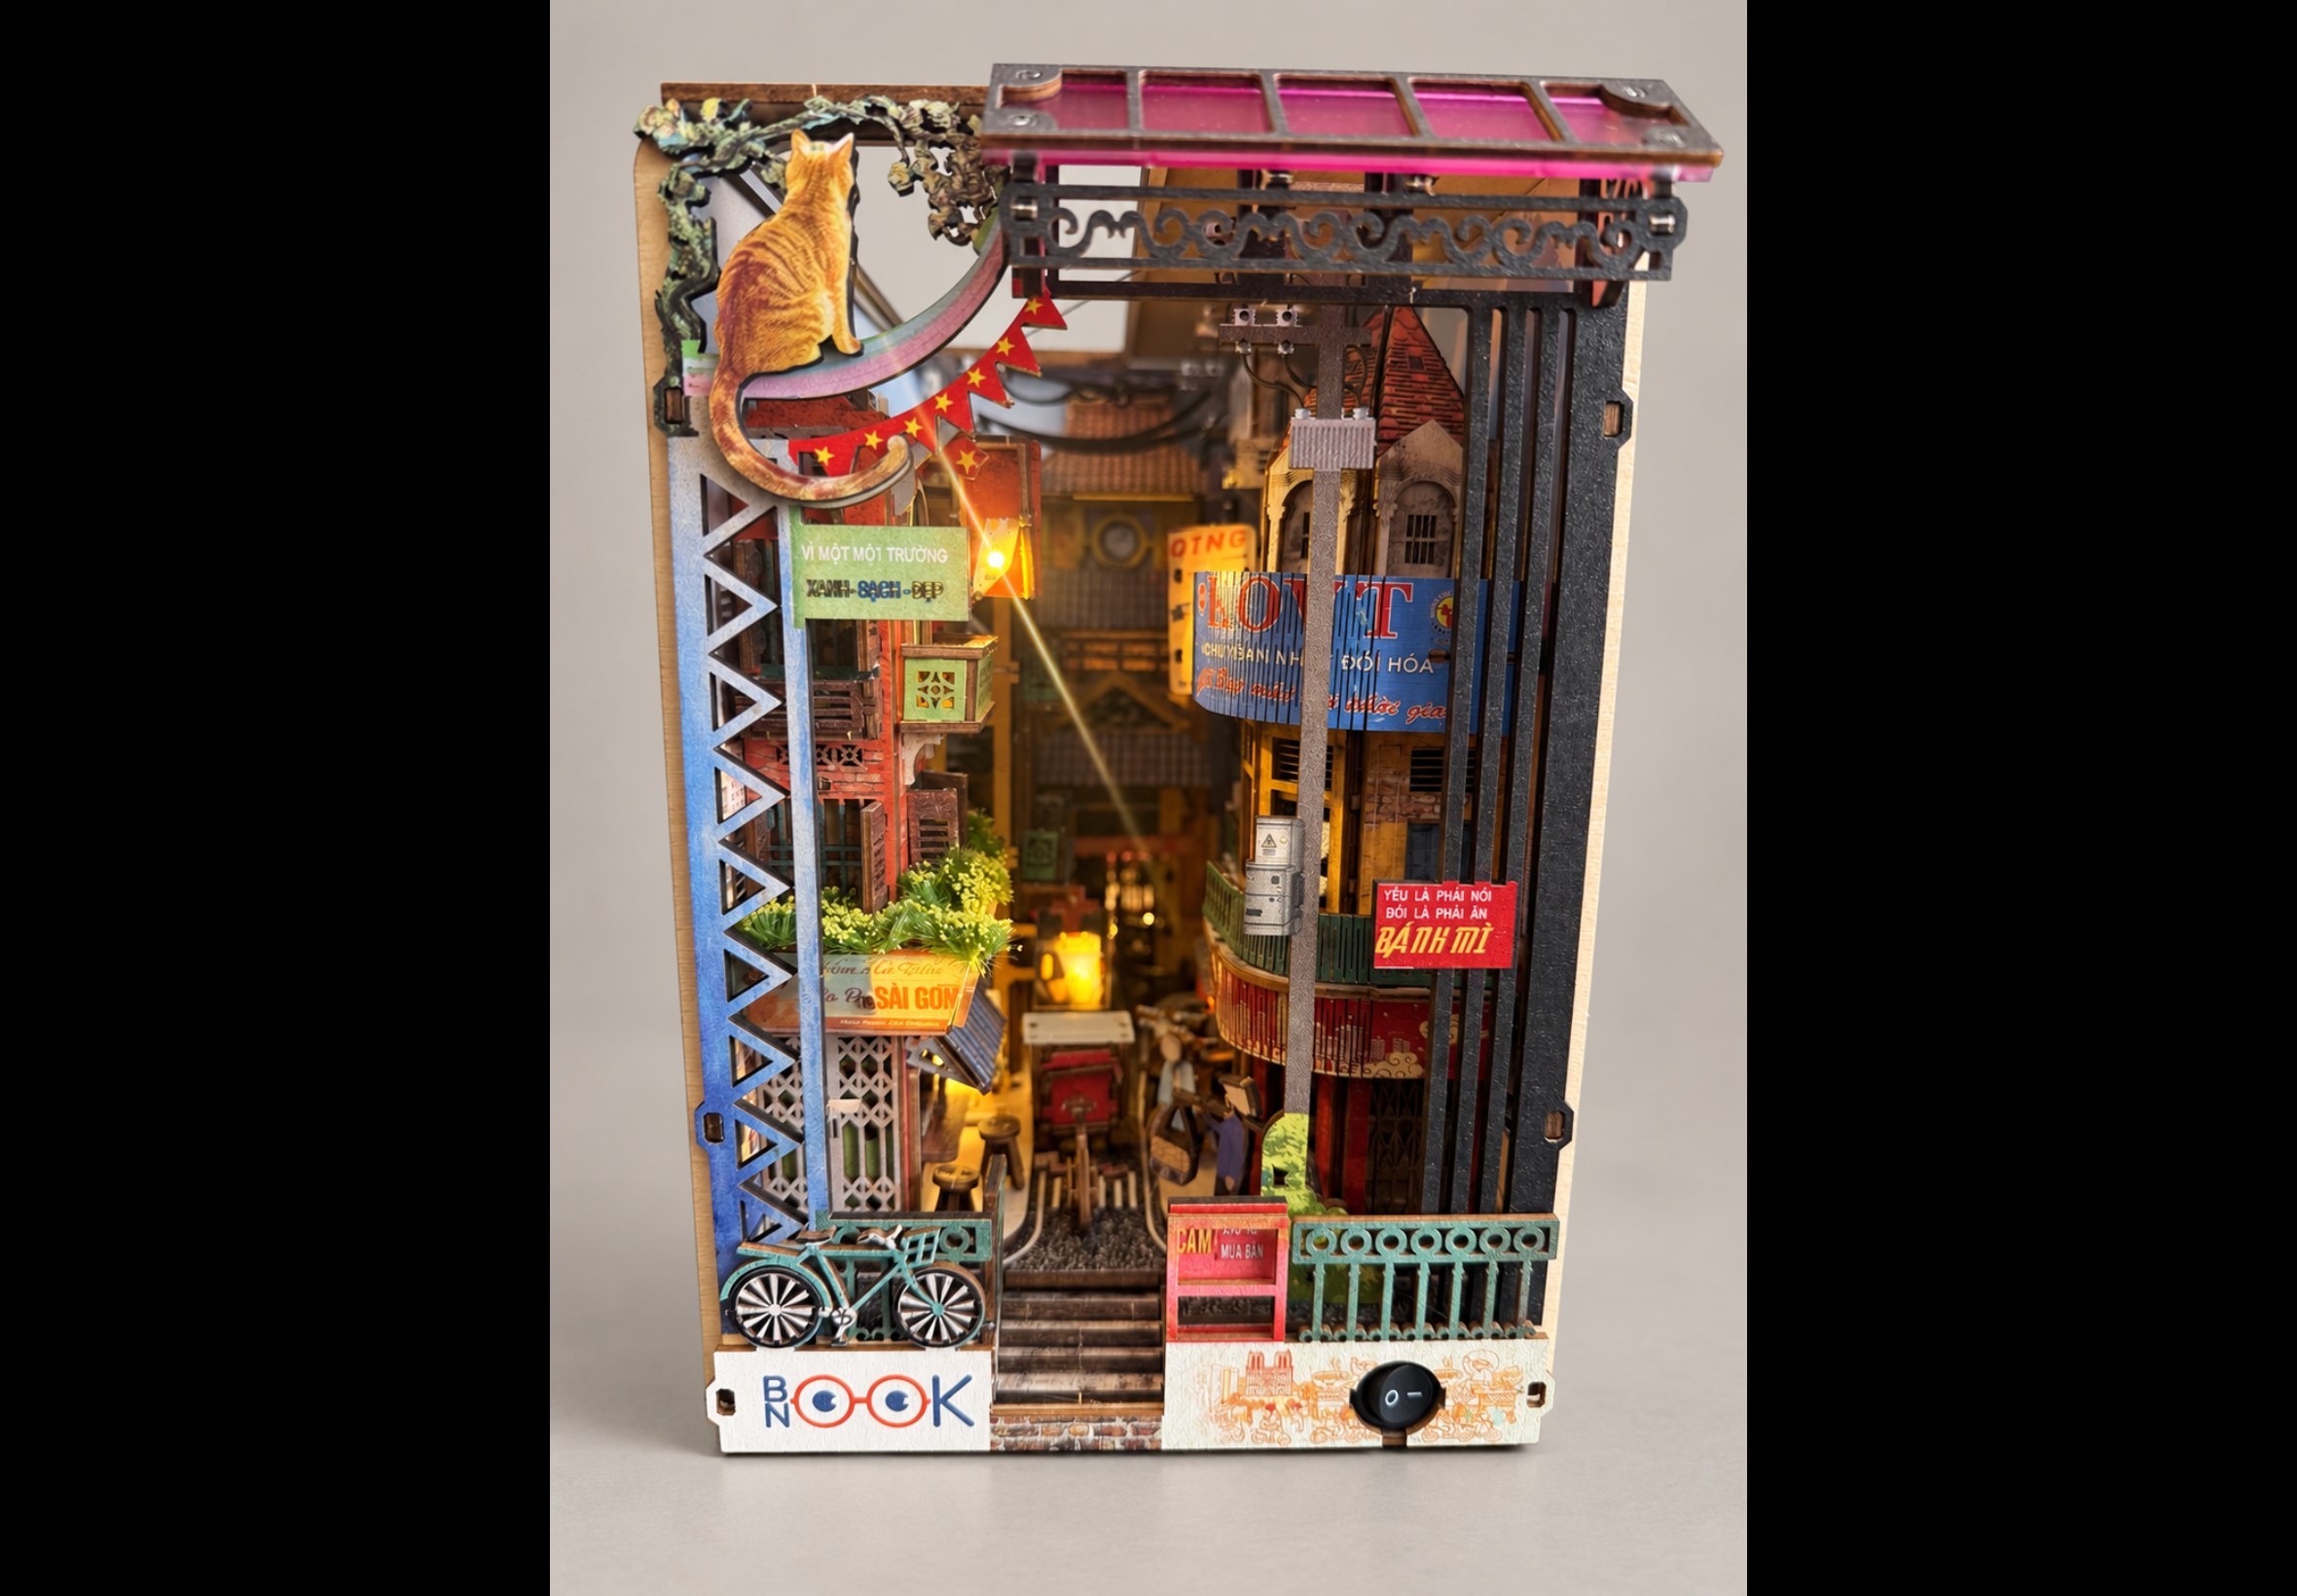
Saigon by Viendor is not simply another attractive “Asian street” book nook. It is a miniature interpretation of a real place, designed in Vietnam by a Vietnamese company and filled with the crowded architecture, layered signage, balconies, overhead structures and street-level detail that give Saigon its unmistakable character.
It is also a build of two very different halves. Constructing the individual buildings was methodical, relaxing and almost entirely trouble-free. Bringing all of them together inside the final shell was capable of turning a dopamine hit into an adrenaline kick. The finished model is excellent; the route to getting there occasionally tested both my patience and my supply of B-7000.

A Very Different Second Viendor Build
This is the second kit I have built from Viendor, one of Book Nook Workshop’s principal partners, and it could hardly have been more different from Heartbrook. That model opened out into a picturesque European-style waterside scene. Saigon is narrower, taller, darker and deliberately more congested. Heartbrook invites you to step back and admire it; Saigon makes you lean closer and peer down the street.
Being a partner does not buy Viendor an easy review. If anything, a close relationship makes honest feedback more important. There is a great deal here that deserves praise, particularly the design research and lighting, but there are also parts of the build that future versions could improve. An 88/100 score reflects both sides of that experience.
Designed in Vietnam, Inspired by Saigon
The most interesting pages in the instruction manual appear before the construction begins. Rather than presenting Saigon as a fantasy street, Viendor shows the real architectural and visual references behind the model: narrow buildings rising above the pavement, weathered balconies, dense shopfronts, brightly coloured signs and lanes that become particularly atmospheric after dark.


Those source photographs matter. You can trace their influence throughout the finished kit: the long façades, railings and shutters; the overlapping commercial signs; the almost improvised use of every available space; and the way the street becomes a canyon between the buildings. Even the clutter has been composed carefully. Nothing feels randomly added merely to fill a gap.
This is precisely why real-location kits can be so compelling. The designer is not inventing a generic visual shorthand for a country; the designer is selecting and compressing recognisable details into a scene small enough to sit between books. Saigon is an excellent companion to our feature asking whether real places could be the future of book nooks.
The Story Behind the Company
The manual also includes a short history of the people behind the kit. Viendor explains that the business began in 2019 as a model-fabrication workshop located within the campus of Hanoi Architectural University. Its original work involved producing architectural models for property developments and planning projects before the team began exploring affordable miniature models that customers could assemble themselves.

That architectural-model background is visible here. The appeal does not depend on a single large centrepiece. Instead, it comes from the relationship between multiple structures and the way they occupy an extremely restricted footprint. The designers have thought in terms of streetscape, height, sightlines and density.
For the fuller story, including our interview with founder Ngo Quoc Hoang, see Behind the Brands: The Story of Viendor. The history printed in this manual makes the Saigon kit feel especially appropriate: it brings together the company’s Vietnamese identity, its architectural roots and its ambition to make detailed miniature environments available internationally.
What Is in the Box?
The box describes Saigon as a 528-piece kit for builders aged 12 and over, with an estimated build time of five to six hours and power supplied by three AA batteries. Treat that time as an indication rather than a challenge. Plywood benefits from patience, and sanding, colouring, dry fitting and gluing properly will add time if you want the best result.
Most of the build consists of making the individual buildings and street features that will eventually be fitted into the outer structure. This approach breaks a visually intimidating model into a succession of manageable assemblies. You are rarely wondering what to do next; the difficulty comes later, when all those completed components must coexist in a remarkably small space.
Plywood Needs a Different Approach
Like Heartbrook, Saigon is a plywood kit rather than one made from printed MDF. Plywood gives the model a natural texture and permits some beautifully fine decorative details, but it handles very differently. The thinner pieces can flex or split, small projections are vulnerable, and the cut edges generally need more sanding and colouring.

Luckily, Freddy Fat Fingers broke only one part: the saddle of the scooter. It was a clean break and easily repaired with my trusty B-7000, but it was a useful reminder not to treat a delicate plywood sheet like a more forgiving MDF board.
The most important practical lesson is simple: if a plywood assembly feels tight during the dry fit, do not assume it will remain secure. Once you are satisfied with the alignment, glue it. I left several apparently firm joints unglued, only to find pieces falling away when the final model had to be lifted, tilted and pressed together. The fit had not suddenly become worse; I had simply asked friction to do the job of adhesive.
You should also sand and colour exposed edges as you progress rather than saving everything until the end. This is particularly important around windows, balconies and rooflines, where a pale raw edge can interrupt the illusion. Completing a kit is not a race, and Saigon rewards the builder who is prepared to slow down.
The Buildings Are the Best Part of the Build
The vast majority of the construction time is spent creating the buildings that eventually form the street. This is where the instructions are at their best. After each new part is fitted, the manual shows how the assembly should look, allowing you to check doors, windows, walls and decorative layers before proceeding.

There is nothing technically complicated about these stages. Tabs, slots and layered façades do most of the work, and the progress feels reassuringly visible. Experienced builders might even find parts of it slightly too simplistic, although that is an observation rather than a criticism. A complex-looking finished model does not need every individual step to be difficult.
Make sure you tick off every piece as you complete a section. Otherwise you may finish the build and discover a few mysterious parts still sitting on the plywood sheets. Not that I have ever done this and stared at the leftovers while trying to decide whether they were essential structural components or merely optional Vietnamese street furniture.
Good Instructions—with One Important Weakness
The substantial A4 manual generally deserves its 8/10 score. Its colour photographs provide a reassuring visual checkpoint after almost every addition, and the sequence for building the separate structures is excellent.
The weakness is that some photographs are too dark to reveal exact placement. That is inconvenient during ordinary construction but more serious when routing the LEDs. A part can often be repositioned; a wire that has already disappeared beneath the base is much less cooperative. Brighter close-ups, clearer arrows or a simplified wiring diagram would improve the experience considerably.
Lighting That Transforms the Street
As with Heartbrook, the lighting uses relatively thick wires running beneath the base before rising into the individual buildings. Read ahead before inserting any LED. You need to understand not only where a light sits in the current step, but where its wire must eventually travel and what other component may need the same slot or channel.

I made one significant mistake by placing an LED casing in the wrong location. Much later, I discovered that it occupied the slot intended for a tramline pole. It was not catastrophic and the finished model survived, but it perfectly illustrates the need to study the photographs and several future steps before committing the lighting components.
Once switched on, all that care is rewarded. Warm pools of light appear at different heights and depths, picking out signs, balconies, shopfronts and the narrow route through the centre. The street looks good in daylight, but after dark it acquires a completely different personality. This is not lighting added merely so the specification can say “LED”; it is fundamental to the design, and it earns a full 10/10.
The Rickshaw and the Details at Street Level
The rickshaw is a lovely miniature in its own right and dominates the front of the street. That prominent position is important because it gives the eye an immediate focal point before leading it deeper into the model. Around it are bicycles, railings, steps, plants, signs and small human details that stop the scene from feeling like a row of empty façades.

What impresses most is the density. The buildings overlap without becoming visually incoherent, and details continue well into the background. From the front, it is difficult to understand how so many separate structures, lights and decorative components have been fitted onto such a small base.
When Dopamine Becomes Adrenaline
Constructing those individual buildings was enjoyable and largely trouble-free. Bringing them together was another matter. At the final assembly stage, very little is secured and you are suddenly contending with wobbling skyscrapers, loose façades, thick lighting wires and parts that appeared perfectly stable ten minutes earlier.
This is where my dopamine kit became an adrenaline kick. You need several hands, none of them fitted with Freddy’s fingers, and the confidence to apply pressure without crushing the finer plywood details. More glue during the earlier stages would have reduced the drama enormously. Future builders should treat every successful dry fit as a rehearsal, not a permanent fixing.
The final assembly is the main reason I recommend Saigon for an intermediate rather than a first-time builder. The individual techniques are not difficult, but managing the completed structures, wiring and outer shell together requires patience and a little experience of knowing when to stop, reassess and add glue.
Would an Open Diorama Have Been Even Better?
My one significant design question concerns the conventional book nook walls and roof. The model contains so many attractive buildings that I would have loved to see them presented as an open-sided, fully three-dimensional Saigon street. Removing the enclosure could have allowed the viewer to appreciate the façades and depth from several angles rather than primarily through the front opening.
That is not a claim that the existing format fails. The narrow shell helps create the compressed, canyon-like feeling of the real inspiration photographs and makes the lighting more dramatic. It is simply one of those rare designs where the miniature architecture is strong enough to make me wonder whether it has outgrown the traditional book nook box.
Final Verdict
Saigon is an ambitious and visually distinctive kit from a company designing from its own cultural and architectural surroundings. That authenticity is its greatest strength. The model does not rely on pagodas and lanterns as generic decoration; it builds its identity from compressed streets, layered façades, balconies, transport, signage and exceptionally effective lighting.
Most of the construction is extremely enjoyable. The buildings go together logically, the manual provides frequent visual checks and the finished density is a considerable engineering achievement. Against that, the plywood requires more care than MDF, several instruction photographs are too dark, and the final assembly is significantly more stressful than the earlier stages suggest.
I recommend Saigon to an intermediate builder. Sand and colour the edges, glue every confirmed joint, tick off the parts, study the entire lighting route before fitting the LEDs and allow more time than the box estimate if necessary. Follow that advice and the frustrations should be manageable.
The final score is 88/100: Design 9, Engineering 9, Instructions 8, Lighting 10 and Build Experience 8. It may not have been a flawless journey, but the destination is a beautifully illuminated, unmistakably Vietnamese street scene—and proof that Viendor’s real-location designs can offer something far more interesting than another anonymous fantasy alley.
Leave a Reply