By John A. MacInnes
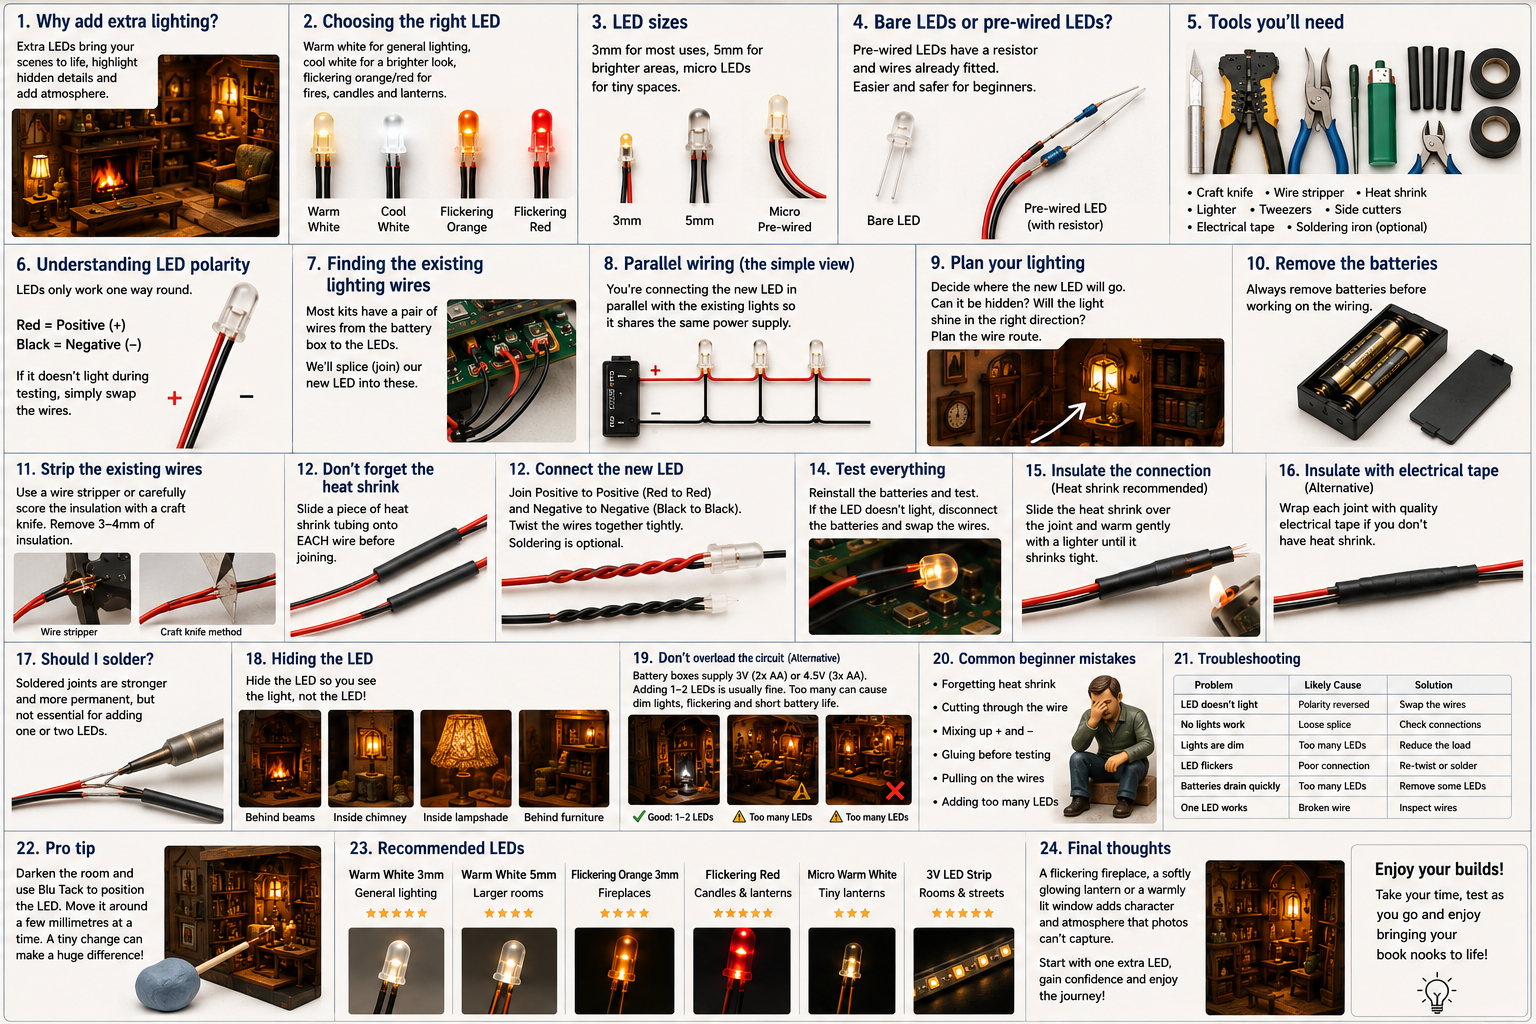
One of the questions I’m asked more than almost any other is, “How do I add extra lighting to my book nook?”
The good news is that it’s much easier than most people think. You don’t need to be an electrician, you don’t need an expensive soldering station and you certainly don’t need to redesign the kit’s entire electrical system.
In most cases you’re simply adding one or two extra LEDs by connecting them to the kit’s existing lighting wires. Done properly, it’s a simple modification that can completely transform the finished scene.
This guide has been written for complete beginners. By the end of it, you’ll understand how to choose the right LED, safely connect it into your existing lighting circuit and avoid the common mistakes most of us made when we first started.
Why add extra lighting?

Most commercial book nook kits include enough lighting to show off the main features, but many leave corners, shelves and decorative details hidden in shadow.
Adding an extra LED or two can dramatically improve the atmosphere by highlighting:
* Fireplaces
* Wall sconces
* Table lamps
* Shop windows
* Lanterns
* Hidden alleyways
* Display cabinets
* Street lighting
* Architectural details
Sometimes one well-positioned LED will improve a scene more than adding several brighter ones.
Choosing the right LED

Not all LEDs produce the same effect.
Warm white LEDs create a cosy atmosphere and are ideal for homes, cafés, bookshops, libraries and traditional interiors.
Cool white LEDs produce a cleaner, brighter light and suit modern rooms, workshops or laboratories.
Flickering orange or red LEDs contain a tiny electronic circuit inside the LED itself which produces a realistic flame effect. They’re perfect for:
* Fireplaces
* Candles
* Lanterns
* Oil lamps
* Campfires
* Wall sconces
A flickering LED immediately adds movement and realism to a scene that would otherwise feel static.
LED sizes and when to use them

Choosing the correct size is just as important as choosing the correct colour.
3mm LEDs
These are probably the most useful size for book nooks.
They’re bright enough for most scenes while remaining small enough to hide inside furniture or architectural features.
Ideal for:
* Table lamps
* Small rooms
* Wall lights
* Window displays
* Ambient lighting
5mm LEDs
These produce more light but are physically larger.
They’re better suited to larger spaces where brightness is more important than concealment.
Ideal for:
* Street lamps
* Ceiling lights
* Large rooms
* Background lighting
Micro pre-wired LEDs
These tiny LEDs are already attached to fine wires.
They’re incredibly easy to hide and are perfect for creating realistic miniature lighting.
Ideal for:
* Candles
* Lanterns
* Fireplaces
* Decorative lighting
* Hidden light sources
As a general rule:
* Small LEDs = subtle lighting
* Large LEDs = brighter coverage
* Micro LEDs = maximum realism
Bare LEDs or pre-wired LEDs?

You’ll see both advertised online.
Bare LEDs are simply the LED itself with two metal legs. They normally require additional wiring and a resistor before they can be used safely.
Pre-wired LEDs already have fine wires attached and, in most cases, include the correct resistor.
For beginners, I strongly recommend pre-wired LEDs. They’re easier to install, reduce the chances of mistakes and can usually be connected straight into your existing lighting circuit.
The tools you’ll need

Fortunately, you don’t need a workshop full of specialist equipment.
You’ll need:
* Sharp craft knife
* Wire stripper (recommended but optional)
* Heat shrink tubing
* Electrical tape (only if heat shrink isn’t available)
* Lighter or small heat source
* Tweezers
* Side cutters
* Soldering iron (optional)
That’s it.
Understanding LED polarity

Unlike an ordinary light bulb, an LED only works when connected the correct way round.
Fortunately, most pre-wired LEDs make this easy.
Normally:
* Red = Positive (+)
* Black = Negative (-)
If you’ve connected everything correctly but the LED doesn’t illuminate, simply swap the two wires and test again.
You’re only working with a low-voltage battery pack, so briefly reversing the polarity won’t normally damage the LED.
Always test before making the connection permanent.
Finding the wiring

Almost every book nook kit has a pair of wires running from the battery box to the LEDs.
Rather than replacing the battery box or modifying the PCB, simply splice your new LED into these existing wires.
This keeps the original connector untouched and makes the whole modification much simpler.
A quick word about parallel wiring

You may hear experienced builders talking about “series” and “parallel” wiring.
Don’t let the terminology worry you.
For this guide you’re simply connecting your new LED into the existing positive and negative wires so it shares the same power supply as the original lights.
That’s exactly how most additional book nook lighting is installed.
Step 1 – Plan your lighting

Before picking up any tools, decide exactly where the new LED will go.
Ask yourself:
* Can the LED itself be hidden?
* Where will the wires run?
* Will the light shine in the correct direction?
* Is there somewhere secure to glue it later?
Spending five minutes planning usually saves half an hour fixing mistakes.
Step 2 – Safety first

Always remove the batteries or disconnect the power source before touching or modifying any wiring. This reduces the risk of accidental short circuits and helps protect both the LEDs and the control electronics.
Before replacing the original battery pack with an alternative power supply, be aware that there are trade-offs.
If you disconnect the battery pack completely, you will also lose the built-in touch sensor and all of its lighting functions, including the different lighting modes. The lights will then be controlled solely by your new power source, meaning you’ll need to switch them on and off using that power supply.
Alternatively, if you fit a battery eliminator that plugs into the existing battery pack, the original touch sensor and lighting modes are retained. However, the lights will still need to be operated using the touch switch on the model rather than being controlled remotely by the external power supply.
Whichever method you choose, take a moment to understand what features you’ll gain and what you’ll lose before making any permanent changes.
Step 3 – Strip the existing wires

Using a wire stripper is the easiest method.
If you don’t have one, carefully score around the insulation using a sharp craft knife.
Don’t press too hard.
You only want to cut through the insulation, not the copper strands inside.
Remove approximately 3–4mm of insulation from both wires.

Step 4 – Don’t forget the heat shrink

This is probably the mistake every modeller makes once.
Before joining the wires, slide a short piece of heat shrink tubing onto each wire.
Forget this step and you’ll have to undo the entire connection.
Step 5 – Connect the new LED

Join:
Positive to Positive
Negative to Negative
Normally:
Red to Red
Black to Black
Twist each pair of exposed wires together securely.
If you’re soldering, apply a small amount of solder now.
If you’re not soldering, a tight mechanical twist is perfectly acceptable for one or two additional LEDs.

Step 6 – Test everything

Before insulating anything, reinstall the batteries.
Does the LED light?
Excellent.
If not, disconnect the batteries and reverse the polarity before testing again.
Never seal the connection until you’ve confirmed everything works.
Step 7 – Insulate the connection

Option 1 – Heat shrink tubing (recommended)
Slide the tubing over each joint.
Using a lighter, gently warm the tubing until it shrinks tightly around the wire.
Keep the flame moving and avoid overheating it.
This produces a neat, strong and long-lasting connection.

Option 2 – Electrical tape
If you don’t have heat shrink tubing, wrap each joint individually with quality electrical tape.
It works perfectly well in the short term but can eventually loosen or dry out.
Heat shrink remains the better long-term solution.
Should I solder?

A soldered joint is certainly stronger and more permanent.
However, if you’re simply adding one or two LEDs to a book nook, soldering isn’t essential.
A tightly twisted joint protected with heat shrink tubing will often last for years.
Don’t feel you need to invest in a soldering iron before trying your first lighting upgrade.
Hiding the LED

The secret to realistic lighting isn’t brighter LEDs.
It’s hiding the light source.
Try positioning LEDs:
* Behind beams
* Behind shelves
* Inside chimney breasts
* Behind window frames
* Under staircases
* Inside lampshades
* Behind curtains
* Behind furniture
You want to see the light—not the LED.
Don’t overload the lighting circuit

This is the most important advice in the entire guide.
Most book nook battery boxes produce either:
* 3 volts (2 AA batteries)
* 4.5 volts (3 AA batteries)
That voltage never changes.
What does change is the amount of current the batteries must supply.
Adding one or perhaps two extra LEDs is usually well within the capability of the original battery box.
Adding ten or more LEDs is another matter.
Eventually you’ll notice:
* Dim lights
* Flickering
* Batteries running flat quickly
* Some LEDs failing to illuminate
If you’re planning extensive lighting upgrades, consider using a dedicated external power supply rather than relying on the kit’s battery box.
Common beginner mistakes

Avoid these and you’ll save yourself plenty of frustration.
* Forgetting to fit the heat shrink before joining the wires.
* Cutting completely through the wire instead of just the insulation.
* Mixing up positive and negative.
* Gluing the LED before testing.
* Pulling on the wires instead of the insulation.
* Trying to power too many additional LEDs.
We’ve all done at least one of them.
Troubleshooting

Pro Tip
Before gluing anything permanently, wait until it’s dark.
Temporarily position the LED using a small blob of Blu Tack.
Turn the lights on and move the LED around a few millimetres at a time.
It’s amazing how such a tiny adjustment can completely change the atmosphere of a scene.
Once you’re happy with the lighting, glue it into position permanently.
Final thoughts
Lighting is one of the easiest and most rewarding upgrades you can make to any book nook.
A flickering fireplace, a softly glowing lantern or a warmly lit shop window adds character, atmosphere and realism that photographs alone can never fully capture.
Start with one extra LED.
Gain a little confidence.
Before long you’ll find yourself looking at every new kit thinking:
“I know exactly where I can add another light.”
And that’s when the real fun begins.

Supplier listing:
John MacInnes, one of Book Nook Workshop’s professional team of builders/contributors uses a UK based family-run supplier called: Captain Jacks Models. They stock a wide range of lighting, cables, connectors, and other accessories. They are offering UK modellers a 10% discount by entering the code LED10 at checkout, and, if your cart exceeds £30 in value, they will throw in free shipping.
Copyright Book Nook Workshop 2026 – All rights reserved. (John A. MacInnes)

Leave a Reply