Reviewed by: John A. MacInnes
Buy this kit on Amazon UK: Check current price and availability →
As an Amazon Associate, Book Nook Workshop may earn from qualifying purchases at no extra cost to you.
John is a Book Nook enthusiast with 40+ completed builds and a growing collection still waiting on the shelves. He particularly enjoys atmospheric street scenes, creative lighting, and immersive miniature worlds packed with storytelling and detail.
| Feature | Details |
|---|---|
| Difficulty | ⭐⭐⭐⭐ |
| Build Time | Approximately 6–10 hours |
| Dust Cover Included | Yes — two included |
| Build Quality | 10/10 |
| Value for Money | 10/10 |
Introduction
For anyone diving into the world of underwater-themed book nook kits, Discover Atlanta from Timory is certainly… an experience. Although judging by the contents, scenery, and enough underwater blue lighting to make a dolphin feel at home, I strongly suspect this kit was originally meant to be called Discover Atlantis.
Unless the city of Atlanta has suddenly developed coral reefs and submerged treasure ships overnight, this appears to be another classic case of “internet translator strikes again” with absolutely nobody in the proofreading department brave enough to question it before production.
Still, accidental geography lessons aside, this is actually a very enjoyable and visually impressive build.
Contents and Instructions

Inside the box you get six full printed boards plus two half boards, along with a motor, battery box, PCB with sensor, speaker, LEDs, and an LED strip fitted with three blue lamps. There’s certainly no shortage of components packed in here, and thankfully it doesn’t feel like one of those kits where half the contents appear to have been sourced from a forgotten electronics drawer from 1997.
The manual itself is black-and-white and comes in at 27 pages. Now normally that sentence alone is enough to trigger mild hobby trauma, but credit where it’s due — this one is actually very well laid out and surprisingly easy to follow from page one right through to the end. The diagrams are clear, the sequencing makes sense, and at no point did I feel the need to stare angrily into the middle distance wondering which tiny tab was supposed to slot into which microscopic hole.
The box also includes accessories, stickers, acrylic sheets, and two dust covers, which is always appreciated because nothing ruins the illusion of a beautiful underwater kingdom faster than discovering it’s also become home to half the dust particles in Scotland.
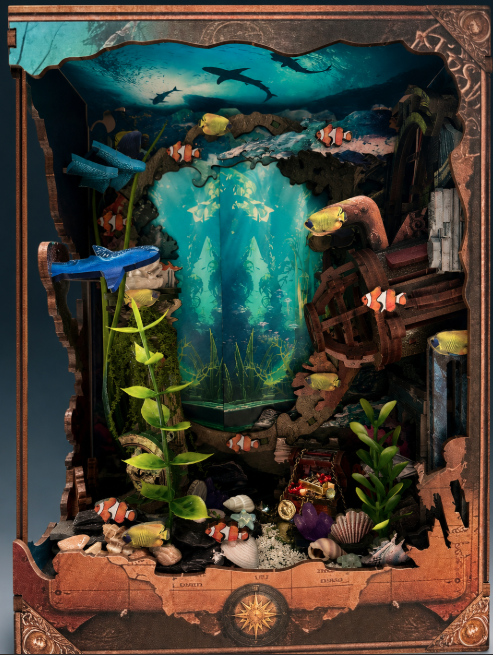
The HD printing throughout the kit is genuinely excellent. Some of the panels are so bright and vibrant they border on photo-realistic, particularly the underwater scenery and ocean effects. The colours absolutely pop once the lighting is installed, and the finished look is far more premium than you might initially expect.
Build Experience

One thing to watch out for is the rolled-up scroll background section. Thankfully this is supplied in PVC rather than paper, which is probably a wise move because the mechanism activates movement once the build is complete. Had this been paper, there’s every chance it would have lasted approximately six minutes before tearing itself into underwater confetti.
The scrolling background section is probably the fiddliest part of the entire build and very much falls into the category of “would benefit greatly from having three extra hands and the patience of a saint.” Trying to hold the PVC scroll straight while lining everything up feels a bit like wrestling an angry eel in a phone box. My advice? Take a deep breath, accept that there will be muttering involved, and just get on with it. Once installed properly, the moving underwater effect genuinely looks superb and adds a huge amount of atmosphere to the finished scene. Just be aware that when operating, the motor isn’t exactly whisper quiet — it sounds a bit like a tiny submarine attempting to start on a frosty morning — but thankfully the visual effect is good enough that you’ll quickly forgive the mechanical grumbling.
Interestingly, step two of the manual already involves fitting an LED lamp. I don’t think I’ve ever built a kit before where the lighting turns up this early in proceedings. Usually the LEDs appear near the end after you’ve forgotten where every wire was supposed to go and questioned yourself several times.
Customisation

For this build I decided to experiment with some new products recently supplied by the manufacturer, namely Water Scenery Gel Paste. This stuff is designed to mimic realistic water effects and can be brushed onto surfaces and layered gradually depending on how dramatic you want the result. I left the first sections overnight to dry and honestly, I was seriously impressed by how effective it looked once cured. The texture and reflective finish added a huge amount of depth to the kit, so much so that I ended up using it throughout the entire build to create more convincing water effects and stronger three-dimensional detail.
This particular kit lends itself exceptionally well to customisation, and I may possibly have gone slightly overboard. Quite literally.
The modifications included:
- Added water gel effects
- Added rocks and sand
- Added plants to replicate seaweed
- Painted the plants, rocks, and gravel with clear water gel for a wet-look finish
- Added shells to the ocean floor
- Completely customised the treasure chest with gold bars, coins, jewels, and the supplied chain
Without customisation, the kit does risk feeling a little bit lacklustre despite the beautiful HD printing. The foundations are excellent, but adding extra texture and detail really transforms it from “nice display piece” into “tiny underwater world.”
That said, a small word of warning for fellow hobbyists who enjoy customising: if you’re adding anything resembling seaweed, keep it simple and keep it green. This is an underwater scene, not your auntie’s prize-winning flower bed. So perhaps avoid sticking bright red geraniums or giant daisies into the ocean floor unless your aim is to recreate Atlantis Garden Centre.
Final Thoughts
One of the standout features of the build is the way the front and side acrylic dust covers meet at a perfect 90-degree angle. It’s genuinely superb engineering. Once assembled, it barely even looks like two separate panels. Instead, it has the appearance of a bespoke acrylic case fitted specifically for the model, and it gives the finished display a far more expensive and professional look.
The manufacturer states an assembly time of 3–5 hours, with a four-star difficulty rating. Personally, including all the customisation work, mine was probably closer to 10-12 hours across 4-5 days, but none of that time ever felt frustrating or repetitive. It was the sort of build where you constantly find yourself adding “just one more little detail” before suddenly realising several hours have disappeared.
The supplied lighting — both the standard LEDs and the blue strip illuminating the moving background — is more than adequate for the kit and creates a lovely atmospheric glow once the room lights are dimmed.

Overall, Discover Atlanta — or perhaps more accurately Discover Atlantis — is a thoroughly enjoyable build with excellent visuals, clever movement effects, strong lighting, and huge customisation potential. Yes, the naming department may have briefly confused a major American city with a mythical underwater civilisation, but honestly, once you see the finished result glowing away on the shelf, you’ll forgive it almost immediately.
Useful Links Relating to this build
Copyright Book Nook Workshop 2026 – All rights reserved. (John A. MacInnes)

Leave a Reply