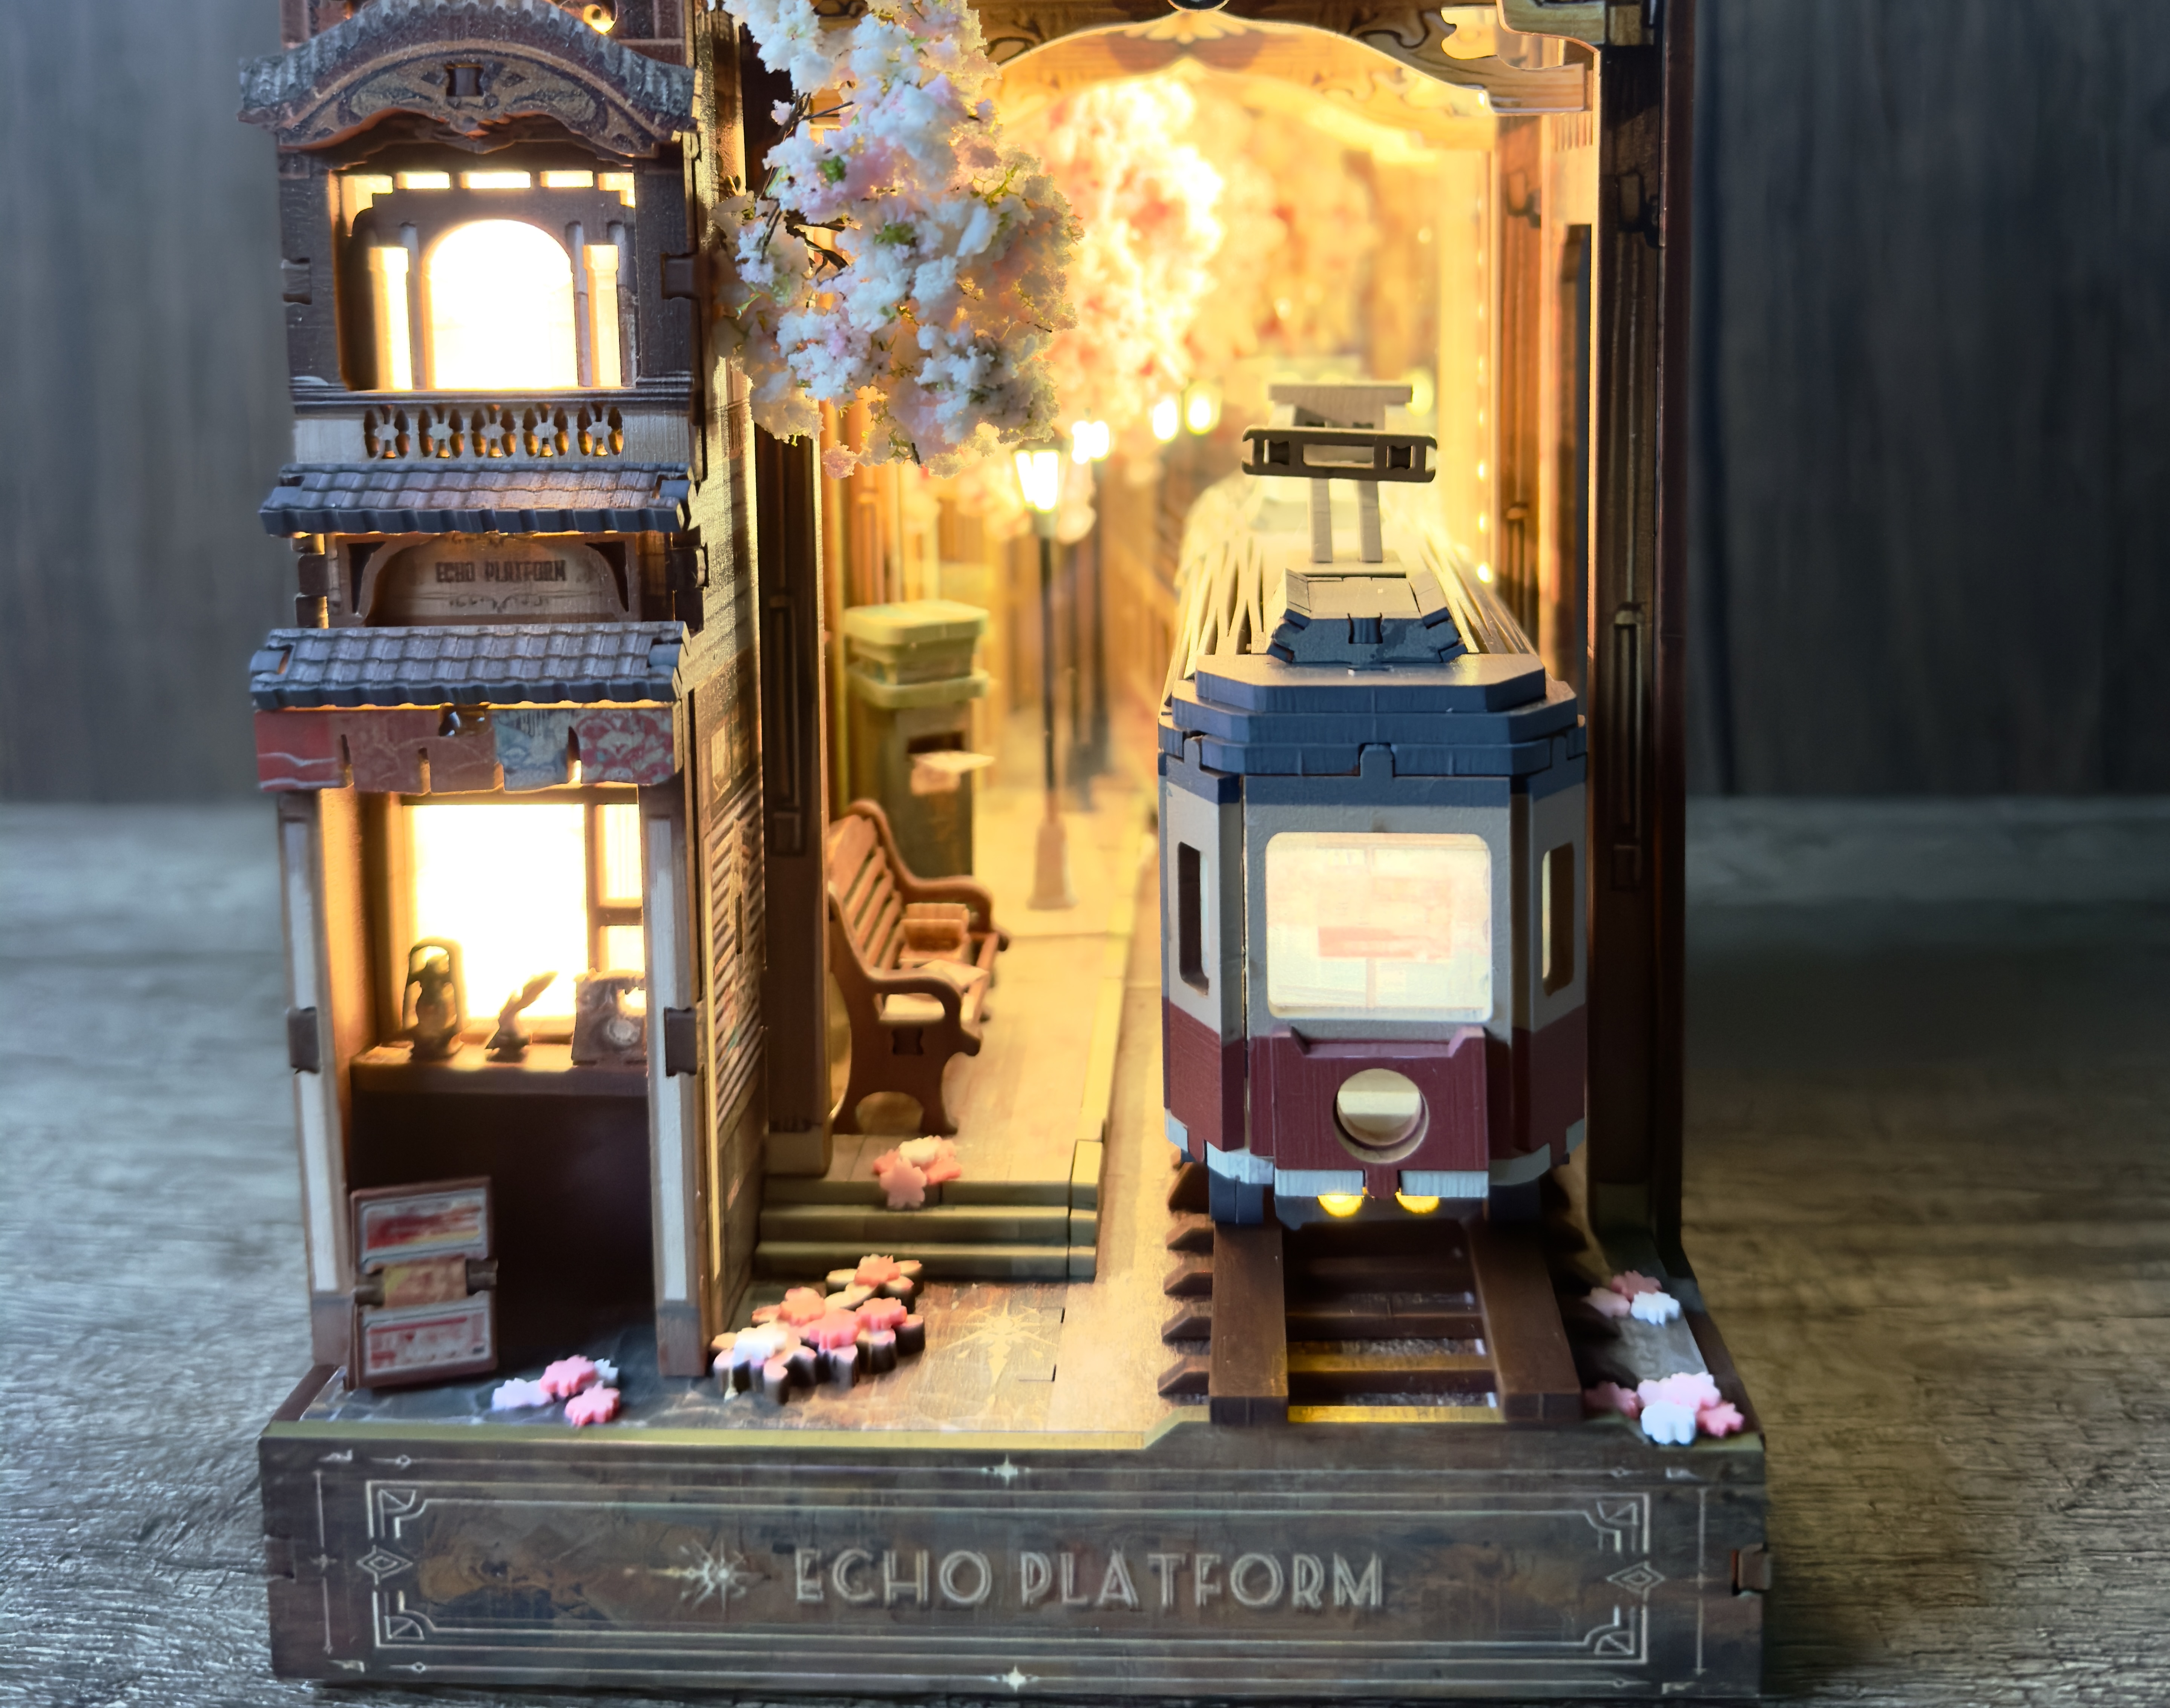
Reviewed and built by: John A. MacInnes – build number 66.
Buy this kit on Amazon UK: Check current price and availability →
As an Amazon Associate, Book Nook Workshop may earn from qualifying purchases at no extra cost to you.
Introduction:
There are some book nook kits that arrive in a box and immediately give you a pretty good idea of what you’re letting yourself in for.
Echo Platform appears to take its inspiration from a peaceful Japanese railway station in spring, with a traditional-style station building, wooden platform, arriving train and, of course, plenty of cherry blossom. There also seems to be a nod towards the famous sightseeing railway around Kyoto’s Arashiyama district, although FunPola doesn’t appear to provide a detailed story behind the individual platform itself.
Instead, the kit is more about capturing a moment — a quiet station, a waiting passenger or two, the postbox, the approaching train and those falling blossoms. Add in the infinity-mirror effect and the idea is to create the impression that the railway and blossom-filled scene continue far beyond the confines of the book nook.
This one certainly doesn’t suffer from a lack of ambition. The box artwork promises an atmospheric oriental-style railway scene, complete with traditional buildings, a rather impressive clock tower, glowing shopfronts, cherry blossom and, naturally, a tram that appears to have wandered into the middle of it all. The result looks considerably more complicated than your average book nook — which, of course, was probably why I bought it.
The Echo Platform is a collaboration between FunPola and Timory and comes as a 330-piece kit. The finished model measures 139mm wide by 161mm deep and 259mm high, so this is a relatively standard size build but one that packs quite a lot into its footprint.

I picked mine up from Amazon for £32.39, which immediately raises the important question with any kit: does £32.39 buy you a genuinely enjoyable building experience, or have you simply purchased several evenings of colourful frustration?
Well, having checked I can tell you Amazon are now selling it at £49.99.
Recommended for builders aged 14 and over, The Echo Platform sits comfortably in the intermediate category, with a four-star difficulty rating. From that first look inside the box, there’s certainly plenty to be excited about.
The panels are already giving away some clues about just how detailed this little scene is going to become, with the architectural elements looking particularly promising.
At this stage, though, it’s always dangerous to get too excited by what you see on the box or printed on the panels. We’ve all opened a kit before, admired the beautifully detailed components and thought, “This is going to be brilliant,” only to discover three hours later that the manufacturer has developed a particularly creative interpretation of the English language.
So, with the Echo Platform promising a four-star challenge, plenty of MDF and a finished scene that looks considerably more complicated than its £32.39 price tag would suggest, it was time to see what was actually hiding inside those panels.
Unboxing:

Opening the box reveals a surprisingly generous collection of components for a kit costing just £32.39. The main construction material consists of eight full-size MDF panels and two half-size panels, all made from 2.5mm MDF. The boards are well packed with components, and even at this early stage it’s clear that the finished model is going to contain a considerable amount of detail.
Alongside the MDF you’ll find the lighting kit, which we’ll look at in considerably more detail later, together with two acetate mirror sheets. There’s also an oil sheet containing pre-cut window inserts, which should add some lovely illuminated detail once the lights are switched on.
The smaller accessories haven’t been forgotten either. There’s a little booklet of stickers designed to create two newspapers, along with four envelopes — because apparently even a tiny railway platform needs somewhere for the post to go.
And then there’s the cherry tree and the LED street lamp.
This is one of those kits where the contents start to make you appreciate just how much has been squeezed into the finished scene. The combination of architectural pieces, reflective acetate, illuminated windows, printed details and decorative elements suggests that the Echo Platform isn’t simply going to be a case of assembling four walls and hoping for the best.
At this point, the four-star difficulty rating was beginning to look rather more justified.
Instruction manual:

The Echo Platform comes with a very good instruction manual, and it is a considerable improvement on some of the efforts we’ve seen from kit manufacturers. It’s an A4 landscape-format, full-colour manual running to more than 30 pages, giving plenty of room for the illustrations and instructions without everything being crammed into tiny boxes.
The build steps are clearly laid out and, importantly, they follow a logical progression through the construction. Each stage leads naturally into the next, with well-detailed illustrations showing what is required rather than leaving you trying to decipher what the manufacturer thinks you should be doing.
The opening pages are particularly useful, as they deal with the lighting kit before you get too far into the build. The PCB is clearly marked to show where the various lighting connections are made, which is exactly the sort of information I like to see provided at the beginning rather than discovering halfway through the build that something should have been connected three pages earlier.
There is also a proper introduction to the lighting components and their placement, giving you the opportunity to understand the lighting system before starting to bury wires behind the model’s walls.
The lighting wires are also partly colour coded, which certainly helps, although in this particular kit I don’t think you’ll actually need to rely on that. The manual is exceptionally clear about which wire connects where, and the PCB is properly marked for the various lighting connections. Even someone who normally approaches book nook wiring with the enthusiasm of a cat approaching a bath should have little difficulty working out what goes where.
Overall, this is a manual that has clearly been designed with the builder in mind. It’s well presented, easy to follow and, so far at least, doesn’t appear to require the traditional book-nook building accessory — a crystal ball.
The kit as supplied:

First impressions count, and The Echo Platform certainly gets off to a good start.
The ten MDF panels — eight full-size and two half-size — are all cut from 2.5mm MDF and, at first inspection, the laser cutting is excellent. The parts are cleanly defined and should pop out without requiring the builder to reach for a sanding stick before the build has even begun. There is also very little of the heavy scorching or blackened edging that can sometimes accompany laser-cut MDF.
The printed elements are equally impressive. There is a good mix of colours and textures across the panels, with plenty of detail already built into the various architectural pieces. Rather than simply relying on bare MDF with a few printed surfaces, the kit gives you a good impression of the finished scene from the outset.
Then there’s the collection of smaller bits and pieces hiding around the box. Alongside the acetate mirror sheets, pre-cut window inserts, stickers, envelopes and the cherry tree, you’ll find an LED street lamp and, lurking almost unnoticed in one corner, a tiny magnet. It’s the sort of component that’s easily overlooked during the initial unboxing, but as with most book nook kits, if the instructions have gone to the trouble of including a magnet, you can pretty much guarantee it’s going to have a job to do later.
Then, of course, there’s the lighting kit, which looks comprehensive and, as we’ve already seen, is particularly well catered for by the instruction manual.
For a kit costing £32.39, the overall first impression is therefore very positive. Nothing in the box immediately screams “budget kit”, and there is certainly enough detail and variety here to suggest that the finished Echo Platform could punch well above its price tag.
Lighting kit:

The Echo Platform comes with a relatively straightforward lighting system powered by a single AAA battery box, providing 4.5 volts. The battery box also has a master on/off switch, which is always a welcome addition — particularly when you don’t want to be relying solely on the touch switch to control the lighting.
At the heart of the system is a PCB with four connections, although the arrangement is slightly more interesting than that description might initially suggest.
One connection is for the power supply, while another feeds a double-LED light cable. A separate cable connects to one of the double-LED boards, with that cable run also providing an additional connection to power the second LED board. The final output is dedicated to the LED street lamp.
For a relatively small kit, this looks as though it should provide sufficient illumination without turning the Echo Platform into the Las Vegas Strip. The PCB also doubles as the touch switch, giving you a simple way of turning the lighting on and off without having to reach around the back of the model.
Having taken the time to read through the manual before starting the build — something I would strongly recommend with any kit — I can’t see any obvious areas likely to cause concern with the wiring. In fact, I’ve already spotted an opportunity to improve the finished effect.
The supplied lighting should do the job nicely, but I think an additional LED filament tucked beneath one of the windows could give that particular area a lovely warm, welcoming glow. It’s not something the kit requires, but it’s the sort of small modification that can take a good lighting setup and make it look considerably more atmospheric.
So, while the supplied system may be fairly modest, it appears to have been sensibly designed for the size of the model — and, importantly, the manual makes it clear where everything goes. That should make this one of those wiring jobs that doesn’t require the usual mixture of crossed fingers, muttering and a magnifying glass.
The build:

So, off we went on our merry way, markers out and ready, an assortment of tweezers that any young female would be proud of, a selection of glues which, when accumulated together, looks rather more intimidating than any sensible person would consider necessary, and, of course, the good old sanding pads.
The workbench was prepared, the manual was open, and the Echo Platform was about to find out whether that four-star difficulty rating was deserved — or whether someone at the manufacturer had simply been feeling optimistic when they put the stars on the box.
As always, the first job was to get ourselves organised. With a kit containing this many small components, trying to find the part you need halfway through a build is a recipe for frustration, particularly when the piece you’re looking for is approximately the size of a postage stamp and currently hiding underneath your cutting mat.
Markers at the ready, glue bottles lined up like a chemistry experiment and tweezers deployed, it was time to start building.
The First Section:

The first section of the build turned out to be a rather nice little diorama in its own right, bringing together a floor section, bench, postal box, street lamp, door frame and door complete with its oil-paper insert.
All of these parts came together really well, with very little sanding required. The only real exception was dealing with those little white nub marks left where the components had been attached to the MDF sheet. They were easily dealt with, but as anyone who knows me will testify, I wasn’t going to leave them sitting there looking at me.
Yes, all the exposed edges were duly repainted. Those who know me will understand my obsession with this particular task. For everyone else, let’s just say that bare MDF edges have a remarkably short life expectancy on any model that passes across my workbench.
The little bench also provided the opportunity to add some of the smaller details from the kit. A newspaper was positioned on the seat, along with two of the tiny envelopes. One envelope was then carefully positioned halfway in and halfway out of the letterbox, apparently having arrived just in time — or perhaps being held there while its recipient waited patiently for the 9.15 mail train to pass.
It’s these little touches that I particularly enjoy with book nook builds. The basic construction might be MDF, but once you start adding the tiny details, the model begins to acquire a story of its own. And at this early stage, the Echo Platform was already starting to do exactly that.
am becoming more impressed as this build progresses. It is obvious that the designers have actually sat down somewhere, had a look at a few photographs and then thought about how they could translate what they had seen into a miniature scene, rather than simply throwing a collection of MDF parts into a box and hoping for the best.
The bench, for example, is a surprisingly substantial little piece, while the postbox has several stepped features that give it a much more convincing three-dimensional appearance. These might seem like small details, but they make a considerable difference once everything is assembled.
The street lamp is another particularly nice touch. Having tested it at this early stage, the amount of light it produces is just about spot on. It doesn’t flood the platform with light, but instead casts a gentle glow around the area, which looks remarkably realistic.
It is these little design decisions that are beginning to convince me that the Echo Platform is going to be rather more interesting than its £32.39 price tag might suggest.
The Railway Track

Page six is where you start laying down the track, and here’s another little point worth mentioning before you get there.
Parts K17 and K19 will only fit in one direction, so once you’ve got them in place you might find yourself looking at them and thinking, “Hang on a minute…”
The larger front section, K19, extends around 3–4mm beyond the edge of the base, while the rearmost section, K17, doesn’t actually join up with the section of track in front of it. At first glance, it really does look as though something has gone wrong.
I placed them, took them back off, looked at the manual, looked at the baseplate, looked at the other bits of track already installed… then repeated the process just in case staring at it for a second time would somehow reveal the answer.
Eventually, I came to the conclusion that it must simply be part of the design. But not entirely convinced, I carried on reading through the manual to see if the mystery would eventually be solved.
Thankfully, it was.
The front track is indeed supposed to extend slightly beyond the base, while the gap between K17 and K19 is there to accommodate one of the mirrors fitted later in the build.
Problem solved. But for a while there, I was genuinely wondering if someone had cut the tracks to the wrong length!
The Train Carriage:

The first thing worth mentioning here is one of those little details that, if I noticed it, I’m fairly certain other builders will too.
Step one on page seven gets us started on building the train carriage, with part K2 requiring the S8 oil-paper window insert. To the manual’s credit, it helpfully tells you which side is the front and which is the rear. So far, so good.
What it doesn’t explain, however, is why the circular rings — which I assume are intended to represent the standing passengers’ grab rails — don’t line up exactly with the window cut-outs.
Cue the inevitable pause, stare at the instructions, stare at the part, and then the thought every book nook builder knows only too well:
“Have I put the wrong bit in?”
So, naturally, I checked. And checked again. But no, the correct section of S8 had been removed and everything was positioned as shown in the manual.
That leaves only one conclusion: this is intentional and the rings are part of the interior design of the carriage rather than being intended to align with the windows.
It’s a very minor point, but it is exactly the sort of thing that can make a builder stop dead in the middle of a build wondering whether they’ve made a mistake. A single line in the manual explaining why the two don’t align would have saved that moment of doubt.
It’s certainly not a criticism of the kit itself — just one of those little “by the way” notes that would make an already good manual even better.
But if just to confirm the next step moves you forward to part K3, which is a preprinted side wall of the carriage who also has the out of sync rings.
Oil Sheet:

One little thing I noticed when fitting the oil-sheet inserts into the carriage windows was that they are ever so slightly oversized. Nothing dramatic, but if you fit them exactly as they come, they interfere with the tenons when you start putting the carriage together.
A quick bit of trimming around the edges sorts it out nicely, allowing everything to slot together as it should. It’s hardly a major issue, but worth mentioning now, as otherwise you could find yourself with everything looking perfectly fine until you try to join the parts together and suddenly wonder why they don’t fit. Ask me how I know.
Tip Number One:

Page nine of the manual brings us to part J1, the rather delicate accordion-style roof piece which wraps around the top and sides of the actual tram.
Now, credit where it’s due, the manual gives you a very clear warning before you go anywhere near it: this part is fragile. And if you damage it while removing it from the MDF sheet, there are no spares.
So that’s the warning passed on. If you’re building this one, don’t go charging in with the enthusiasm of a toddler opening a Christmas present. Take your time, carefully work your way around the piece and support it as you remove it.
Because if it snaps… well, you’ve been warned, folks!
Customisation

As I was building the tram, I came across a small piece of MDF that immediately got me thinking. It looked as though I could carefully drill it out and accommodate two small 3mm yellow LEDs to create a couple of front lights.
The fact that there was already an LED board inside the tram meant I had a convenient power source, so I could tap into the existing wiring rather than having to introduce another battery or run additional cables through the model.
It wasn’t the easiest of modifications. I didn’t cut into the interior cables and instead worked from the outside, and the original cable needed to retain its full length, which made fitting the two additional LEDs into the existing cable run a particularly fiddly exercise. There was plenty of tweezers, patience and probably a little more muttering than was strictly necessary.
But perseverance won out.
The two yellow LEDs now illuminate the front of the tram and, although it’s only a small bit of customisation, the effect is surprisingly effective. It’s exactly the sort of modification I like — it doesn’t change the character of the kit, it simply adds another little detail that makes the finished scene feel that bit more alive.
LED filament 19mm warm white
The other area I decided to have a wee play around with was the rear window of the booking hall. This had no direct illumination, and I felt it was crying out for a little extra light.
I cut into the main lighting cable and spliced in a 3-volt warm white LED filament, soldering the connections and covering the solder joints with heat shrink for a bit of added protection. I fitted the 19mm filament across the top of the window, which turned out to be a perfect fit.
The reason for using a filament rather than a standard LED bulb was to avoid creating one harsh point of light. Instead, the filament spreads the illumination evenly across the width of the window, giving it a much softer and more natural glow.
Having now seen it all lit up, I’m pleased to say it achieved exactly what I was hoping for. Another small modification, but one that makes a noticeable difference to the finished scene.
Cherry Blossom
The manual calls for some cherry blossom to be added at this point, but of course the pieces supplied are flat, 2D printed sections. Now, this kit deserved a bit more than that.
Yes, I could have reached into my floral stash box and added some individual flower heads, but then I remembered something I had ordered from Temu some time ago entirely by mistake. They were advertised as spring blossom trees but, when they arrived, they were tiny and absolutely useless for what I had originally intended.
Still, being a book nooker, I did what we all do. I held onto them.
You never know when that drawer full of bits and pieces you couldn’t possibly throw away will suddenly become useful. I just didn’t know that day would come courtesy of the Echo Platform.
And this was it.
The little blossom tree turned out to be absolutely perfect for the scene, fitting beautifully and giving the platform a much more realistic three-dimensional effect than the flat printed pieces ever could. Sometimes those purchases you thought were a complete waste of money turn out to be exactly what you needed — you just have to wait a while to find out why you bought them!
I also used some of my cherry blossom coloured acrylic pieces on the platform and at the front entrance as you look into the build, rather then the blocky 2D ones supplied.
A Wee Extra Tip for Free
The supplied cherry blossom tree is fitted right at the very end of the build and, like most things that have been squashed, battered and generally abused on their journey from China to the UK, it will need a bit of tweaking to give it a more natural look.
It fits into a gap on the left-hand side of the build and pokes through into the scene, sitting in front of the infinity mirror and directly above the street lamp. So before you commit yourself with glue, take a minute to move it around and make sure you have it sitting exactly where you want it.
For this part of the build, I went with hot glue to make sure the tree wasn’t going anywhere. Then, just for good measure, I went around the base of the hot glue with UV resin and cured it.
That tree is now better anchored than the Titanic ever was!
And, as you can see from the finished effect, it was well worth the effort. The combination of the three-dimensional blossom, infinity mirror and the light from the street lamp creates an absolutely phenomenal effect.
Sound track
I then used various soundtracks of trains, announcements, and station bustle, which I synced to the 1min -44second long video which is located at the end of the review underneath the gallery.
Key elements:

One thing that has really stood out throughout this build is just how well the instruction manual guides you through it, step by step. It doesn’t simply show you a picture and leave you to work out the rest for yourself. When a particular part needs to be fitted in a certain direction, it tells you. When there’s a specific order to fitting something — the roof tiles, for example — again, you’re given the heads-up before you make a mistake.
They might seem like wee things, but they’re exactly the sort of details that can make the difference between an enjoyable build and one where you’re constantly stopping to ask, “Now, what on earth do they want me to do here?”
It’s this attention to detail that makes the manufacturer stand out from many others. To be fair, though, some of the truly dreadful manuals I’ve come across have tended to be with kits bought directly as imports rather than those supplied through recognised manufacturers or retailers. Even so, when you’ve built enough kits, you quickly learn to appreciate a manufacturer that has clearly put as much thought into telling you how to build the thing as they did designing it in the first place.
The build format
One of the things I really liked about The Echo Platform is the way the build progresses. It follows a very logical sequence throughout, with each completed section naturally leading you into the next.
You begin on the left-hand side, building up the station concourse with its bench, lamp, post box, paper accessories and what I’m calling the booking office. From there, you move onto laying the train track before making a start on the train itself.
There are quite a number of pieces involved in building the train, so this is probably a good point to say: pace yourself. There’s nothing particularly difficult about it, but there’s plenty going on, and taking your time pays off.
Next up is the front of the building, along with one of the mirrors and some of the roof sections. The front tower section, complete with its clock, is then built before being fitted onto the sections you’ve already completed.
The right-hand side comes next, along with the LED strips, before the rear mirror and the back of the building are added. This is where much of the cabling starts to disappear from view, which is always a satisfying moment in any build involving electronics.
The remaining lighting runs are then positioned and secured, before adding the touch sensor, PCB and battery box. That leaves the remaining roof sections and decorative materials before the build is finally closed up with the base plate, safely hiding all that wiring away, and the left-hand rear wall section.
All in all, it’s a very logical build from start to finish. At no point did I feel as though I was jumping ahead, building something that should have been fitted earlier or having to dismantle half the model because I’d missed something three pages back. The manual takes you through the build in a sensible order, and the kit itself has clearly been designed to follow that same progression.
My Thoughts:

Overall, I thought The Echo Platform was an excellent build. The quality of manufacture is very good throughout, with solid 2.5mm MDF boards, crisp HD printing and laser cutting that caused no problems during the build.
Everything fitted together as it should and, despite the amount of detail packed into the finished model, there was very little need for glue. That’s always a good sign, as there’s nothing worse than having to use half a bottle of adhesive simply to persuade parts to stay where the manufacturer designed them to go.
The build is well thought out, the manual is excellent and the logical progression means you’re never left wondering what should happen next. There are enough pieces and detail to keep things interesting, without it becoming an unnecessarily complicated build.
I’d recommend The Echo Platform for anyone from an advanced beginner moving up to their first intermediate-level kit, through to the newer intermediate builder. The four-star difficulty rating feels about right, although the excellent instructions do make the whole process considerably more straightforward than that might initially suggest.
For £32.39, it is not only a very good kit indeed, but an absolute bargain as value for money.
Pros
- Excellent quality 2.5mm MDF throughout
- Crisp, detailed HD printing
- Clean laser cutting with no fitting problems
- Parts fit together extremely well, requiring very little glue
- Excellent full-colour A4 instruction manual
- Logical, step-by-step build sequence
- Helpful warnings and instructions where parts need fitted in a particular order or direction
- Well-designed lighting system with clearly marked connections
- Effective touch sensor, along with a master on/off switch on the battery box
- Good level of detail for a relatively compact kit
- Infinity mirror creates a fantastic finished effect
- Plenty of opportunities for customisation
- Very good value at £32.39
Cons
- Oil-sheet carriage window inserts are slightly oversized and need a little trimming. The printing on these could be a bit brighter too.
- The track arrangement can initially make you think the parts have been cut incorrectly until the mirror is fitted later in the build
- The manual doesn’t explain why the carriage grab rings don’t align exactly with the window openings
- Part J1, the accordion-style tram roof, is particularly fragile, with no spare supplied
- Supplied flat 2D cherry blossom pieces don’t quite do justice to the otherwise three-dimensional scene.


Copyright Book Nook Workshop 2026 – All rights reserved. (John A. MacInnes)
Leave a Reply