Brandy and a Touch of Paris
Built & Reviewed by David Richards
Kit kindly supplied by ETKVR for an independent product review.
Introduction – All Business Upstairs, All Pleasure Downstairs
I have built a considerable number of book nooks over the past year, but I cannot recall another that combines an executive office with a café and bar directly beneath it.
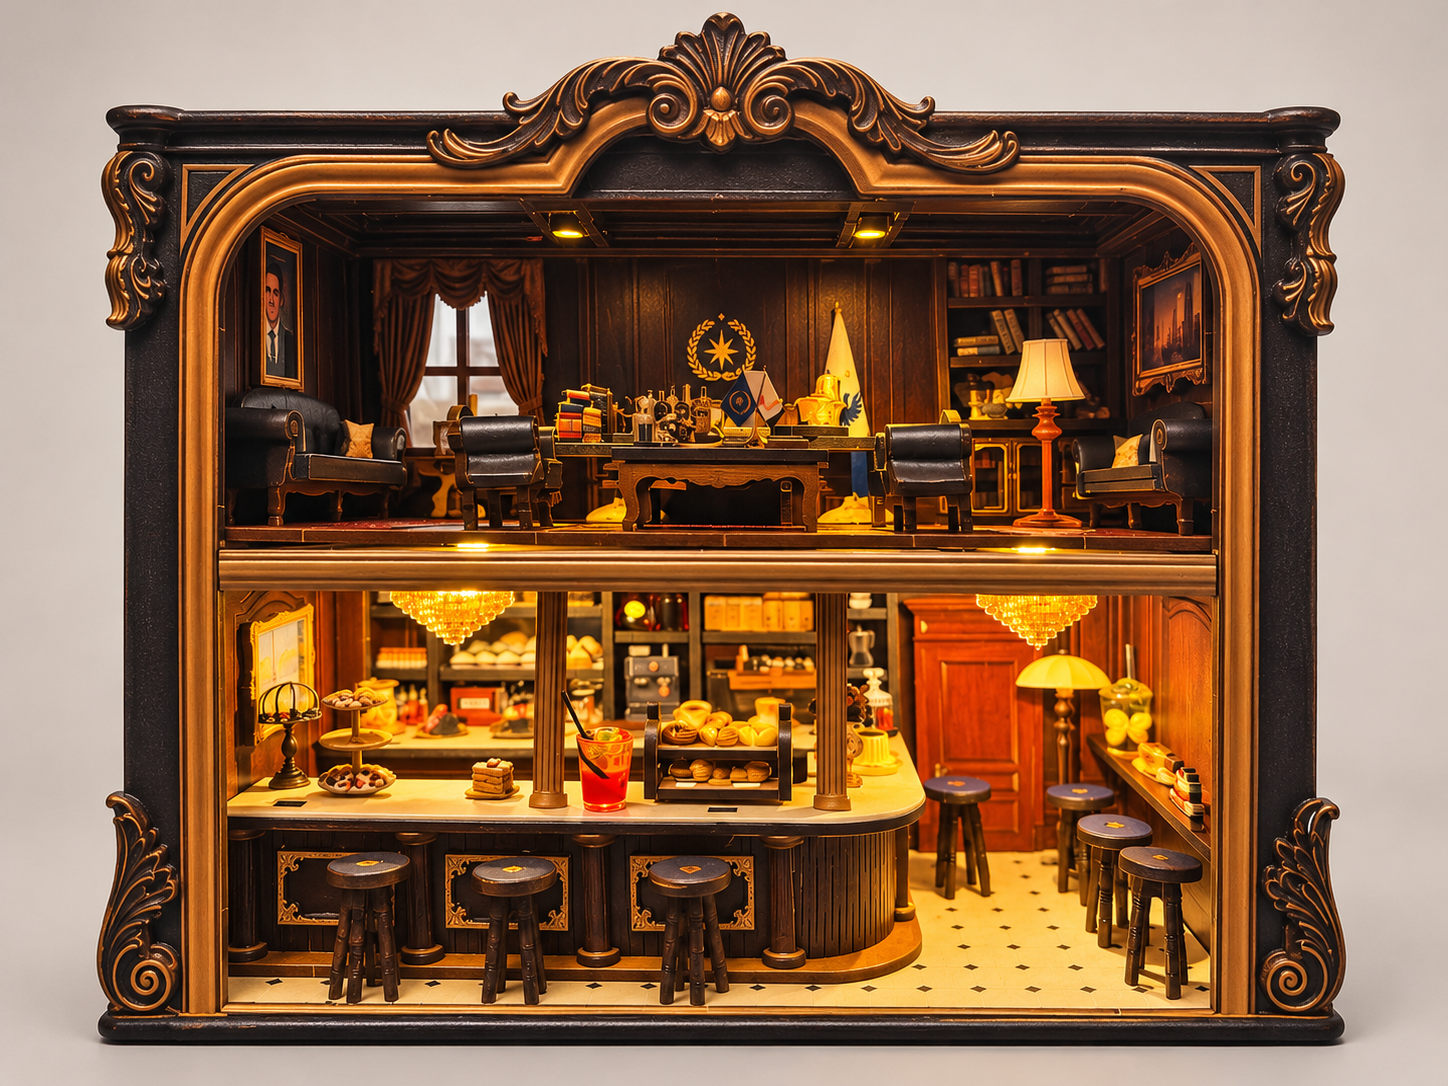
Welcome to The Executive Lounge, a two-storey model from ETKVR that takes a rather different approach to the traditional miniature library.
On the ground floor, we have a rather inviting café/bar, complete with pastries, cakes, bottles of alcohol and seven bar stools. Upstairs, things become considerably more serious, with desks, boardroom-style tables, bookcases, sofas, armchairs and flags.
Personally, I know where I would be holding the majority of my meetings.
There is even a picture of the Eiffel Tower beneath a rather dapper-looking gentleman, which makes me suspect that this kit has a French connection.
And naturally, I couldn’t resist imagining a conversation with a certain French president.
« Vous voulez quelque chose à boire, Président Macron ? »
Would you like something to drink, President Macron?
Although, judging by the contents of the downstairs bar, I suspect the answer would be oui.
The combination of a café/bar on the ground floor and an executive office above is certainly unusual. But perhaps manufacturers are beginning to realise that there are only so many miniature libraries we can build before we need somewhere to discuss the books over a glass of something stronger.
And if such a building existed in reality, Paris would be a rather appropriate location.
The real question is whether this unusual concept translates into an enjoyable build.
Fortunately, the answer is largely yes.
ETKVR The Executive Lounge – Review Summary

Approximate build time: 6 hours
Difficulty: Beginner-friendly, with a couple of slightly tricky assembly stages
Lighting: Four LEDs
Design: Two-storey café/bar and executive office
Design & Artistic Content – 9/10
The overall concept is imaginative and enjoyable, particularly the contrast between the two floors.
The café/bar is undoubtedly my favourite part. There is plenty to look at, with miniature pastries, cakes, bottles and decorative accessories. ETKVR has also included several three-dimensional pieces rather than relying entirely on flat printed details.
I particularly liked the food accessories and the bottles behind the bar. They add depth and character to what could otherwise have been a fairly ordinary miniature interior.
The executive office is attractive too, although I would have appreciated a couple more 3D decorative accessories upstairs.
The main disappointment was the use of stickers to cover the arms of the sofas and armchairs.
Unfortunately, the result is immediately noticeable, particularly in the finished video. The stickers don’t convincingly reproduce the appearance of upholstery and detract from an otherwise very attractive interior.
A little thin fabric would have made a considerable difference.
I have no objection to stickers when they are used appropriately, but trying to make a flat adhesive sheet look like upholstered furniture is asking rather a lot.
That is where the missing point went.
Engineering & Precision – 10/10
ETKVR deserves full marks here.
The wooden components popped out of their boards cleanly, with virtually no burrs and very little sanding required.
Anyone who has spent half an evening removing rough edges from miniature wooden components will appreciate what a difference that makes.
It also meant that touching up the exposed edges was considerably quicker.
The components fitted together accurately, including the curved wall behind the bar counter, which was particularly satisfying.
There were no major engineering frustrations, and the overall quality of the laser-cut components was excellent.
Instructions – 10/10
The kit comes with a full-colour A4 instruction manual.
And, for once, I have absolutely nothing to complain about.
The illustrations were clear, the assembly sequence was logical and the instructions were easy to follow.
There are a couple of stages where you need to pay attention to the orientation of components, particularly around the café ceiling, but the information is there.
Whether I always followed it correctly is an entirely different matter.
Lighting & Electronics – 8/10
There are four LEDs in the kit, two of which are installed in the ceiling of the lower floor.
The lighting arrangement is straightforward, and the wiring is cleverly concealed within the wooden construction.
However, the upstairs lighting is too dim.
Once the executive office is enclosed, it becomes difficult to see the details towards the back of the room. This is a shame because there is some attractive furniture and decoration that deserves to be properly illuminated.
A brighter lighting arrangement upstairs would have made a noticeable difference to the finished model.
I also felt that the method of securing the two café ceiling LEDs could have been improved, something I’ll explain in the build section.
Build Experience – 9/10
This was a very pleasant build that took approximately six hours.
There were no major frustrations, no impossible miniature assemblies and, perhaps most surprisingly, no serious challenges for my famous sausage fingers.
That alone deserves recognition.
The construction progresses logically from the café to the ceiling and finally the executive office, with enough variety to keep things interesting.
There are a couple of slightly awkward moments, but nothing that should discourage a beginner.
Build Stage 1 – The Café/Bar
As always, I began with a lighting test.

I strongly recommend doing this before starting any book nook involving electronics. Discovering that an LED doesn’t work after it has been buried inside a completed structure is not my idea of a relaxing evening.
The Executive Lounge contains four LEDs, and I was pleased to confirm that everything worked before assembly began.

Construction starts with the bar counter, which gradually fills with an attractive combination of two-dimensional and three-dimensional accessories.
Among my favourites were the lovely heart-shaped pastries.
I cannot say whether they would meet the standards of a Parisian pâtisserie, but they certainly looked appetising.
Two pillars are also incorporated into the counter assembly. These eventually connect with the ceiling, helping tie the ground-floor structure together.
One particularly satisfying detail was the curved bar counter wall. Curved wooden components can sometimes be troublesome, especially when they need to align precisely with surrounding parts.
Not here.
Everything fitted beautifully.
Seven Bar Stools and One Small Design Quirk
Next came the construction of seven bar stools.
They were straightforward to assemble, although I noticed an unfortunate little detail.
The connector between the legs and the seat remains visible, leaving a brown centre in an otherwise blue seat.
It isn’t a major problem, but once you notice it, you cannot entirely unsee it.
A perfectionist might decide to paint all seven connectors blue to disguise them.
I considered doing so for approximately three seconds before deciding that life was too short.
The back bar counter was then assembled, complete with numerous shelves and two particularly attractive 3D bottles of brandy.
Now we are talking.
The back and right-hand walls received their decorative details before being attached to the base.
By this stage, the café was already developing plenty of character, and I was beginning to wonder whether the executive office upstairs was really necessary.
Surely a comfortable bar stool and a decent glass of brandy would be sufficient for most management discussions?
Build Stage 2 – The Ceiling

The next stage involves building the ceiling that separates the café from the executive office.
Two LEDs are installed here.
My only criticism is that they are secured using adhesive rather than a more substantial mechanical fixing.
I would have preferred a small wooden plug or retaining component to hold each LED firmly in position.
Adhesive works, of course, but I generally prefer a solution that feels more permanent, especially when the lighting will eventually be enclosed inside the model.
The remainder of this stage involves constructing a series of wooden channels.
These serve two purposes.
First, they conceal the LED wiring, keeping everything tidy and preventing loose cables from spoiling the finished interior.
Second, they create an attractive crisscross pattern across the ceiling.
I thought this was particularly effective.
It is a clever way of turning what could have been a purely functional wiring arrangement into a decorative feature.
However, there is one important warning.
Make absolutely certain that the wooden channels are installed in the correct orientation.
If you assemble them the wrong way around, you will discover that the back wall cannot be attached correctly.
And I am definitely not speaking from personal experience here.
Absolutely not.
Moving swiftly on.
Once everything is correctly positioned, the result looks excellent and provides a solid foundation for the executive office above.
Build Stage 3 – The Executive Office

With the café completed and the ceiling installed, it was time to move upstairs.
Out with the pastries and brandy.
In with the desks, bookcases and boardroom furniture.
The executive room contains an assortment of miniature furniture, including sofas, armchairs, desks, tables and bookcases.
Most of these components are straightforward to assemble, with the same excellent precision that characterised the lower floor.
There are no particularly complicated furniture constructions, and the instructions continue to be clear.
The Upholstery Problem
Unfortunately, this is also where the kit’s most noticeable design weakness becomes apparent.
The sofas and armchairs use stickers to cover their arms.
I understand why ETKVR chose this approach. Stickers are inexpensive, easy to include and generally straightforward to apply.
But they simply don’t produce a convincing upholstered finish in this particular application.
The problem becomes even more obvious when the furniture is viewed close-up or under lighting.
A thin fabric covering would have been far more effective and would have given the executive office a more luxurious appearance.
After all, if you’re going to invite the President of France upstairs for a meeting, you should probably provide him with a decent armchair.
Concealing the Wiring
The final substantial furniture-related assembly is a two-sided column designed to conceal the wiring.
This is an effective solution, keeping the electronics out of sight without requiring the builder to struggle with exposed cables.
However, installing the column into the right-hand wall was probably the trickiest part of the entire build.
My recommendation is to lower the back wall slightly while inserting the column.
This makes it considerably easier to engage the locating tab correctly.
Trying to force everything into position without creating a little extra clearance is unnecessarily awkward.
Once the column is installed, the remaining construction is relatively straightforward.
The ceiling is added, followed by the left-hand wall and finally the front frame.
And suddenly, the executive office is ready for business.
Although I still think the downstairs bar is likely to be the more popular meeting venue.
Final Thoughts – A Meeting Worth Attending?
ETKVR’s The Executive Lounge is an unusual and thoroughly enjoyable miniature model.
Combining a café/bar with an executive office might sound like a strange concept, but it works surprisingly well.
The ground floor is particularly attractive, with its pastries, bar stools, bottles and decorative details creating a lively miniature setting.
The executive office provides an interesting contrast, although I would have liked a few additional 3D accessories and a more convincing finish on the upholstered furniture.
The engineering is excellent.
The components are beautifully cut, require very little sanding and fit together with impressive accuracy.
The full-colour A4 instruction manual is equally good, making this a kit that I would happily recommend to somebody relatively new to the hobby.
The only areas that genuinely disappointed me were the sofa and armchair stickers and the rather subdued upstairs lighting.
Neither ruins the finished model, but both prevent it from achieving an even higher score.
At approximately six hours, this is also a manageable project that doesn’t require several days of concentration or an advanced degree in miniature engineering.
And, for once, my sausage fingers emerged from the experience completely unchallenged.
Final score: 92/100.
Would I recommend it? Absolutely.
Would I choose the executive office or the café for my next meeting?
I think you already know the answer.
« Un café ? Un cognac ? Ou les deux ? »
A coffee? A cognac? Or both?
Bon appétit!
Leave a Reply