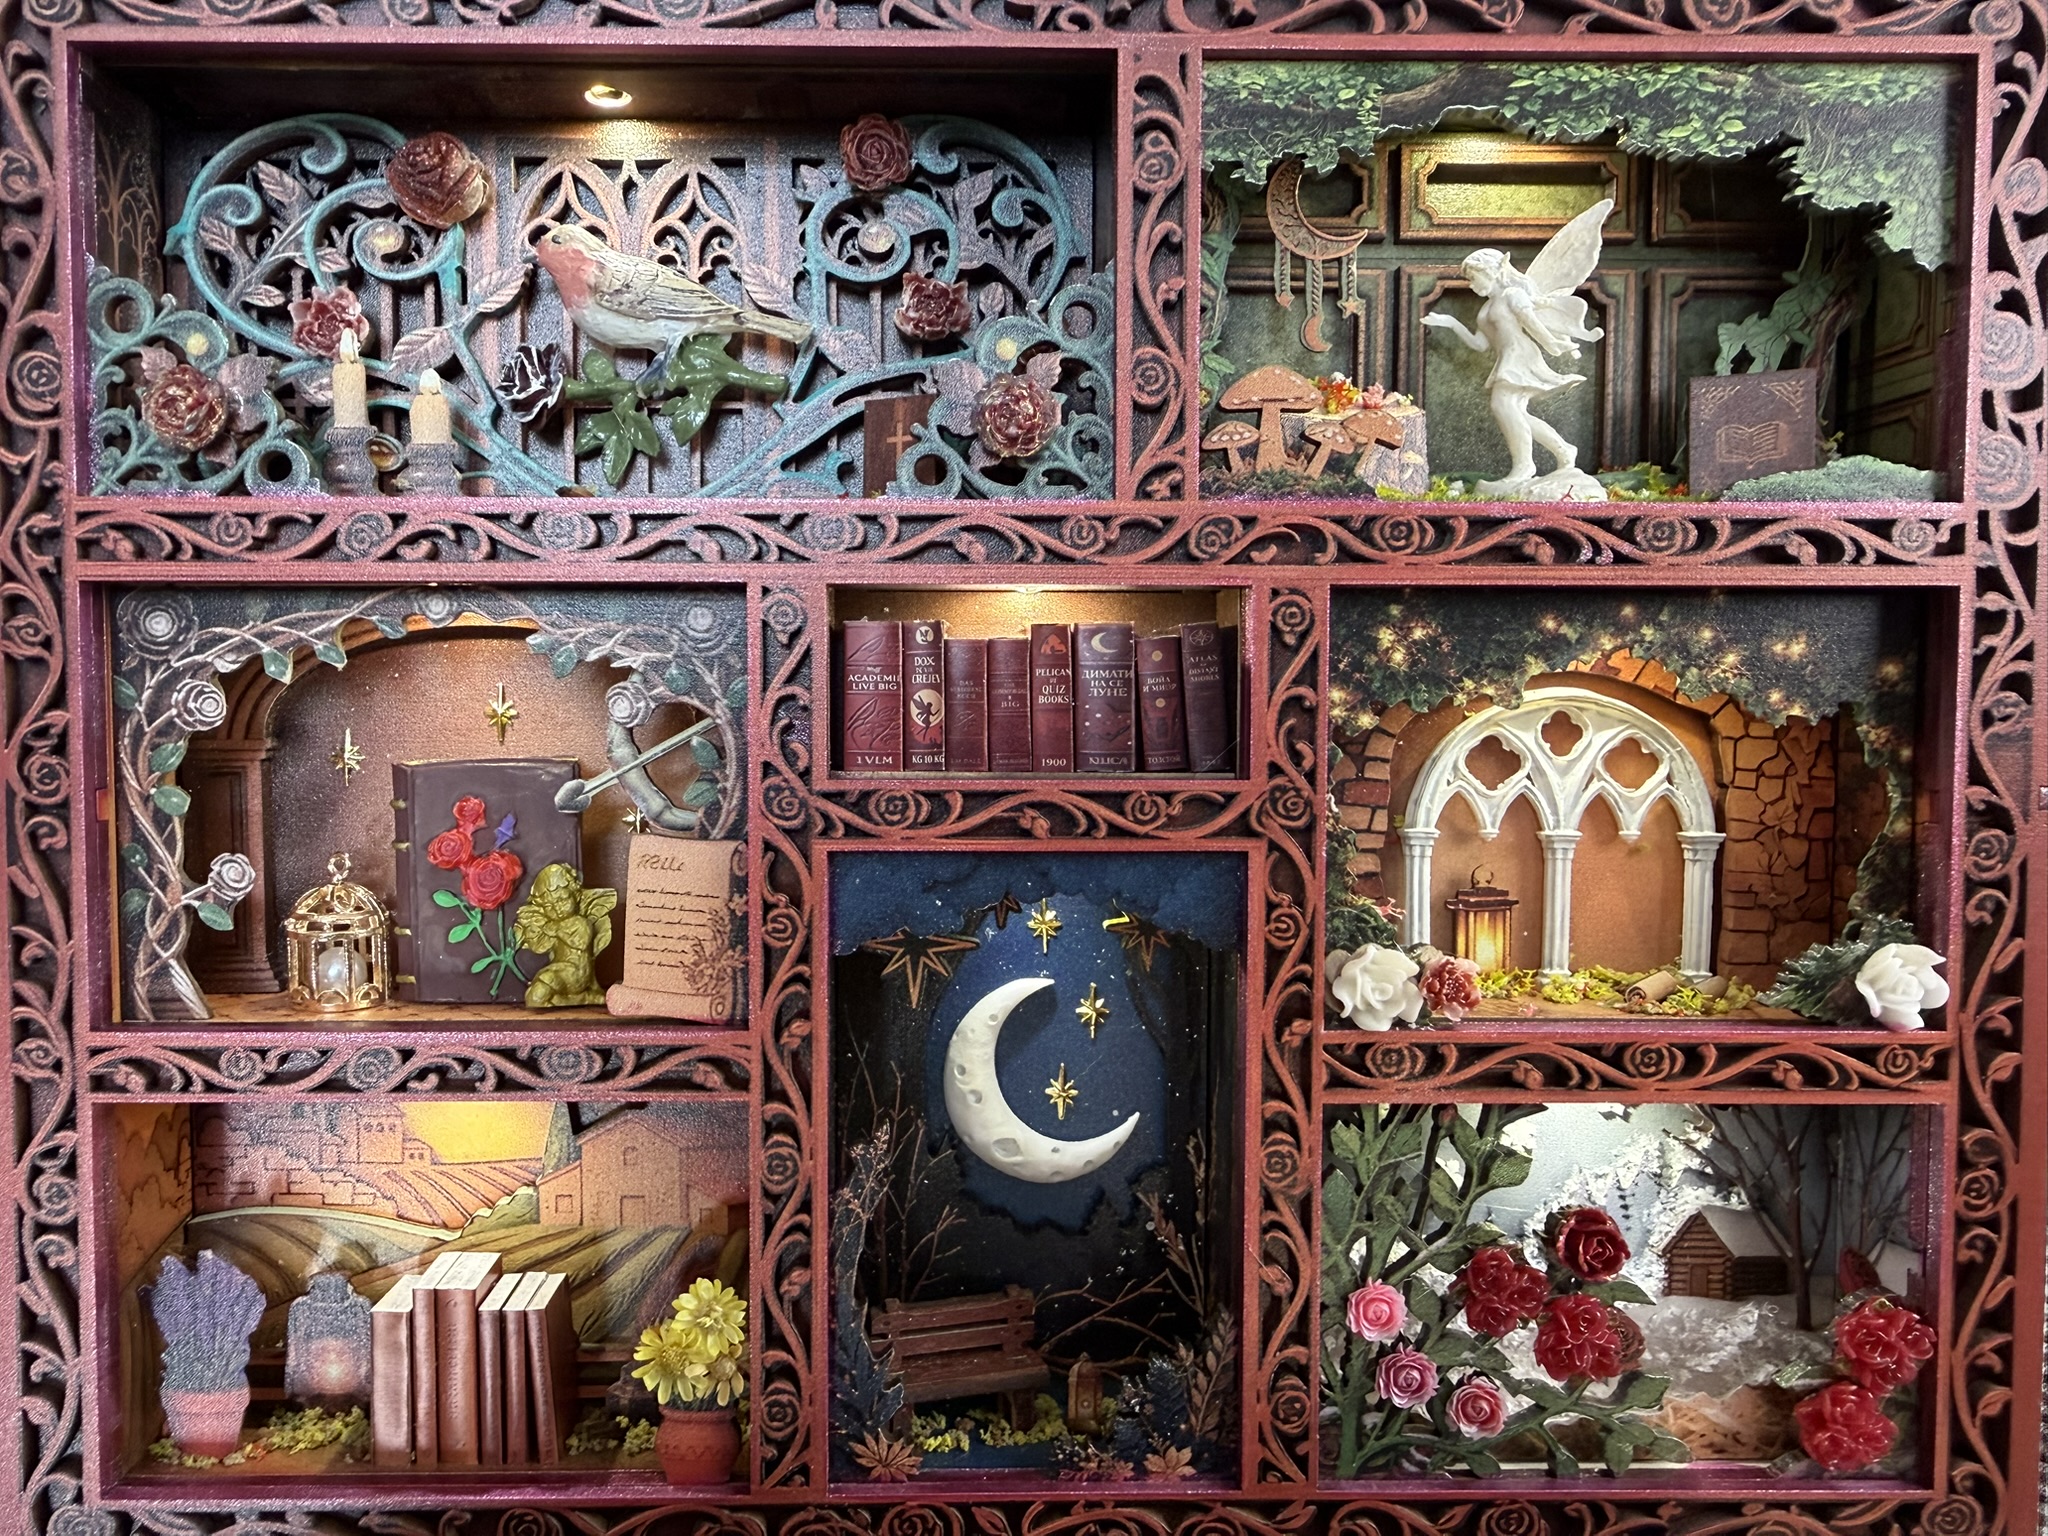
Build #62 by Martin Seidler | Frame diorama | Beginner-friendly | Overall rating 94/100
ETKVR provided this kit for review. The opinions and rating are my own.
A frame I nearly passed over
ETKVR offered me a few of its new releases to review, and frankly, most of them weren’t quite my style. I don’t usually go for frame builds either, but the little white 3D pieces in the product photos caught my eye. The Portrait Photo Frame was the one I was most curious about, although my expectations were fairly modest.
I got that completely wrong. This turned out to be one of the most enjoyable easy builds I’ve done. The frame is divided into eight miniature scenes, each with its own light and a small, thoughtfully chosen set of furnishings. There’s a moonlit scene, a snowy corner and even a little patch of summer. Working through one compartment at a time gave me eight small chances to try something different.
What’s in the box
- Pre-cut MDF boards for the frame, dividers and furnishings, plus an acrylic dust cover.
- Five white 3D prints: a small bird, a moon, an arched gate, a decorative book and an angel statue.
- Eight cool-white LEDs and a battery box that takes two AA batteries.
- Snow powder, snowflakes, gold stars, a grass mat, a small gold birdcage and a sheet of book-cover stickers.
- Glue, tweezers, a sanding stick and illustrated instructions.
There are books, of course. We’re still in book nook territory. What I appreciated here was the variety. Some are built from two layers, some from three, so they have different thicknesses. The covers have lettering and ornament rather than a single block of colour. I sanded the exposed edges and painted the page blocks white. You only see a sliver of some of them once they’re in place, but those little white edges make them read as books.


Instructions, fit and build time
You assemble the frame and furnish one section after another. The instructions are straightforward, the pictures are large enough to be useful, and the parts on my kit fitted very precisely. If this is your first miniature build, I’d be quite happy to point you towards it.
I’d allow two to three hours for a straightforward build with the prints left white and the edges as supplied. Painting and finishing can easily take that to four or five hours. I spent about six hours on mine with the extra painting, edge work and landscaping.
Five white miniatures. Should you paint them?
This was the only real puzzle the kit gave me. The prints look good in their original white, and I’d happily leave them that way on a quick build. In the end I painted all five, although you have to look quite closely to tell on a couple of them.
- The bird. I worked from a reference photo and used several tones, including olive green, to give the little bird some natural variation. This was the piece I most wanted to see in colour.
- The moon. I kept the surface pale and lightly shaded the craters to bring out the relief.
- The arched gate. I shaded a few recessed details and kept the rest light. At a glance it still looks almost like the original print.
- The angel statue. I layered ivory whites and light greys, letting the shadows do most of the work. I wanted it to look like a small white marble statue.
- The decorative book. I went with a brown leather effect, rose-red flowers, green leaves and a gold angel on the cover. I also borrowed a few of the gold stars supplied for the moon scene and used them here.

Snow, fallen leaves and a few familiar workshop tricks
The supplied snow powder makes a real difference in the lower-right winter scene. Once sprinkled on, it softens the ground and gives the little landscape its own character. In several other compartments I used autumn-coloured scatter and small fallen leaves to make the surfaces feel less tidy. The angel’s scene comes with a grass mat. I trimmed the fibres where the statue would sit to give it a firm gluing surface, then added a little more grass and scatter around it.
I used my usual Flysea acrylic markers for most of the exposed MDF edges. This was also the first build where I made extensive use of a set of glitter acrylic markers I’d recently bought in a wide range of shades. For the exposed edges around the front cover, I picked a brownish purple that came very close to the colour of the front frame. It made those edges blend in and gave the frame a much more finished look.


The glitter markers are an optional extra, but if you’ve been thinking about trying them for miniature work, I’d recommend giving them a go. I can’t recall which set I bought, but the ones I used worked very well.
On a few flat details, including the candles and the little stamp, I thinned the parts from the back or rounded the edges so the profiles looked less like cut board. I also added a few spare resin roses from my workshop to the grilles and railings where the kit calls for roses. You can pick any one of these tweaks and do it in a single compartment. That’s part of what makes this frame so easy to personalise.
Lighting and electronics
Each compartment gets its own cool-white LED. The LEDs push through round holes and are very easy to install. The instructions call for tape to secure them. I used a small dab of UV resin to hold mine in place.
From the front, some LEDs shone straight into my eyes. I shaded the side of the lens facing the viewer with a black acrylic marker to reduce the glare. In the lower-left summer scene, I also used a yellow marker to warm up the light. That one little change made the lighting feel more appropriate to the scene. Cool white makes sense for the snow and the moon. I’d have liked warmer light in a few of the other compartments.
The frame runs on two AA batteries. I didn’t measure runtime, but with eight LEDs I’d expect battery changes to become an inconvenience if I lit it regularly. A factory USB-C power option would be my first improvement. A USB-C rechargeable version, like the approach MiniCity uses on some kits, would be even more convenient. I can see why ETKVR chose a simple battery box at this price. The power arrangement, glare and uniform cool-white colour are where the kit lost points for me.
Price, difficulty and value
The price I saw on Amazon Germany while preparing this review was about €44. I think that’s fair for a frame with eight separately lit scenes, an acrylic cover, five 3D prints and a good supply of decorative extras. It’s an easy first build, and if you already have a box of leftover flowers and scenery materials, you’ll find plenty of places to use them.
Ratings
| Category | My rating |
|---|---|
| Design | ⭐⭐⭐⭐⭐⭐⭐⭐⭐⭐ 10/10 |
| Component quality and precision | ⭐⭐⭐⭐⭐⭐⭐⭐⭐⭐ 10/10 |
| Instructions | ⭐⭐⭐⭐⭐⭐⭐⭐⭐⭐ 10/10 |
| Electronics and lighting effects | ⭐⭐⭐⭐⭐⭐⭐☆☆☆ 7/10 |
| Customization potential | ⭐⭐⭐⭐⭐⭐⭐☆ 7/8 |
| Recommended experience | Beginner-friendly |
| Overall verdict | 🏆 94/100 · Highly recommended |
Would I recommend it?
Absolutely. I started this one wondering whether a frame build was really for me. Six hours later I was still finding places to put a fallen leaf or a tiny rose. If you want an easy, cosy build with plenty of room to make it your own, the ETKVR Portrait Photo Frame is an easy recommendation. I’d just give those lights a little attention before closing it up.
Gallery


Leave a Reply