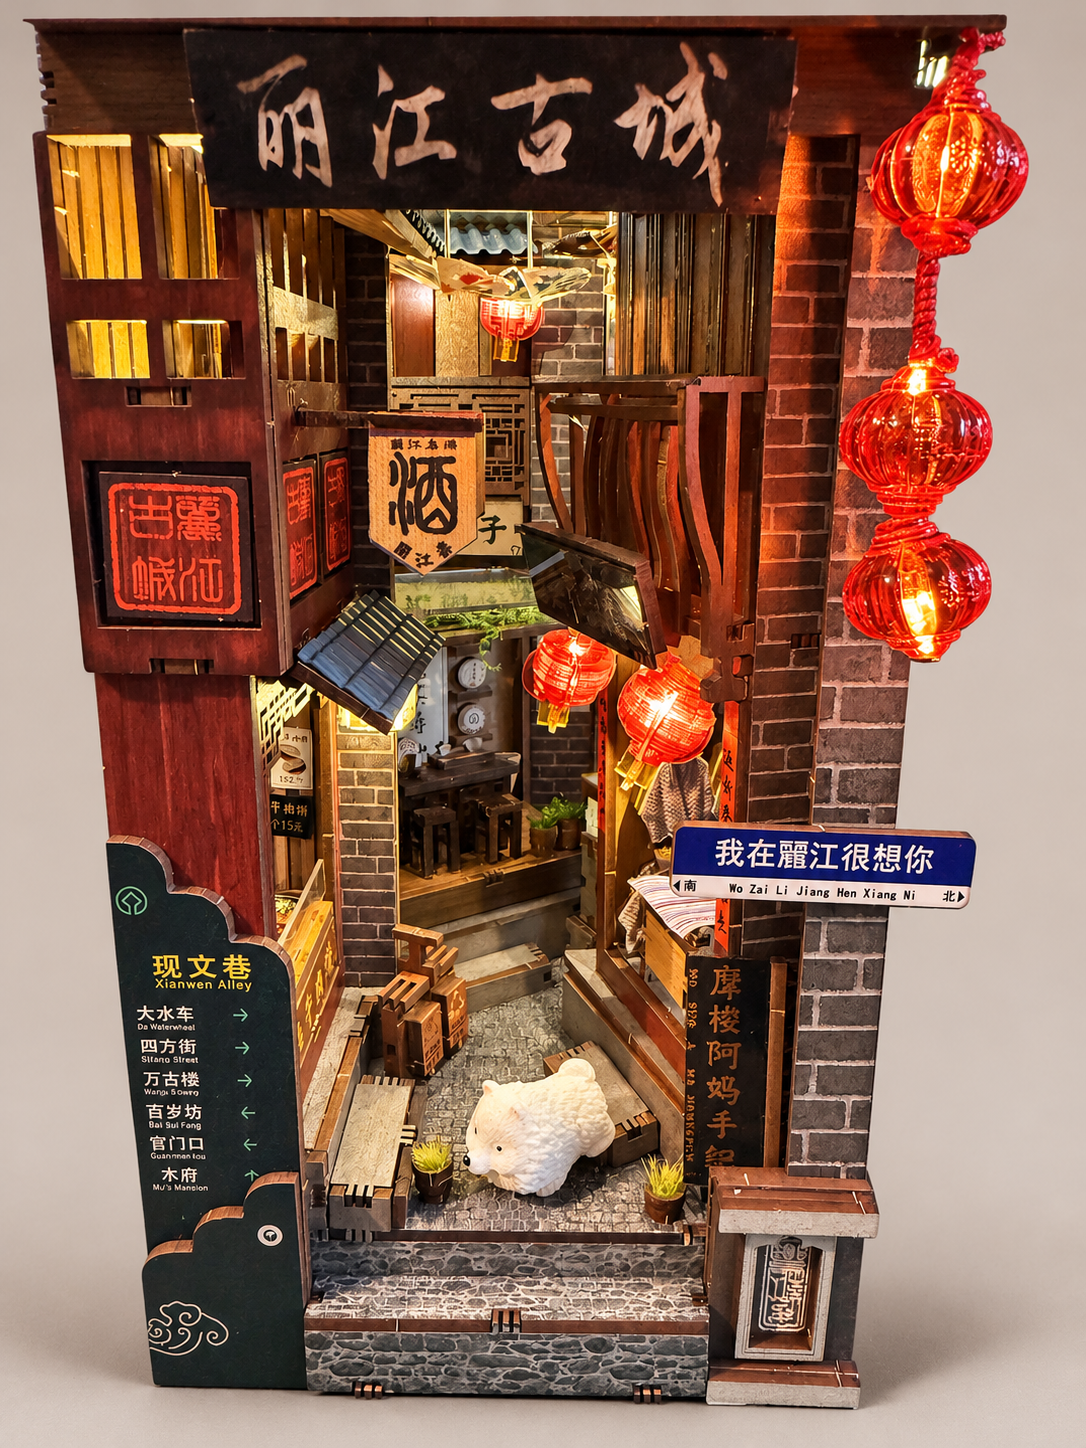
Built & reviewed by David Richards
Introduction
As you may already be aware I was loathe to buying Anavrin kits due to their premium price but having initially built Old Shanghai and awarded it 100% I was bitten and bought another (well a few more than another…shush) Lijiang Ancient Town was a completely different build experience as there were some wood quality issues with splintering when you slotted certain items and it was very difficult. This is an expert build with some very frustrating bits and this is why I lowered my build experience rating as whilst a kit can be advanced it should also be enjoyable.
Summary Table

The Inspiration: Lijiang Dayan Ancient Town, Yunnan

Anavrin explains that the inspiration for this book nook came from its team’s visit to Lijiang Dayan Ancient Town in Yunnan, China. Wandering its narrow cobblestone lanes, the designers were struck by traditional carved wooden balconies, inviting storefronts and red lanterns glowing in the evening. One particularly memorable alley featured colourful umbrellas suspended overhead.
The accompanying photographs in the kit booklet show the old town’s traditional architecture by daylight, lantern-lit streets at night, a colourful canopy of hanging umbrellas, and an atmospheric view over tiled rooftops and narrow lanes.
The designers also recall the sounds of local conversation, the aroma of freshly brewed tea, and shops selling yak-meat specialities associated with the region’s Naxi and Tibetan food traditions. They highlight Dongba pictographic writing, a distinctive part of Naxi cultural heritage, as another inspiration for the model’s decorative details.
According to Anavrin, the miniature draws on these memories through its detailed architecture, glowing lanterns, tea tables, yak-meat displays and traditional inscriptions. This background helps explain why even the smallest signs and ornaments deserve a closer look during the build.
What Is Included in the Box?

There is quite a collection of materials inside the box, from the structural sheets to the tiny finishing touches that give this miniature street its character. There is even a dog, Xiao Xue, who has the considerable advantage of arriving ready-made.
- 13 MDF sheets
- 2 acrylic sheets
- 4 Perspex sheets
- 16 lights with a touch sensor and battery box
- Sticker sheet
- Cloth sheet
- Corrugated roof pieces
- Mirror
- Iron shafts
- 3 lanterns
- Grass
- Xiao Xue, the dog
- 2 crocks
- 16 gaskets
- Rope
- Metal handles
- Vine
- Sanding stick and tweezers
- High-quality instruction manual
The instruction manual is high quality, which is welcome when there is this much to keep track of.
Lighting Test: Check Before You Build

With 16 lights to install, I would strongly recommend testing them before starting the build. Finding a problem while everything is still accessible is considerably more appealing than discovering it after you have built a small Chinese town around the wiring.
The diagram in the manual shows how the lights should be grouped. I would also recommend labelling each light so that you can identify the correct one when it is needed. Did I follow that sensible piece of advice myself? No, of course I did not. Silly me. This is very much a case of learning from my experience.
Build Part 1: The Light Tower and Rear Tea Shop
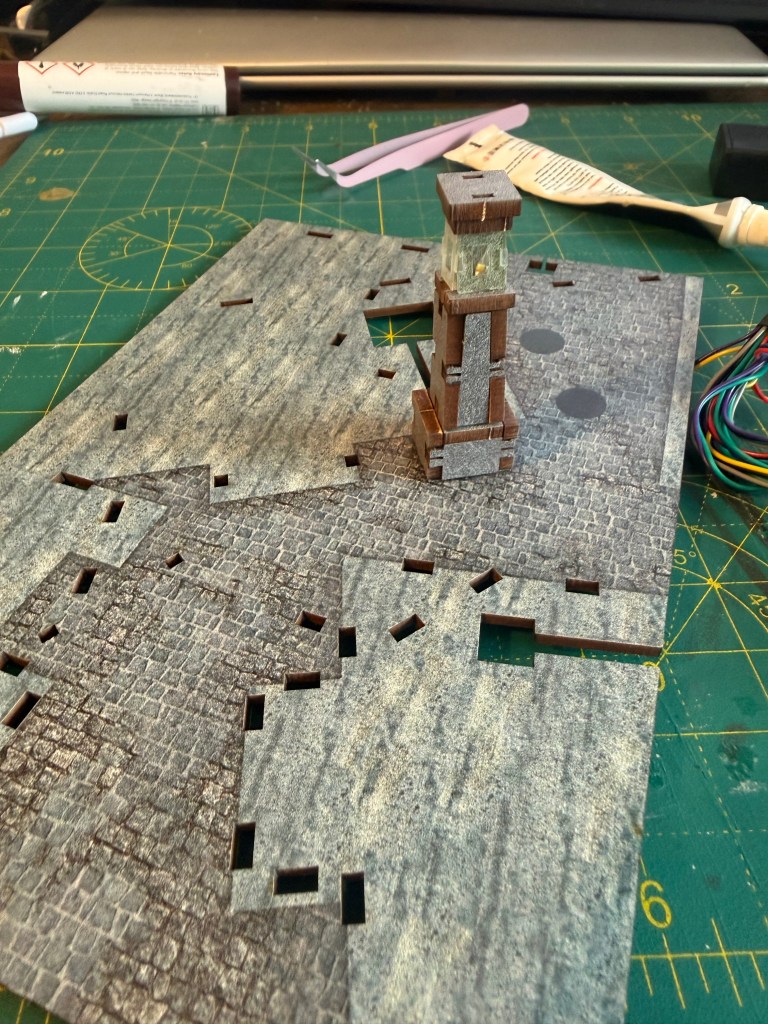

The manual calls the first structure “The Lighthouse”. I suspect something has been lost in translation here, so I am going to call it “The Light Tower”. It seems a more suitable name, unless there is a miniature shipping lane through Lijiang that I have missed.
The first particularly tricky task arrives as early as instruction six: gluing the tiny acrylic side pieces into place to allow the light to shine through. These are fiddly little pieces, and this stage calls for patience and perseverance.
Unfortunately, I have no clever shortcut or handy trick to offer for this part. Sometimes the most honest building advice is simply to take your time, keep going and accept that a few very small pieces can demand a surprisingly large amount of patience.
The Light Tower goes together in three stages, with a single LED at the top. Once assembled, the tower slots into the baseboard.
Next I built the furniture for the rear tea room. This was where I first ran into trouble with the quality of the wood. When I fitted the three stools into the tea room base, the legs splintered and started to break down on all three. That is disappointing on any kit, and especially on one at this price.
I know a lot of Anavrin builders mention how much work goes into details you will barely see once the kit is finished. I quite like that part. I still get the satisfaction of building the furniture, and I know it is there even if nobody else ever spots it. With the furniture in place, I added some vine and a Perspex roof, then fitted the tea house into the base.
Battery Box, Wiring and Mirror

The battery box goes underneath the base. This is where I had to tackle my very own Spaghetti Junction. Some wires feed through the back, while the others clip underneath in two bundles.
Remember my advice about labelling the lights? I only discovered several stages later that I had routed the wrong bundle to the wrong side. That hurt. I had to take a substantial part of the build apart to put it right.
The rear section of the base, next to the tea shop, was fairly straightforward by comparison. This is where I fitted the mirror.
Acrylic Lanterns

Even looking back at the instruction manual to write this brings the pain of this stage back. I had to assemble two lanterns that would eventually hang outside the tailor shop. Each one has 19 acrylic pieces ranging from small to microscopic, with an LED running through it. The wiring was already connected, so I had to build both lanterns with their leads coming out from under the base.
With fingers like sausages, I reckon those two lanterns took me about two hours and quite a lot of swearing. They look all right at normal viewing distance, which is where I recommend you stand.
The lanterns hang beneath a roof above the tea room. Once I fed the wires through the slot and attached them to the roof, the corrugated roof piece went on top. I was less keen on this bit of the design. The roof sits on the light leads, so it does not lie flush.
The First Building on the Left
I started with a food display cabinet that sits at the counter below the shop, complete with miniature yak meat delicacies. Then came another acrylic lantern. This one was rectangular, but it was every bit as tiny and just as painful to assemble.
Next came the cloth flags. The instructions call for a scalloped outline with little points along the edges. I found the cloth too stiff to cut that shape cleanly and eventually settled for a plain shield. Better builders than me may manage it. Looking at the immaculate flags on the front of the manual, I did wonder whether AI had lent a hand. That is only my suspicion.

It was at step 191, while building the yak meat pie shop, that I finally discovered I had sent the wrong bundle of wires down the wrong side. The manual does recommend testing the lights throughout the build. By step 191, I had a fairly good idea why. I had to take a substantial part of the build apart to correct the routing.
I added a refuse bin in front of the shop. It even has English labels for “Recycle” and “Other Waste”. I appreciated knowing which side to put my imaginary pie wrapper in.
The Tailor’s Shop
I started by cutting several Chinese scarves from the same cloth. These were much easier shapes to cut, although a set of precision scissors has still gone on my Christmas list.
The lighting wires feed into the backboard straight away. That left me building the whole shop upside down with only a few centimetres of wire coming out of the base. There is also a canvas chair in the shop. I am still wondering what it is doing there.
Then came two more acrylic LED lanterns. I briefly contemplated a glass of Malbec, despite it being only 10.30 in the morning. I built a second level with a table and chair, and encountered more wood that disintegrated during assembly. Hanging the lanterns was a challenge in itself. Mine are up, although neither is particularly committed to hanging vertically.
The shop sign reads 摩梭阿妈手织, which I have translated in the Chinese signs section below.
The Front and Side Window
I assembled the front of the kit and added the welcome sign. The three front lanterns come pre-assembled, which was a relief. The instructions then ask you to wind a tiny strand of red rope around the wire between them. After a couple of hours of trying, I decided exposed metal wire looked perfectly respectable.
A large Perspex sheet slots into the right-hand wall and gives you another view into the interior.
The Parasols and Touch Switch

If I thought the lanterns were difficult, the parasols were another level. Each has ten acrylic pieces, and getting them to click securely into place was a battle. There are eight to make. I reckon I spent three hours on them.
Each parasol hangs from the underside of the Perspex roof on a metal rod, secured with a 2 mm grommet underneath and another at the top. I could have done with more arms than Ollie the Octopus for that job. The irony is that you cannot see the parasols from the front.
The touch switch was one of the last parts to go in. A protrusion on the sensor bracket pushed the left wall away when I clicked it into place, so I sanded it off. The switch still stops working whenever I fit the back wall. I will give it another try tomorrow.
Chinese Signs and Their Meanings
As we build Anavrin’s Lijiang Ancient Town, the Chinese lettering adds another layer of character to the miniature streetscape. This running guide records the translations and cultural meanings of the signs encountered during the build.
既见君子 — Jì jiàn jūn zǐ

The miniature sign actually reads 既见菌子. It plays on the classical phrase 既见君子 by swapping 君子 (gentleman) for 菌子 (mushrooms). Both are written JUN ZI without tone marks, as on the sign.
Translation: “Now that I have met the gentleman.” A more poetic rendering is “At last, I have met the noble gentleman.”
This classical expression appears in the ancient Chinese Book of Songs (Shijing, 诗经). The word 君子 (jūn zǐ) means a gentleman or a person of noble character, not necessarily an aristocrat. The phrase conveys admiration, affection or the pleasure of meeting someone highly regarded.
觅茶寻山意 — Mì chá xún shān yì


甲辰 孟冬 清風閣
- 甲辰 (Jiǎ Chén) – The Year of the Wood Dragon in the traditional Chinese calendar, corresponding most recently to 2024.
- 孟冬 (Mèng Dōng) – Early winter, traditionally the first month of winter in the lunar calendar.
- 清風閣 (Qīng Fēng Gé) – “Pavilion of the Gentle Breeze” or “Clear Wind Pavilion”.
So the inscription can be interpreted as:
“Early winter of the Wood Dragon year, at the Pavilion of the Gentle Breeze.”
The red stamp underneath imitates a traditional Chinese artist’s seal.
牦牛肉饼 — Máo niú ròu bǐng: Yak Meat Pies

One of the miniature shop signs reads 牦牛肉饼, meaning “yak meat pies” or “yak meat pancakes”. The characters break down as 牦牛 (máo niú), yak; 肉 (ròu), meat; and 饼 (bǐng), a flatbread, pancake or pie.
It is a particularly appropriate detail: Anavrin’s account of its visit to Lijiang specifically mentions yak-meat specialities and their connection with local Naxi and Tibetan-influenced food culture. This small storefront sign helps anchor the miniature in the everyday life and cuisine of the region. A second pair of signs on the food stall repeats 牦牛肉饼 (yak meat pies) and gives the price in two forms: 15元/个 and 每个15元, both meaning 15 yuan each. The illustrated sign also depicts two round filled flatbreads. This consistency between the menu, price signs and the manufacturer’s inspiration story is a charming piece of miniature-world detail.

Red Doorway Decorations — Auspicious Calligraphy
Two red square inscriptions appear on the wooden façade. They resemble traditional Chinese auspicious doorway decorations, associated with wishes for happiness, good fortune and prosperity. The lettering is highly stylised and cannot yet be transcribed with confidence, so a precise character-by-character translation is deliberately withheld.

摩梭阿妈手织 — Mó suō ā mā shǒu zhī: Mosuo Mother’s Handwoven Textiles
Another tiny shop sign reads 摩梭阿妈手织, which translates naturally as “Mosuo Mother’s Handwoven Textiles”. 摩梭 refers to the Mosuo people, 阿妈 means mother, and 手织 means handwoven. The sign even includes a small romanised rendering beneath the characters.
The Mosuo community lives around Lugu Lake on the Yunnan–Sichuan border and is known for its matrilineal family traditions and textile craftsmanship. This miniature sign suggests a shop selling locally handwoven goods, adding another thoughtful regional detail to Anavrin’s Lijiang streetscape.

Final Verdict

The finished Lijiang Ancient Town looks lovely on display, and one of my favourite parts was translating the Chinese signs with Owen, my ChatGPT assistant. Reading the shop signs added another dimension to the build. I especially enjoyed discovering that the yak meat pies were 15 yuan each and that the shop sign was making a mushroom pun.
Would I recommend it? Yes, to a patient, experienced modeller with a steady hand and preferably tiny fingers. The finished scene is attractive, but there were too many frustrating stages, too much wood splintering, and a touch switch I still need to sort out. In my opinion, it does not justify the premium price.
I would love to watch the product designer build this kit. I would pull up a chair, make a coffee and wait for the parasols.
Leave a Reply