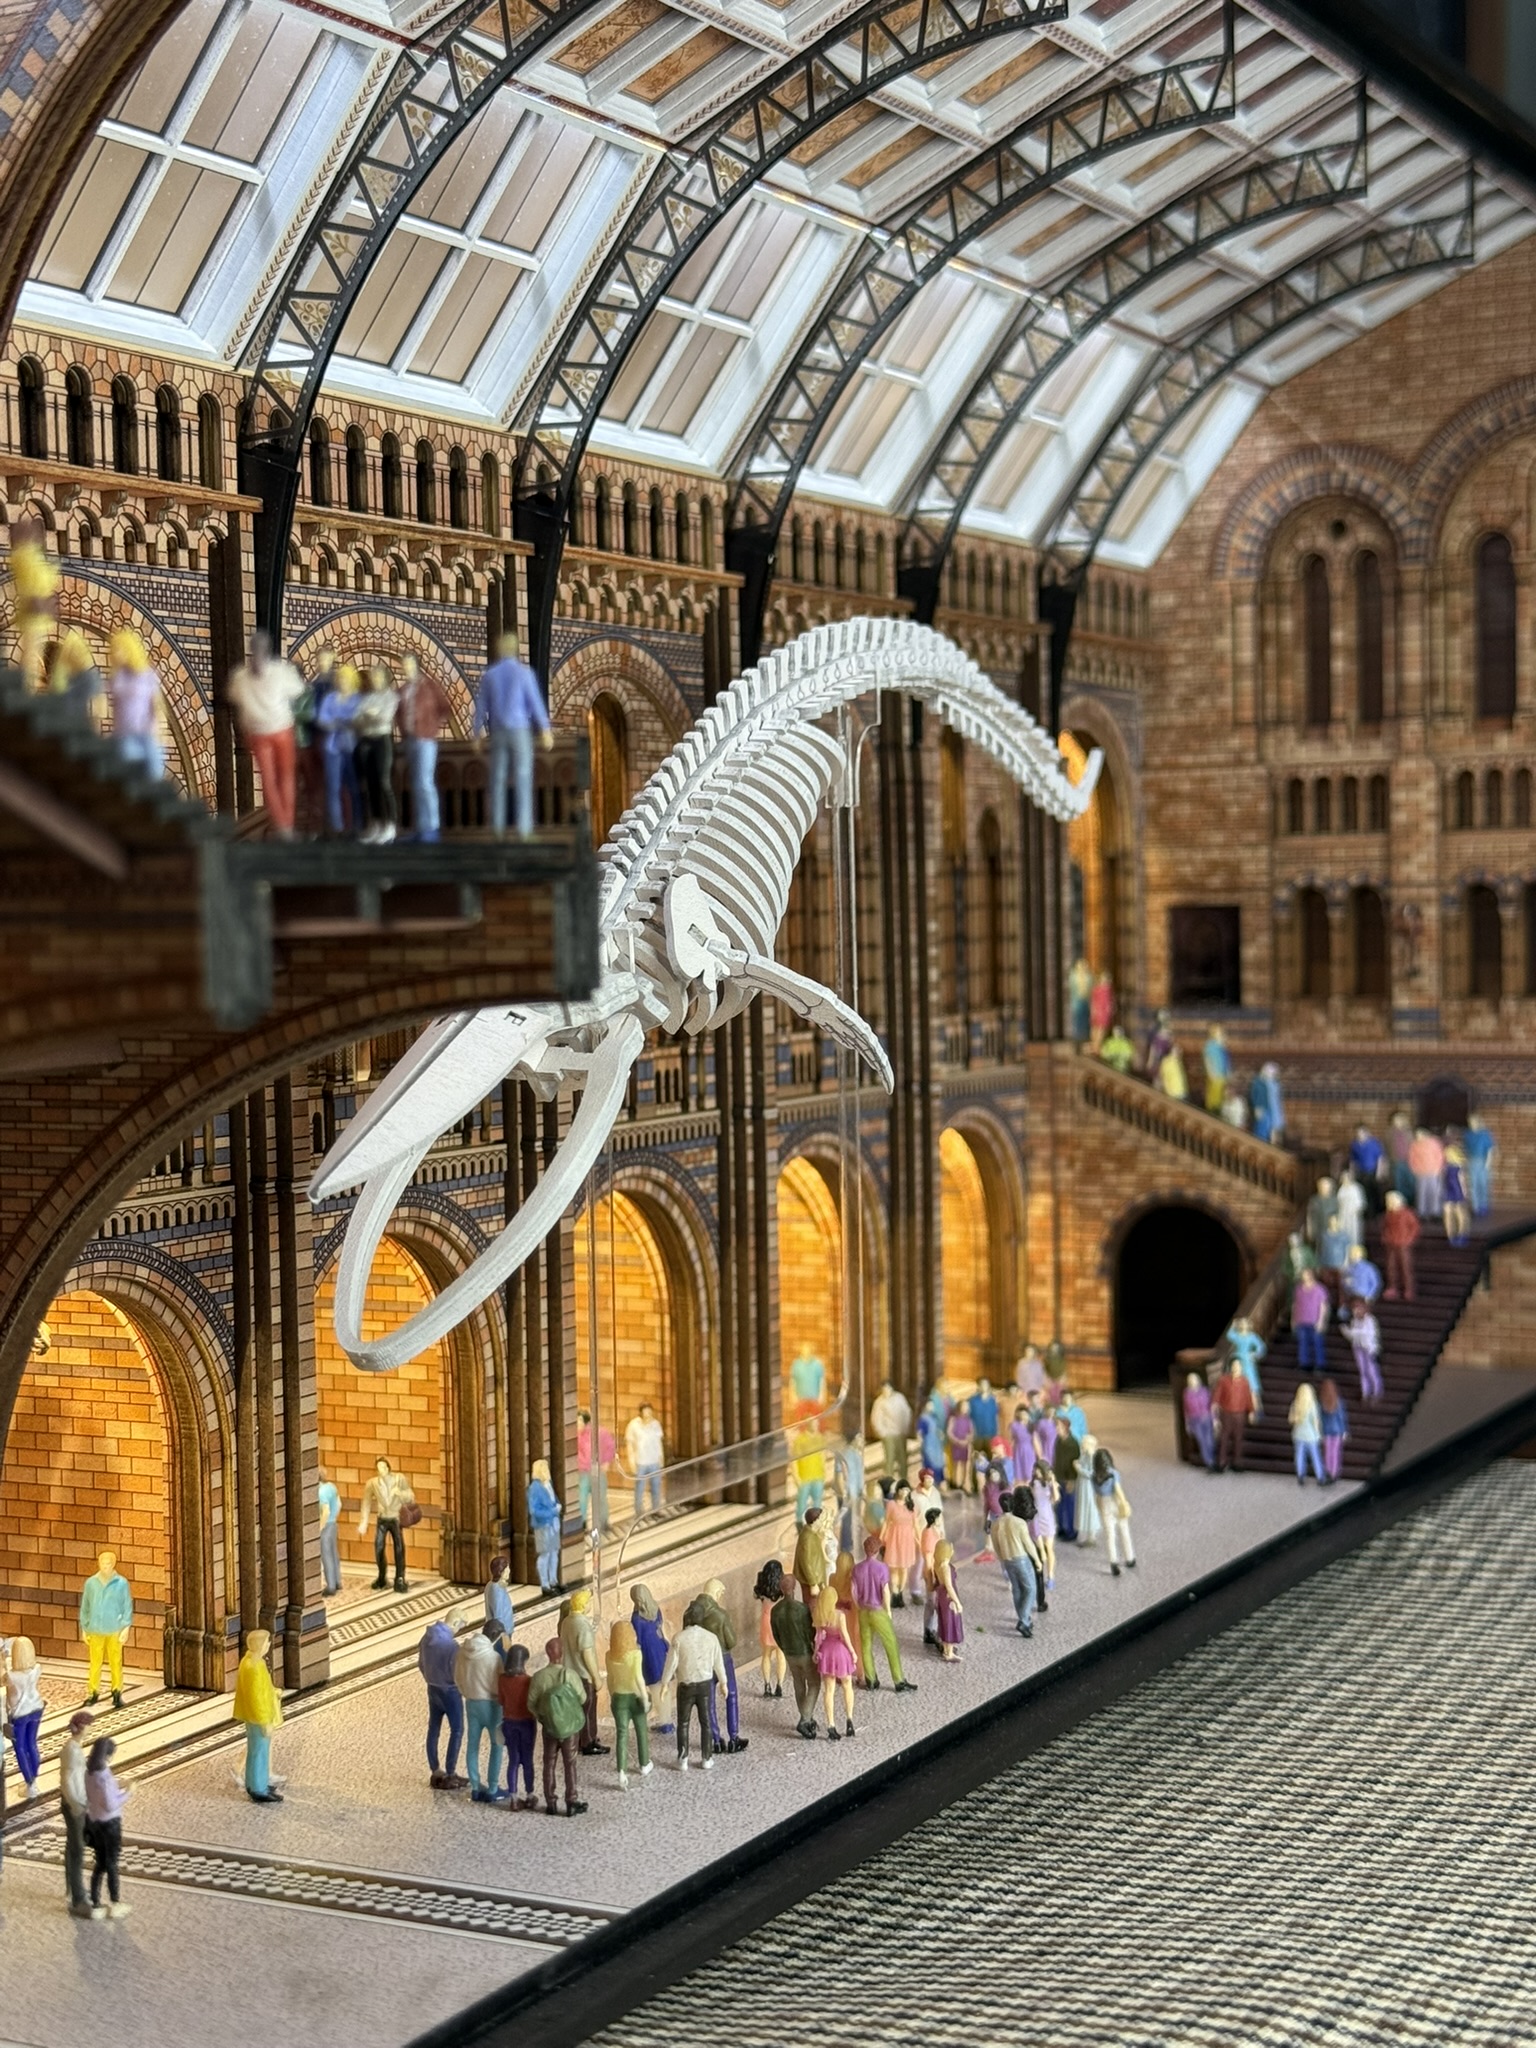
Build as reviewed by Martin Seidler as Build #61 | Classics Series | Scale 1:100 | Overall rating: 92/100
The real building behind the miniature
London’s Natural History Museum is one of those buildings where the architecture deserves almost as much attention as the exhibits. Designed by Alfred Waterhouse, its South Kensington home opened on 18 April 1881. The design combines Romanesque architecture with Gothic Revival influences, elaborate terracotta decoration and details inspired by the natural world. Its great central space, now known as Hintze Hall, brings together soaring arches, galleries, staircases and an extraordinary decorated ceiling. www.nhm.ac.uk
The hall’s famous skeletal centrepiece is Hope, a blue whale, installed there in 2017. The real skeleton measures 25.2 metres long. At 1:100 scale, even a blue whale becomes a reasonably manageable modelling project. Whether its backbone survives your fingers is another question. www.nhm.ac.uk
This is the setting JOOHOUR has chosen for the second kit in its Classics Series, following Titanic Grand Staircase. It is an ambitious subject, and the result asks rather different things of its builder than a conventional book nook.
My 61st build—and a very different experience
I had the privilege of receiving an advance review kit before release. By the time of writing, it had already been on sale for several days.
My previous JOOHOUR build was Space Capsule. Although unusual in its subject, that still felt recognisably connected to the book nook experience. I have Titanic waiting, but have not built it yet.
Museum 1881 was therefore my first encounter with this particular approach, and it was something completely new.
There is a great deal of precise assembly, layered construction, gluing and checking. Individual operations are not necessarily difficult. The challenge is keeping everything square, flat and correctly aligned while several layers gradually become one architectural structure.
With a little exaggeration, it feels like delicate cabinetmaking. The birch plywood even smells pleasantly of wood. My workshop briefly resembled a miniature joinery business, with a surprisingly demanding customer.
What JOOHOUR is trying to achieve
Before writing this review, I asked Lea and Joye to explain the thinking behind the range. At approximately €159 or US$179, this is a substantial purchase, and I wanted to understand its intended audience.
Their answer helped put the whole experience into context.
JOOHOUR describes the Classics Series as a range for modellers seeking detailed, collector-grade architectural scenes, with particular attention to the relationship between buildings and the people using them. The finished appearance takes priority, and each subject determines its own appropriate size and presentation.
According to the team, their museum research included original architectural drawings, photographs taken on site and detailed study of the building’s proportions, terracotta decoration, roof patterns, window grilles and structural junctions. They say they first developed a full-scale digital reconstruction before adapting it into an assembly made from panels, and checked its alignment against the museum’s officially released point-cloud model.
Those are the designers’ descriptions of their process; I have not independently verified their dimensional accuracy. What I can assess is the resulting miniature, and the care invested in its architecture is very apparent.
The team also explained that the range responds to builders asking for something more intricate than stylised, flat scenic kits—particularly builders adding detailed 3D figures who want an equally convincing environment around them.
That makes sense. This kit needs to be judged as an architectural model, with the demands and compromises that follow.
What is in the box?
The package is extensive. My review kit contained:
- Nine MDF boards.
- Fifteen boards of very high-quality birch plywood.
- Three sheets of acrylic parts, providing components for the displays, roof structure, windows and front dust cover.
- Two LED-strip lighting assemblies, with USB power connections and touch controls.
- Two battery boxes, each taking two AA batteries.
- A bag of 100 white moulded plastic visitors in 1:100 scale.
- Three white markers and one black marker for finishing exposed edges.
- The instruction manual.
- Numerous spare parts, including duplicate components for the delicate whale skeleton.


The plywood is a particular pleasure to work with. The printed colours are restrained, which suits the subject, although opening the box does not immediately reveal the finished model’s appeal.
The restrained printing does not immediately communicate how impressive the completed building will be. Much of the appeal emerges as the layers, exhibits and lighting come together.
Instructions and preparation
The instructions in my pre-release kit were excellent overall: clear, easy to navigate and straightforward to follow. There were a few minor errors, which I expect JOOHOUR to address in production copies. I cannot confirm those corrections yet, but none caused a serious problem with the build sequence.
JOOHOUR recommends PVA glue. I used Aleene’s Tacky Glue for the main construction, E8000 for selected jobs, particularly the acrylic display cases, and B7000 to secure the visitors.
This kit uses adhesive as an integral part of its layered architectural construction. Builders accustomed to mostly push-fit book nooks should allow for more bonding and drying stages here. I found that carefully glued assemblies helped keep the broad surfaces flat, the layers aligned and the finished structure precise.
The important thing is controlled application. Thin, even layers of adhesive work best: excess glue between stacked components can increase the assembled thickness and affect later fitting.
Clamps are extremely useful, and drying time becomes part of the assembly plan. At some stages I had deployed practically the whole army visible in my photographs. While one section dried, I worked on another—or painted more visitors.

Building the exhibits and whale
The build begins with smaller museum exhibits and their acrylic display cases, followed by the whale skeleton.
The skeleton is delicate and rewards patient handling. This was the one occasion when I needed a spare: a backbone component broke, and the supplied duplicate solved the problem immediately.
There are plenty of backup parts elsewhere too. I hardly needed them, but their presence is reassuring in a kit with so many fine components.


The acrylic display pieces aligned well and needed adhesive to secure the completed cabinets. A slightly tighter fit would have made these small assemblies easier to handle during bonding, but I had no difficulty getting the parts to match.
Walls, layers and the importance of being square
After the exhibits, the main structure begins with the base and ground floor.
Much of the architecture uses an MDF structural component faced and reinforced with printed birch plywood. Assemblies commonly involve around five layers, with some appearing to reach seven.
This creates convincing wall thickness, recessed details and architectural depth. It also means that a small alignment error can travel through several layers and become rather more interesting later.
My routine was simple: dry-fit, establish a reliable reference edge, check the right angles, apply a thin layer of glue, clamp and allow the joint to set.
The individual operations are manageable. Understanding why that sequence matters is where experience helps.
The main wooden components fitted exceptionally well. Tabs and slots generally came together cleanly when the assemblies remained square and glue thickness was controlled. Precision is one of the strongest aspects of this kit.


Exceptionally thoughtful laser cutting
One engineering detail deserves particular praise: the positioning of the tiny retaining bridges that hold the laser-cut parts in their sheets.
On many kits, removing a part leaves a small nib on a visible edge. You then have to file or sand it away, which can interrupt the otherwise uniform laser-cut surface. Around a decorative arch, that little patch can be surprisingly noticeable.
Here, JOOHOUR has clearly thought about where those attachment points belong. On virtually all the parts—and on all the birch-plywood parts in my build—the remaining nibs sit in locations that become hidden during assembly. The visible contours, arches and exposed edges are left intact.
As a result, I hardly needed to file away any retaining nibs. The visible MDF and birch-plywood edges retained their continuous, uniform laser-cut finish, without little sanded patches interrupting the surface.
I absolutely loved this. It saves repetitive preparation work and protects the final appearance at the same time. Someone has considered not only how to cut the parts out of a sheet, but also what the builder will see after assembling them.
For an engineer, this is deeply satisfying. We are easily entertained, provided the tolerances are good.
Full credit to JOOHOUR for exceptionally smart laser-cutting design. It is an easily overlooked detail in a finished photograph, but a real pleasure throughout the build.
Edges are part of the architecture
The absence of visible retaining nibs does not eliminate edge finishing. The supplied markers are there for a reason: colouring an intact edge and filing away a protruding attachment point are two different jobs.
I followed the edge-finishing instructions, but also coloured exposed birch-plywood edges with furniture markers. A walnut shade brought them closer to the printed terracotta tones and made the laminated construction less conspicuous.
For the staircase edges, I preferred dark brown to the supplied black because it blended better with the printed steps.
These are small jobs repeated many times. Their cumulative effect is substantial. An untreated edge can announce “plywood sandwich” rather loudly in the middle of an otherwise convincing Victorian interior.
The roof windows needed particularly thorough white edge painting. I applied approximately three or four coats until the coverage was properly opaque. Time well spent.
Staircases, galleries and roof
The staircases are assembled step by step. Literally.
It is repetitive work, but the finished stairs contribute enormously to the scene. Once people begin walking up and down them, their importance becomes even clearer.
The upper galleries continue the same layered construction, followed by the columns, side structures and roof supports.
The roof is particularly satisfying. Acrylic arches form part of its supporting structure, while the decorated roof sections use layered assemblies combining MDF, birch plywood and acrylic. Some involve five layers: two MDF, one birch and two acrylic.
Once again, careful alignment pays off. This is where all those earlier checks of squareness become visible in the finished structure.
Towards the end, the rear support for the upper lighting is installed, followed by the controls and enclosing panels. A removable rear panel provides access to the battery and USB compartment.
The large acrylic front dust cover slides through the slot on the left and is secured by the locating arrangement on the right. It works well and gives the finished interior useful protection.


Lighting: beautiful results, awkward power arrangements
There are two lighting circuits. One illuminates the lower interior; the other lights the upper and rear windows.
Both offer warm, cool and combined white light. Having these choices separately is very effective here. Warm lighting inside the hall, paired with cooler or mixed light through the windows, creates a convincing contrast and brings out the terracotta colours beautifully.
The lighting itself contributes enormously to the finished result.
The power arrangement is less successful.
Each supplied battery box takes two AA batteries, providing a nominal 3V, while USB supplies 5V. In my build, the lights were noticeably dimmer on batteries.
I asked JOOHOUR why they had not chosen three-cell, 4.5V battery boxes, which would bring the nominal voltage closer to USB. Their reply emphasised that USB is the recommended power source, with batteries intended as an alternative because they will not power the lighting for long. They did not give a specific technical explanation for choosing two cells.
A three-cell arrangement seems worth investigating, although its suitability would need confirmation for the supplied lighting circuit.
JOOHOUR also said they are considering improvements to their lighting system, including USB-C and rechargeable solutions. They raised lithium-battery transport and compliance requirements as a complication for products with built-in batteries. That explains a concern about rechargeables; it does not explain the particular choice of two AA cells.
For a collector’s display likely to remain in one place, USB is a sensible primary supply. I would nevertheless prefer the backup battery option to deliver a more comparable result.
My USB-C conversion
The two outgoing USB leads also felt unnecessarily awkward to me.
I removed their plugs, combined the two lighting feeds and connected them to a single USB-C power socket mounted at the rear, using the existing cable-exit location.
The result is neat and convenient: one accessible socket and one supply cable.
This was a practical modification to my model, rather than the supplied arrangement, and it involves electrical work. Anyone considering the same change needs to understand the connections and preserve the correct supply requirements.
An integrated USB-C socket would be a welcome improvement in a future version.
Replacing the visitors: approximately 165 colourful fleas
My other major customisation was replacing the supplied white plastic visitors with my own resin-printed figures.
The included visitors are usable, particularly if you like the restrained architectural-model appearance shown in JOOHOUR’s official photographs. They need some trimming of moulding remnants, and their detail is fairly basic. My resin prints offered a noticeable improvement.
I initially designed some figures myself, spending Meshy credits before remembering that suitable downloadable models already existed.
An excellent example of an engineer enthusiastically solving a problem before checking whether it had already been solved.
I found around 30–40 different characters and printed them in bulk. At 1:100 scale, most adult figures are roughly 17–18mm tall, so large batches are practical. I printed several hundred while deciding how many I would need.
Approximately 165 visitors eventually entered the museum.
I painted them with acrylic markers, usually beginning with skin tones and then adding clothing and hair. The painting alone took at least five hours. A consistently professional finish would take considerably longer.
Some turned out rather well. Others would struggle at a miniature portrait competition. The better ones received prominent positions at the front; the less fortunate were offered excellent views from the rear.
In a group photograph, they resemble an army of colourful fleas. Inside the hall, they work surprisingly well.


Something was missing: mobile phones
While arranging the figures, I realised something was wrong.
They were looking at the museum.
A charming idea, but insufficiently representative of modern public behaviour.
Where were the selfies? The group photographs? The visitors inspecting a small screen while standing beneath one of the most extraordinary skeletons on Earth?


I returned to Meshy and created six different phone-using characters: people taking photographs, posing for pictures and attending to their screens. I printed them in quantity and used around 30.
That allowed me to create recognisable little scenes: friends posing for a group photograph, someone photographing an exhibit, and people apparently checking whether the museum experience had received sufficient approval online.
Suddenly the crowd felt contemporary.


Bringing the hall to life
I installed visitors in the harder-to-reach rear areas before securing the whale skeleton. This made placement on both levels considerably easier.
Then came the enjoyable part: arranging people in believable groups.
Couples, families, people gathering around displays, visitors walking upstairs and downstairs, and small groups pausing in places where people would naturally stop. On the upper left, there is even a woman with twins.
This was one of the most entertaining parts of the whole project.
The empty architecture had felt impressive but rather cool and sterile. Exhibits gave it purpose. People gave it life.
The structure remains the main attraction, but the visitors explain its scale and turn it into a place where something is happening.


When the finished model finally reveals itself
I did not fall in love with this kit immediately.
For much of the build, I admired its engineering while still wondering how strongly I liked the subject. Restrained colours and repeated structural assemblies do not provide the instant satisfaction of a brightly decorated little shop.
Even near completion, I still had doubts.
Then the exhibits went in. The visitors arrived. I switched on warm light in the interior and cooler light at the windows, and started taking photographs.
That was when the whole thing came together.
The arches, terracotta surfaces, galleries, staircases and roof acquired the depth they needed. The miniature began to communicate the beauty of the original building.
This is a model whose appeal develops slowly. Mine waited until it was almost fully occupied before making its case.
Price and value: a substantial kit for a substantial price
At approximately €159 in Europe or US$179 on Amazon US at the time of this review, Museum 1881 is certainly not a cheap kit.
It sits in the price territory of premium or limited-series releases. Depending on the brands and offers you normally buy, that can mean spending roughly as much as on three or four regular book nooks.
But the amount of kit in the box also needs to be considered.
With nine MDF boards, fifteen birch-plywood boards and three acrylic sheets, this is a substantial package. The extensive layered architecture, fine laser work and sheer amount of material and processing put it, in my judgement, closer to three or four conventional book nook projects than to one typical small scene.
That is a practical comparison of scope, rather than a measured equivalence in dimensions or build time. Nevertheless, it makes the price much easier to understand.
The quality of the birch plywood, the carefully planned laser cutting and the depth created by the many architectural layers all contribute to the value. So does the design work needed to turn this particular building into a convincing model.
It remains a considered purchase. But having worked through the contents, I consider the price reasonable for the quantity and quality provided. You receive a great deal of model for your money.


Difficulty and customisation potential
I would place this kit at advanced intermediate to experienced modeller level.
It requires patience, controlled gluing, accurate alignment and an understanding of how small errors accumulate. A person with good woodworking or furniture-making skills might manage it as a first miniature kit, but a complete beginner expecting forgiving, largely push-fit assembly could find it frustrating.
The assembly method also involves a reasonable trade-off. More obvious tabs and slots might make construction easier, but they could interrupt the architectural surfaces. The layered, bonded construction helps preserve the finished appearance.
Structural customisation potential is relatively limited. This is a specific building, and much of its appeal depends on retaining its proportions and architectural relationships.
Visitors, their arrangement, edge finishing and the power connection offer useful opportunities for personalisation. I would rate the overall customisation potential at 4/10, separately from the quality of the kit.
My ratings
| Category | Gold stars | Score | Comments |
|---|---|---|---|
| Materials and component quality | ⭐⭐⭐⭐⭐⭐⭐⭐ + ½⭐ | 8.5/10 | Excellent birch plywood, precise wooden parts and concealed retaining points; the supplied visitors and fit of the acrylic display joints leave room for improvement. |
| Design and architectural presentation | ⭐⭐⭐⭐⭐⭐⭐⭐⭐ | 9/10 | Beautiful architectural depth, convincing layered construction and thoughtful laser cutting; the rear power arrangement could be simpler. |
| Instructions | ⭐⭐⭐⭐⭐⭐⭐⭐⭐ + ½⭐ | 9.5/10 | Clear and easy to follow, with a few minor errors in my pre-release copy. |
| Lighting and electronics | ⭐⭐⭐⭐⭐⭐⭐⭐ | 8/10 | Excellent atmospheric possibilities; dimmer battery operation and the two outgoing USB leads are the main weaknesses. |
| Customisation potential | ⭐⭐⭐⭐ | 4/10 | Mainly visitors, staging, finishing and power connections; assessed separately from product quality. |
| Difficulty | — | Advanced intermediate / experienced | Careful bonding, alignment, clamping and patience are essential. |
| Overall verdict | — | 92/100 | A distinctive architectural display with an exceptional finished presence and some practical compromises. |
The overall score is my judgement of the complete experience and finished result, rather than an arithmetic average. In particular, limited customisation does not make a faithful architectural model a poor product.
Would I recommend it?
Yes—to the right builder.
This is a strong choice for architecture enthusiasts, admirers of London’s Natural History Museum, collectors of architectural miniatures and experienced builders seeking a more demanding project.
At approximately €159 or US$179, it needs to be a subject you actually want to spend time with. I would be more cautious about recommending it to someone seeking an easy, colourful weekend book nook with lots of decorative effects and opportunities to rearrange the structure.
JOOHOUR has created something distinctive. The materials, architectural treatment and precision of the main components are impressive. The carefully positioned laser-cut retaining points are a particularly thoughtful piece of engineering, preserving clean visible edges while saving the builder unnecessary filing. The assembly rewards careful bonding and patience, while the power arrangement remains the clearest opportunity for improvement.
But once the lighting is on and the hall is populated, the finished result is beautiful.
Build number 61 made me work for it. It also reminded me that, after 60 previous builds, there are still entirely new experiences waiting in a box and approximately 165 very small people waiting to be painted.
Leave a Reply