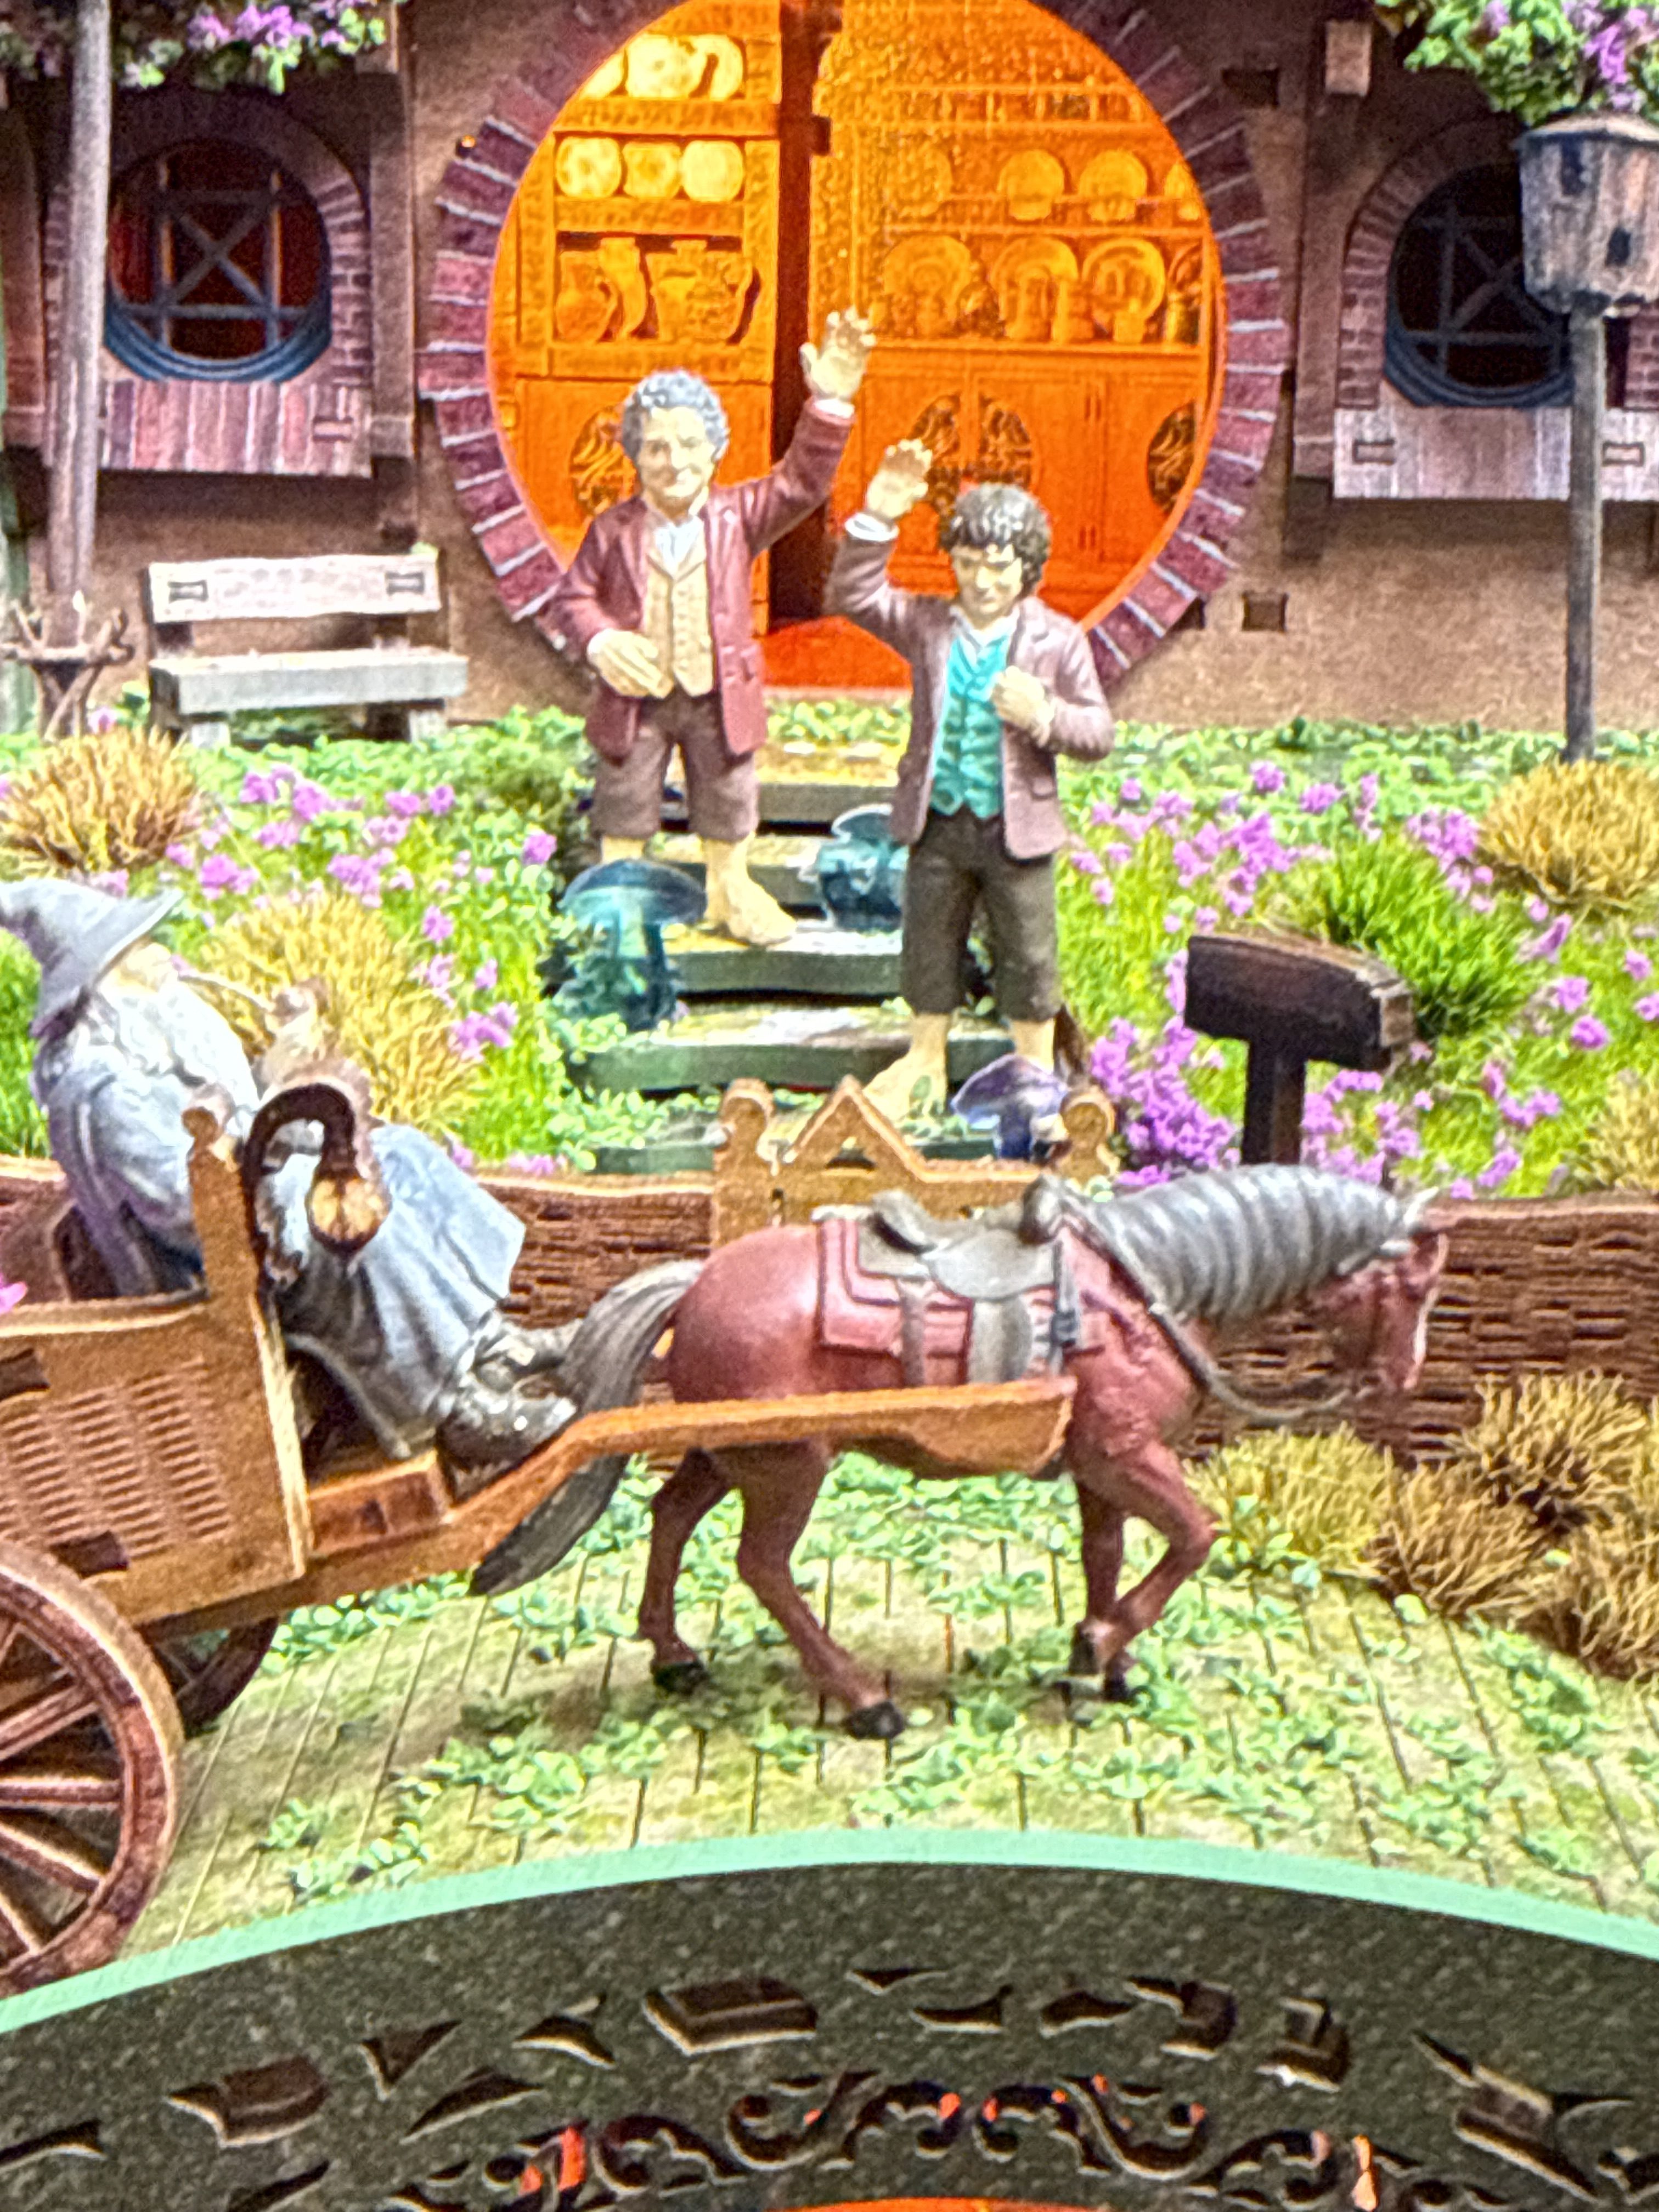
A practical introduction from an engineer with several weeks of experience
There comes a point in building book nooks when you look at a lovely little room and think: somebody ought to live here.
Unfortunately, the somebody provided with the kit may be a flat piece of acrylic. Perfectly respectable from the front, considerably less convincing from the side. Rather like a politician’s election promise.
This is how I became interested in printing my own miniature characters. I wanted people, animals and accessories that suited my scenes, in the right size and preferably with all their limbs in the correct places.
I am an engineer, so my response was predictable: read things on the internet, compare equipment, justify the investment and acquire another machine. Several weeks of practical experimenting later, I can report that resin printing is quite manageable. There are simply a few more stages than “press Print and receive Claude Monet”.
If you are curious but have never met an STL file, this is for you. You can take part without owning a printer, an airbrush or a second home in which to store the equipment.


First decide how much of the hobby you actually want
You have three perfectly sensible choices. Buy a painted figure and put it in the scene. Buy an unpainted printed figure and finish it yourself. Or get involved in designing and printing your own.
None of these is cheating. We do not normally insist that someone buying a book nook must first grow the tree.
For a few characters, buying unpainted prints is an excellent starting point. Somebody else deals with the machinery and liquid resin; you get the pleasant part of deciding whether the gentleman’s trousers should be brown or a regrettable shade of purple.
For budgeting, allow roughly €5–7 for a small character around 35–40 mm tall, €8–12 for a typical 65–80 mm book nook adult, and €20–30 for a larger 1:12 figure. These are indicative starting budgets for ordinary unpainted catalogue prints, not universal market prices or quotations. Elaborate sculpts, accessories and custom designs can cost more; delivery is additional. Very small background people sold in packs can be much cheaper per person.
Check whether the listing is for a physical print or a digital file. Buying an STL is rather like buying a knitting pattern: useful, but the cardigan will not arrive on Tuesday.
Two kinds of printer and one important difference
A filament printer melts plastic from a spool and lays it down through a nozzle. Imagine a very disciplined piping bag, operated by a computer that never gets bored. This is often called FDM or FFF printing.
It is useful for scenery, furniture, structures and practical objects. With the right setup it can make figures too, but at miniature scale its layers can be rather more visible than we would like.
A resin printer uses light to harden liquid resin, a thin layer at a time. For small faces, fingers, coat buttons and animals, it usually gives the finer detail and smoother finish. That is why I chose resin for my characters.
My printer is an Elegoo Saturn 4 16K. The number sounds impressive, and undoubtedly helps with selling printers. It does not, however, give the machine the ability to correct a badly designed nose.


Before printing somebody you need a digital somebody
You can download an existing model from places such as Printables, Thingiverse, Cults or MyMiniFactory. Some files are free; others are paid. Check the individual licence, particularly if you intend to sell prints. “Available on the internet” is a location, not a commercial licence.
You can also create your own. Traditional modelling software gives you detailed control, but AI tools such as Meshy and Tripo have made the first steps much more accessible. You describe a character, provide a suitable reference picture, or combine the two, then inspect what the software produces.
For example: “An elderly gentleman in Victorian clothing, sitting on a chair and reading a book, full body, suitable for a small resin miniature.”
It is sensible to start with one person. Ask for a group and you may receive several people joined together in a permanent expression of community spirit. Charming as sculpture; inconvenient if you want one of them upstairs.
Rotate the model and look at it from all sides. Count the fingers, examine the feet and make sure a walking stick has not become part of the gentleman’s leg. AI is helpful, but it has not attended anatomy classes with quite the diligence one might hope.
Also, a coloured preview is not a promise of a coloured print. The printer reproduces the shape in the colour of the resin. The fine jacket and rosy cheeks on the screen are usually digital decoration. You will be supplying those later.


What the free accounts actually give you
Both Meshy and Tripo let you experiment without immediately reaching for your bank card. Their free plans have limits on credits, model versions and downloads. “I have generated it” and “I can download it for printing” are not always the same achievement.
At the time of writing, Meshy’s specific Free-plan guide lists 100 monthly credits and up to ten downloads of untextured Meshy 6 Lite models. Other versions and features need a paid plan for export. Meshy Pro is listed at US$20 with monthly billing and 1,000 credits.
Tripo lists 200 monthly credits on Free. Its Pro option with monthly billing is US$20 with 3,000 credits and broader export options. Credits do not translate neatly into finished characters: different operations use different amounts, and the first attempt may have a hand where you had hoped for a pocket.
For occasional experiments, start free. For regular designing, a modest paid plan can be useful. The expensive professional tiers are not necessary because your café needs a waitress.
There is one dull but useful point: check commercial rights before selling. Meshy Free outputs require attribution under its stated licence. Tripo’s official pages conflict about Free commercial use, so do not assume that a free model can be sold. Paid tools also do not supply permission to sell somebody else’s protected fictional character. The source notes explain the current plan-page discrepancies without making everyone read a licensing seminar halfway through a hobby article.
Check whether the gentleman fits through the door
This is called scale. Fortunately, it requires division rather than advanced mathematics.
A real person 1,750 mm tall would be approximately 146 mm at 1:12, 73 mm at 1:24, 36 mm at 1:48 or 17.5 mm at 1:100. These heights are from feet to the top of the head, before adding a hat or a base.
Measure your actual scene as well. Book nook furniture does not always obey one consistent scale. A perfectly proportioned man can still look foolish if his chair appears to have come from a primary school.
Remember that reducing the figure also reduces the fingers, spectacles and ankles. At some point these need thickening or simplifying. The printer is good, but it cannot negotiate with physics.
The slicer is the translator
The digital model, often an STL file, goes into a program called a slicer. Examples for resin printing include CHITUBOX and Lychee, provided the particular printer is supported.
The slicer sets the size, positions the model, adds temporary supports and prepares the thin layers that the printer will expose. It is rather like turning a recipe into instructions for an extremely obedient cook. Wrong instructions still produce the wrong dinner, but with remarkable consistency.
Supports are little bits of scaffolding. A hand or the underside of a book needs something to hold it while the layers are forming. We remove the scaffolding afterwards, preferably leaving the fingers on the person.
Automatic supports are useful, but worth checking. Supports on the back of a coat are usually less troublesome than supports across the nose.


Then the printer gets on with it
A print can take several hours. On this type of resin printer, several figures of similar height can often share a plate without taking several times as long. A little company is therefore quite economical, at least until everybody needs washing and tidying individually.
Once a design and its settings are proven, repeating it is fairly straightforward. The initial learning involves finding suitable settings, arranging supports and discovering which fine detail was unnecessarily ambitious.
My experience so far is that regular use makes an enormous difference. It is much like a sewing machine or a complicated coffee machine: use it often and the routine becomes familiar. Bring it out once every few months and the first part of the session is spent reconstructing the relationship.
For an occasional two-person scene, buying prints can be much more sensible than maintaining a small production department in the spare room.
The printer has finished but the figure has not
A fresh resin print needs washing to remove the liquid resin left on it, usually with isopropyl alcohol, commonly called IPA. This is where the washing station earns its place on the workbench.
The supports are carefully removed, the contact points checked, and the model allowed to dry. A common approach is to remove supports after washing and before final UV curing, while they are easier to cut. The exact order can vary with the resin and the model, so follow the manufacturer’s advice.
The figure then gets its final UV cure. Think of the printer as forming the object and the curing station as completing the material’s specified hardening. More UV is not automatically better; use the recommendations for the resin and equipment.
Small figures are often printed solid. Hollow models need proper openings and access for internal cleaning and curing. Trapping liquid resin inside is a future problem carefully packaged as a present success.
There are a few workshop rules: good ventilation, suitable gloves and eye protection when handling uncured resin, and care with flammable IPA. Keep resin and cleaning liquids away from children and pets, and collect contaminated liquids for proper disposal, including water used with water-washable resin. It is ordinary chemical-handling discipline. The washing station belongs in a suitable work area; it is not another kitchen appliance.
If you buy a properly prepared print, the washing and final curing should already be done. Your job starts with any small remaining support marks. Trim or sand these carefully, controlling and collecting any dust. You do not need to purchase the washing station in sympathy.


Painting is where it becomes your character
Now we reach the part that makes the biggest visual difference, and the part people sometimes worry about unnecessarily.
A grey figure fresh from the workshop can look rather unpromising. Add skin, hair, clothes and shoes, and suddenly it belongs in the room. You do not need to become a professional miniature painter before being allowed to enjoy this.
Start with a simple figure and a modest ambition: neat main colours that look convincing inside the scene. Most book nook inhabitants are viewed through a doorway under little LEDs. They are not being examined by a committee with magnifying glasses, unless you have invited particularly difficult friends.
If you already enjoy crafting, you will recognise much of the work: choosing colours, controlling how much paint goes on and letting one layer dry before disturbing it. A steady hand helps; patience and practice help too. An expensive box of paints does not confer either, unfortunately.
Acrylic markers are a perfectly respectable starting point
For many simple book nook figures, acrylic markers are enough for a pleasing result. Skin, hair, a jacket, trousers, shoes: these can be approached as small areas to colour, rather than as a painting examination.
Choose a tip that suits the area. A fine or brush tip is useful, and a small regular brush can reach places the marker cannot. Put the first bit of paint on a scrap surface if the marker has an enthusiasm for delivering too much at once. A flood of brown is helpful on a fence, less so on somebody’s face.
Use light applications and let them dry. You can add another coat, correct a boundary or change a colour. There is no need to settle the gentleman’s entire wardrobe in one heroic operation.
At small scales, keep faces simple. A little skin colour, hair and suggestion of shadow can be quite effective. Two ambitious dots intended as eyes can make an otherwise calm person look as though they have just seen the electricity bill.
Markers vary, and some work better on a particular resin surface than others. Try the combination on a spare print or an inconspicuous area first. If you enjoy the result and want more control, a few model acrylic paints and a good pointed brush are the natural next step.


Primer is helpful rather than an entrance examination
Primer is the thin first coating that helps paint grip and gives it a consistent starting colour. It generally makes painting easier and adhesion more reliable. I recommend it, particularly for figures that will be handled or paints that are reluctant to cover.
But I have also painted directly onto properly cleaned and fully cured resin. In my experience this can work, sometimes with more thin coats to obtain decent coverage. Whether it works well depends on the resin, surface and paint or marker.
There is an important distinction here: extra coats can improve coverage, but they do not necessarily cure poor adhesion. If the paint beads up, rubs off easily or refuses to behave, adding five more layers is merely increasing the size of the disagreement. Try a suitable primer.
You can buy primer in an aerosol, use a brush-on miniature primer, or apply it with an airbrush. A beginner with one figure does not need an airbrush and compressor to join the proceedings. A little brush-on primer is a perfectly reasonable introduction.
Apply thin coats and follow the product’s drying instructions. The aim is to give the paint something to hold onto, not put the character into a winter overcoat. When spraying primer or paint, use suitable ventilation and protection for the product; a spray booth must be appropriate for what you spray.

The extras can wait until you actually want them
Once the basic colours are in place, you can stop. A neatly painted character is already a considerable improvement on an empty chair.
If you want more depth, a wash adds a little darker colour in folds and recesses. Drybrushing catches raised details with a nearly dry brush and a lighter colour. These are useful techniques rather than secret qualifications. Practice on a spare figure before introducing them to your favourite resident.
An airbrush is good for primer, base coats and smooth transitions. It also introduces another piece of equipment to clean. I have one, and it has its uses; a small paintbrush remains entirely capable of giving somebody brown shoes.
Metallics, leather effects, rust and other special paints can improve particular details. Buy them when a project gives you a reason. Otherwise it is surprisingly easy to acquire an excellent collection of bottles and a much smaller collection of finished figures.
Varnish is optional too. It can protect the paint and adjust the shine: matt often suits clothing, satin can suit selected surfaces, and gloss is useful where you actually want shine. Let the paint dry, test compatibility and apply thinly. Varnish cannot rescue paint that never adhered properly, nor make a delicate resin wrist suitable for heavy industrial service.
What are you paying for when you buy a print
The resin in a small figure can cost only a few tens of cents. Naturally, this encourages the engineer to calculate that the entire operation should be almost free.
Then we remember supports, cleaning liquid, gloves, equipment, failed attempts, preparation time and packaging. Also the small administrative task of getting the correct person into the correct box and sending them to the correct country.
That is why a figure priced at €8–12 is not simply a few cents of plastic with an ambitious personality. You are buying the usable result, including somebody having made sure it prints properly.
For a regular user, owning the equipment offers freedom and can spread those costs over many projects. For the occasional builder, buying a few unpainted figures and colouring them at home can give most of the creative satisfaction with considerably less maintenance.
You can become interested in the printer later. There is no shortage of equipment manufacturers willing to assist with that decision.
Put somebody in the room
My suggestion is to begin with one sturdy figure, a few suitable acrylic markers or paints, and the scene you already want to improve. Try primer if it helps your chosen combination. Add sophisticated shadows, varnish and expensive machinery when you find yourself wanting them.
The whole process is learnable. Designing and printing become a routine with practice; painting can begin very simply and develop as far as your interest takes it.
I have worked with aircraft engines, so I am reasonably comfortable saying that this is not rocket science. It is, however, another hobby in which a supposedly simple decision can leave you with a workbench full of equipment.
The compensation is a small person standing exactly where you wanted them, wearing the clothes you chose, in a scene that now feels like yours.
For me, that is a rather good result from a few weeks of reading the internet and arguing politely with a machine.


Leave a Reply