Built and reviewed by Ian Scott Horst
Ian is the administrator of the Wooden Asia Facebook group for fans of Chinese, Japanese, Vietnamese and other Asian-themed DIY kits.
Summary Table

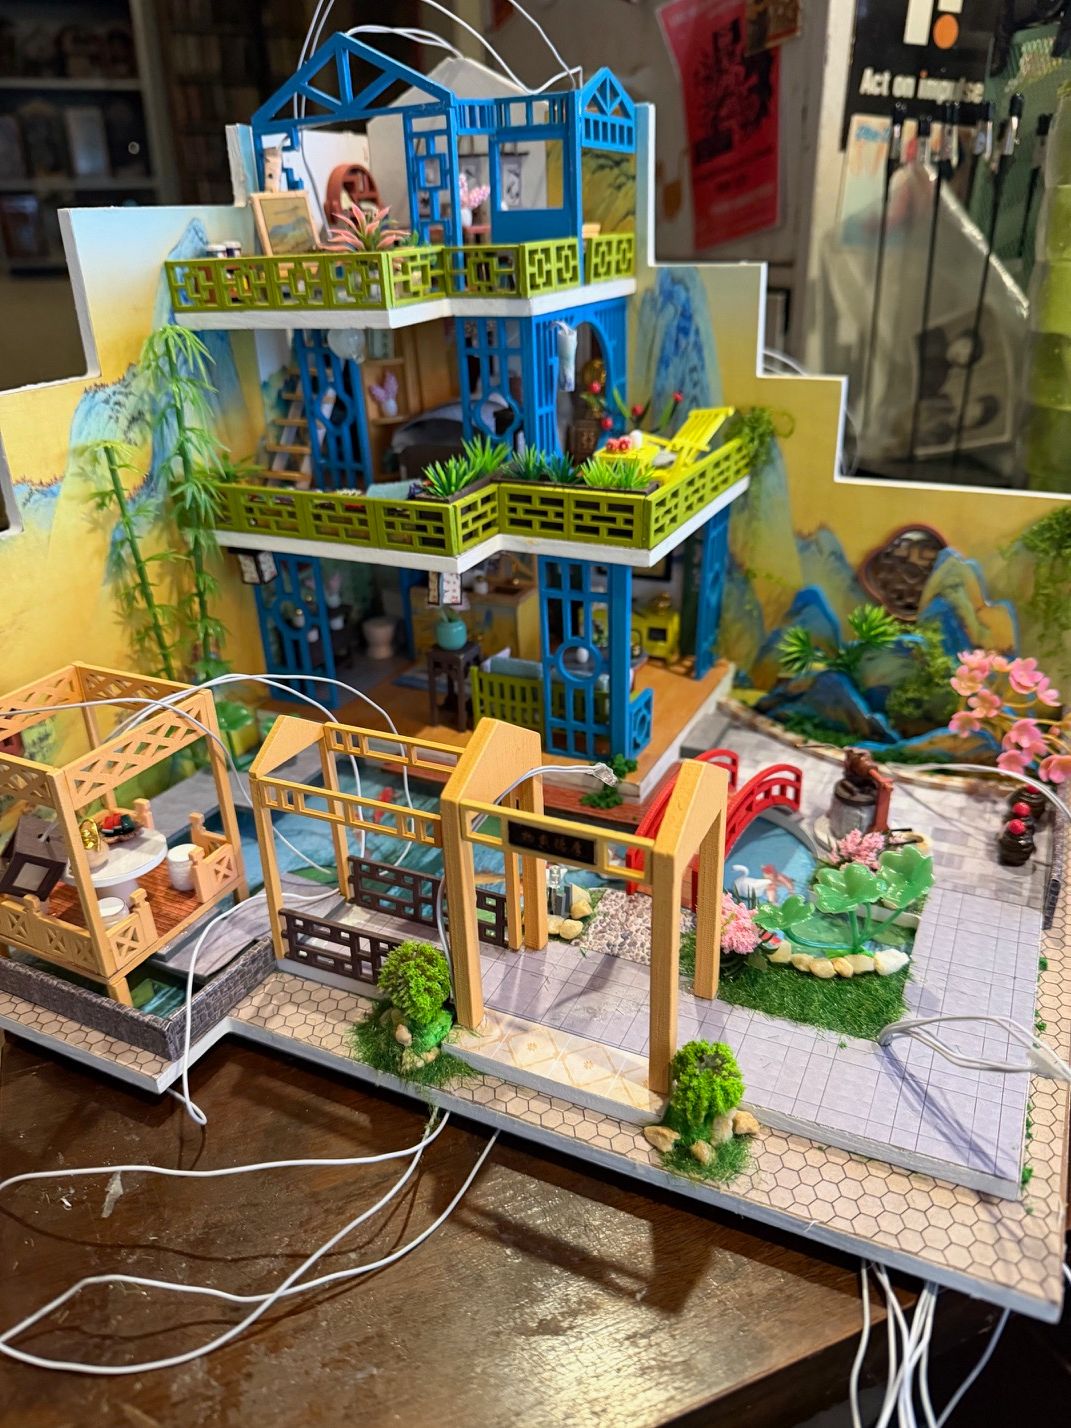
Fuchun Resort from Guangzhou Jiate is a colourful, three-storey miniature house with a courtyard, pond, gardens and enough tiny furnishings to keep a pair of tweezers thoroughly occupied. It is also a good illustration of why I have fallen in love with the kind of kit many book nook builders describe with a single, slightly nervous word: “fiddly”.
This is me sharing what I have learned as, relatively speaking, a newcomer to this side of the hobby. There are people who have been building miniatures for years who might consider my skills rudimentary. But if you have ever opened a box, spotted bags of fabric, beads and thread, and wondered what you had let yourself in for, I know exactly how you feel.
Adventures in the Fiddly Realms
Shortly after I started this hobby, before I had much experience, a stash or my particular obsession with Asian-themed kits, I picked up a cheap and cheerful book nook called Bruges Ancient Town. It belongs to the same family as the notorious Sea Breeze, although I would not have recognised that warning at the time.
I opened the box and found blank wood and sheets of printed paper. Instead of lovely pre-printed pieces with easy tabs and slots, I was expected to cut out images and paste them onto furniture, bases, buildings—everything. Then there were little bags of cloth, string, plastic flowers and beads.
The detailed manual explained how to turn all of this into a scene of houses lining a canal. I tried, but found it insanely difficult and, frankly, uninteresting. I wanted to see progress. I wanted something to materialise quickly from snaps and pops. After a few attempts at the basic frame, I put the box away.
That was my introduction to the Fiddly Realms.
What makes a kit “fiddly”?
There are several kinds of fiddly kit, but they all ask for more than popping pieces from a board, snapping them together, adding electronics and closing up a box. They demand your attention and your involvement in making the details.
Some, including many Rolife miniature rooms, have you recreate every tiny element of a room setting. Book nooks such as Sea Breeze, Bruges Ancient Town and Vitrine’s Tale ask you to manufacture much of the scene. Others, such as Chinese Restaurant Row, even involve making the outer box from layers of wood, cardboard and cloth.
Then there are dollhouse-style kits: open-sided, three-dimensional houses, often with a courtyard or garden. You make the base, floors, walls and sometimes the roof, followed by the furniture and practically everything sitting on it. You plant the garden, wire the lights and finish with something between a diorama and a dollhouse.
You have used a LOT of glue in the process.
These kits take up more room than a book nook and come in many styles, from tropical compounds and traditional houses to forest mansions and modern apartments. Prices vary widely, but I often find examples in the US$30–60 range. The quantity of work involved in packing them amazes me: someone has to make sure the tiny beads, short lengths of thread, coded bags and structural pieces all reach the right box.
From frustration to a love affair
After a few dozen builds, I reconsidered the idea of tackling one. My next attempt took forever. Some parts were sloppy, and I skipped details that seemed beyond my ability. Fabric still gives me trouble, while my retiree eyes and fingers are not always enthusiastic about paper leaves and tiny threads.
Gradually, though, I realised I was learning. Experience helped, and so did using the right tools. I also discovered something rather liberating: leaving out an ornamental detail did not necessarily stop me finishing the kit. With a tab-and-slot book nook, a seemingly insignificant piece can be essential to holding the structure together.
Better still, I could deliberately change things. These kits give you room to customise, substitute and reinterpret. My tentative embrace of the fiddly became a love affair.
I have turned Elegant Orchid Pavilion into a tribute to autumn, populated a Jiangnan Town with tiny people and changed Hexi Residence Japanese Restaurant from cherry-blossom spring to snowy winter. Bamboo Courtyard became a reminder of my holiday in South Asia. With Zhao Hua Xi Shi Ancient Cottage, I challenged myself to follow every word of the instructions.
I still enjoy a good pop-and-snap kit. I just like visiting the Fiddly Realms as well.
Fuchun Resort: what you are building
Fuchun Resort is a large dollhouse-style kit from Guangzhou Jiate, product code PO13. The three-storey Chinese-style house stands in a walled courtyard with a pond, gardens, a picnic pavilion and a covered gallery. There are roughly eight rooms or balconies filled with furniture and little props.
There is a real Fuchun Resort in Hangzhou, China, although this miniature does not closely resemble the photographs I have seen of it.
Lights appear throughout the scene: in the garden, beneath a little bridge, inside rooms and on cabinets. Add lush greenery, tiny swans and textured plastic roofing, and there is plenty to look at. Absolutely everything needs gluing together.
The finished dimensions are 29.8 × 27.3 × 24.5 cm, so allow a proper display space. I worked on mine alongside other projects for about two weeks. I cannot give a meaningful total in hours or a reliable piece count.


What is in the box?
The kit includes a detailed instruction booklet, coded components and actual-size paper templates that help identify the pieces. There are paper cutouts, roofing material, fabric and plastic components, structural boards, smaller wooden parts, lighting wires and a battery box.
The main structural pieces are heavy MDF. Other components include pre-painted wood and thinner laser-cut plywood, which can be fragile and splintery. This kit had only two of the thin plywood boards; some similar kits use many more.
The paper here is glossy coated paper that needs cutting out. Occasionally you get lucky with die-cut paper or stickers in this kind of kit, but that was not the case with Fuchun Resort.
My box also included a metal music-box mechanism and an acrylic dust cover to assemble. These can be optional extras on listings, so check what is included in the version you are buying. I normally pass on both, but somehow this one arrived with them.


The tools that make fiddly builds easier
Before getting into the build, here are the tools I find most useful:
- A good craft knife. I particularly like my forefinger-style X-Acto knife.
- A small, controllable pair of scissors.
- Wire cutters and needle-nose pliers for cutting and shaping wire.
- A wire stripper, together with your preferred method of insulating wire connections.
- A metal straightedge.
- A small plastic spatula for spreading glue—a miraculous little tool.
- A small squeegee for pressing glued paper flat.
- Tweezers.
- Plenty of glue. I use B-7000 for much of the furniture assembly and for plastic or metal, and Aleene’s Tacky Glue for paper cutouts and placing furniture.
- A threading needle with a large opening. I often replace thread with very fine wire where I can, but this makes the remaining thread work much easier.
The right tools remove a surprising amount of frustration. And when a tiny detail still defeats you, there is usually room for a substitution, a simpler approach or a little creative cheating. Nobody’s watching.

Instructions and planning the build
The manual becomes your best friend. It includes parts lists with dimensions and quantities, step-by-step fabrication instructions, structural assembly diagrams and photographs showing how the scene fits together.
Study those final photographs carefully. The instructions are mostly thorough, but I found the later placement of completed items less clear. Individual parts are well identified; an assembled object is not always referred to quite so helpfully. Finding the home of three little wine jugs took me a surprisingly long time.
I do not usually count every item in every bag before starting, but I do check that all the coded bags are present.
One of the pleasures of these kits is being able to change tasks. If you do not fancy making flowerpots today, you can work on something else. However, read ahead before fixing anything in place. Lighting, access and the order of construction still matter.
I tend to begin the main structure a little earlier than the manual suggests, so I can picture where everything belongs. But you cannot finish the second storey before completing what needs to go into the first, and ceiling lights must be considered before closing a room.
On Fuchun Resort, I could build up much of the house but had to leave the outer walls and gallery until the gardens were finished. Otherwise I would have blocked access to areas that still needed work.


Paper, furniture and a little artistic licence


When covering the structural pieces with paper, aim for a thin, even layer of glue across the whole surface. Too much can cause trouble, but incomplete coverage can leave bubbles, wrinkles or loose edges. It also matters when later pieces need to stick to that surface.
Curved cutouts can be awkward. Sometimes scissors work best; sometimes I reach for the craft knife. Watch for holes in the structure, too: they are often needed for wiring or the music box.
For some furniture edges, I have replaced paper coverings with acrylic markers. A good gold acrylic pen is worth keeping nearby.
My personal rule is simple: if I think a detail is going to turn out tragically ugly, I look for an alternative. I often simplify upholstery and substitute other greenery for tiny paper leaves and flowers.
I did make the wire tree in this kit, and I think it looks rather good. Instead of punching out all the tiny blossoms, though, I used pink cherry-blossom fluff. I added some extra greenery and flowers elsewhere, too.
The pond uses clear textured plastic to suggest water. On previous builds I have added UV resin or water-effect paste; this time I left the supplied plastic as it was and glued the tiny swans into position. I omitted the two character figures because they were too cartoony for my taste.
These are personal choices, and that freedom is a large part of the appeal.


Where Fuchun Resort challenged me
Overall, this was a smooth and enjoyable build, but three areas caused trouble.
The third-storey walls and balcony: the green balcony pieces and blue wall pieces followed the instructions, but did not agree with the illustration and some tiny markings on the floor. To make them fit, I ended up with a gap and a protruding section. I am still not sure what a better solution would have been.
The walkway to the picnic pavilion: I glued this down where the instructions indicated, but it needed to sit further across to line up with the pavilion doorway. The mismatch is there, although you have to look closely.
The front-right gallery: getting everything aligned was awkward, and I was left with a small gap. Some parts have to be glued together before fitting the assembly into place, which means relying on the designers’ measurements. Those were not quite exact in my build.
None of these problems spoiled the finished model for me, but they are worth knowing about before gluing things permanently.


Let there be light: wiring Fuchun Resort
As the build progresses, lights are installed in the garden, beneath ceilings, inside outbuildings and through furniture. One little lamp is made using a large bead. When wires start dangling everywhere, I know I am making serious progress.
Connecting them all is another matter. In my experience, the wiring diagrams in this type of kit can involve a fair amount of wishful thinking. You finish the house with wires emerging from holes underneath and in the rear wall, but they do not necessarily all reach the battery box as neatly as the illustrations suggest.
Fuchun Resort has a good home for the battery box, and the instructions suggest using the supplied long heat-shrink tubes for connections at the back. Looking at my collection of wires, that seemed optimistic.
My solution was to join the wires beneath the base into a single pair that could run up to the battery box. In this kit, I grouped the white wires with the red lead and the grey wires with the black lead. Those colours describe the components supplied with my build; check your own instructions and maintain the correct polarity.
The white and grey wires are difficult to distinguish in poor light. They are also very fine, so stripping the insulation without cutting through the wire takes patience.
I taped the underside wires down and fed my connecting pair up near the battery box. Having missed a rather inconvenient existing hole, I ended up drilling another one. I then gathered the rear wires and connected everything, keeping the two polarities separate and insulating the joints.
When I finally fitted batteries and switched on, two of the 18 LEDs did not work. Neither was in a crucial position, but by that stage the wiring was embedded in the model and difficult to reach. It is a good reason to check the lights before installation and again as the build progresses.
The back of the house still had a less-than-elegant collection of wires. This is where fake greenery comes to the rescue: I secured the wires, applied Aleene’s glue and added vines. Fortunately, the resulting greenery suits the house very well and helps conceal the wiring.


The finished result: satisfaction in miniature
Despite the delicate-looking details, the finished model feels remarkably sturdy once everything is glued down. It does take up a fair amount of space, but the house, garden, pond and layers of furnished rooms reward a proper look.
I am proud of this one. I am making a conscious effort to attempt more of the fiddly details, and every completed build leaves me keen to renew my passport for another trip to the Fiddly Realms.
I have seen Fuchun Resort listed on Temu, AliExpress and Amazon. My suggested price range is around US$40–50, although listings, shipping and included extras can change what you actually pay.
If fiddly kits intimidate you, that is perfectly understandable. I think they take some working up to. My own attitude has moved from fear and disinterest to deep satisfaction, helped by practice, better tools and the realisation that I can make a kit my own.
If you enjoy Asian-themed miniatures and fancy a more hands-on challenge, Fuchun Resort offers plenty to get absorbed in. Just bring patience, tweezers and a generous supply of glue.
Build gallery


Leave a Reply