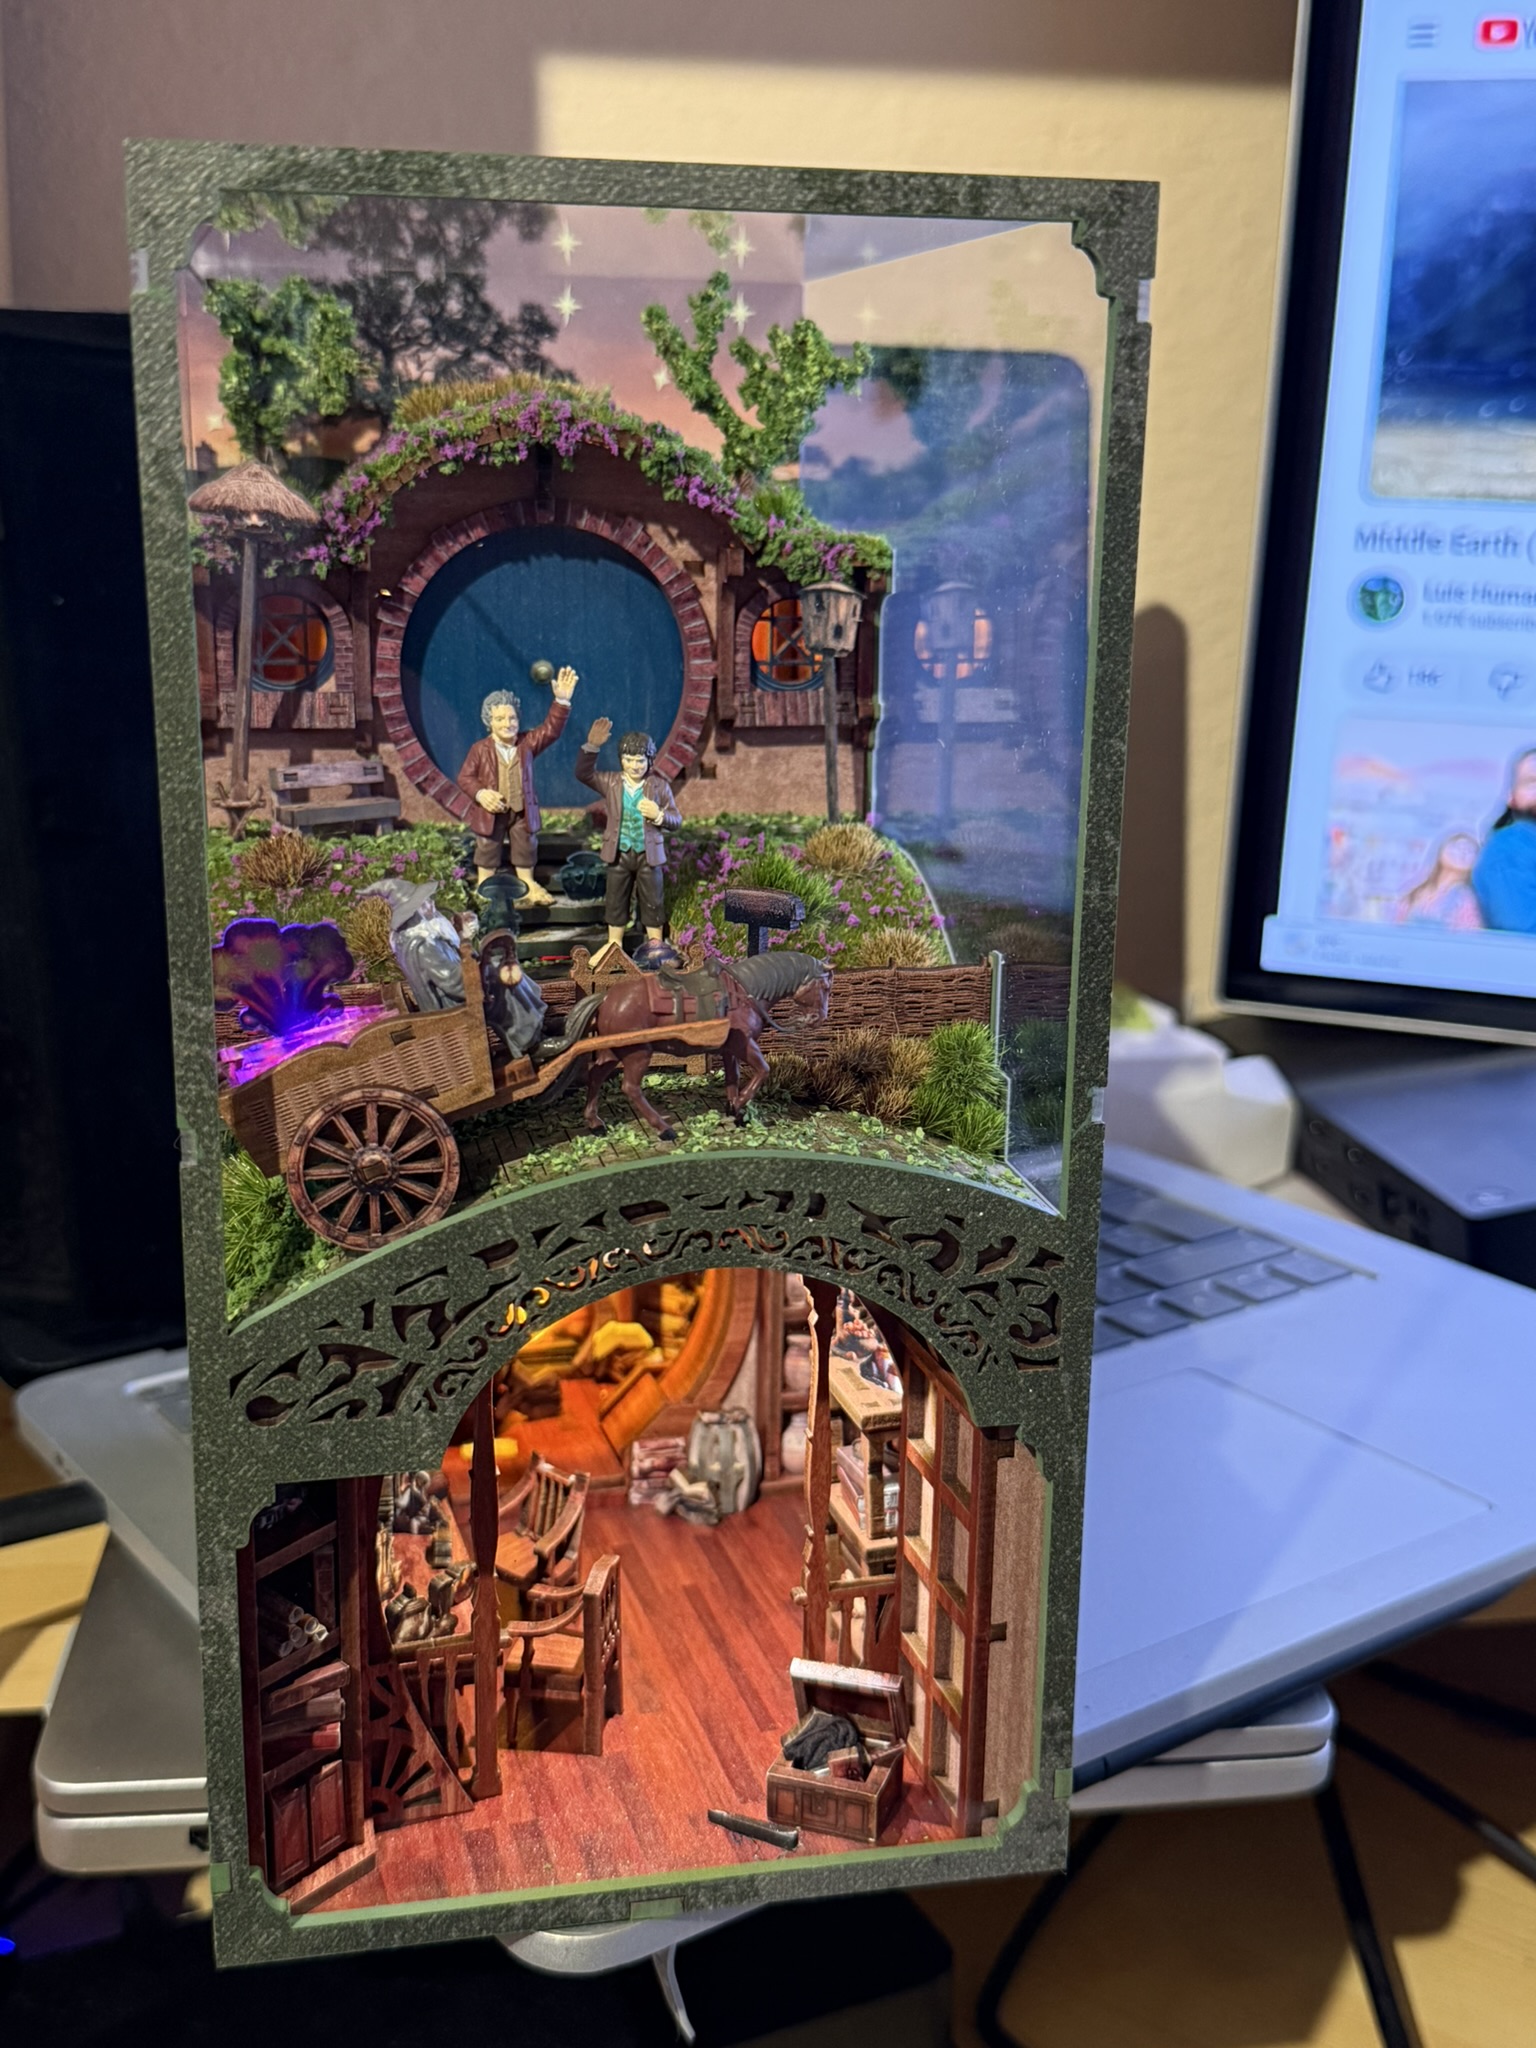
Fifijoy Hillside Cottage Review: A Little Journey into the Shire
Build #60 | Built and reviewed by Martin Seidler | BookNookWorkshop.com
The short review: a little hillside, a huge amount to love
Superb precision. Beautiful interiors. Clever construction. A working cottage door. A landscaper’s playground. Hillside Cottage is Fifijoy at its best—and one of the most enjoyable kits I have built.
The two-level cottage combines richly detailed rooms, a beautifully engineered vaulted ceiling and clear acrylic panels that let you appreciate the work inside. Outside, the hillside offers enormous scope for foliage, scenery and personal touches. My version adds 3D-printed Gandalf, his horse, Bilbo and Frodo, extra landscaping and a modified fireplace.
The one missed opportunity? The fireplace and fireworks use slowly breathing LEDs. Irregular flickering would make both effects more convincing. Clear acrylic also rewards careful handling: fingerprints and dust will show.
Should you buy it? Absolutely yes. Especially if you are a Lord of the Rings fan or a Fifijoy enthusiast, this is a kit you absolutely must have on your shelves. For intermediate and experienced builders who enjoy detailed interiors and landscaping, it gets my wholehearted recommendation.
| Category | My rating |
|---|---|
| Design | ⭐⭐⭐⭐⭐⭐⭐⭐⭐⭐ 10/10 |
| Component quality and precision | ⭐⭐⭐⭐⭐⭐⭐⭐⭐⭐ 10/10 |
| Instructions | ⭐⭐⭐⭐⭐⭐⭐⭐⭐⭐ 10/10 |
| Electronics and lighting effects | ⭐⭐⭐⭐⭐⭐⭐⭐⭐☆ 9/10 |
| Customization potential | ⭐⭐⭐⭐⭐⭐⭐⭐⭐⭐ 10/10 |
| Recommended experience | Intermediate to advanced |
| Overall verdict | 🏆 99/100 — Highly recommended |
The full review
Some kits attract me because of their architecture. Others because of their mechanisms, lighting or tiny interiors. Fifijoy’s Hillside Cottage caught my attention because of the landscape. A cottage built into a green hillside, with stairs, trees and plenty of opportunities to play with foliage? That sounded very much like my kind of project.
What I had not fully appreciated from the first photographs was just how familiar some of its inhabitants would look. Once I unpacked the kit and looked more closely, there was a wizard with a horse-drawn cart and fireworks. Suddenly, the countryside cottage had become something rather more recognisable.
And the moment I saw the flat, two-dimensional wizard and horse, my approach to the build changed completely.


They were going to become 3D figures. There was really no question about it.
A confession before we enter the hillside
I should probably confess something before the Tolkien fans get too comfortable: I am not a devoted Lord of the Rings fan.
I watched the first film while preparing to build Anavrin’s Whispering Hollow, mainly because I wanted to understand the landscapes and their atmosphere. I loved the scenery and the beauty of the settings. The film itself did not win me over in quite the same way, and I never felt the urge to work through the rest of the films.
There. Confession made. Please allow me to keep my modelling tools.
With Hillside Cottage, however, it felt entirely natural to embrace the inspiration. Once Gandalf and his fireworks were part of the scene, adding Bilbo and Frodo seemed the obvious next step. My finished version is my own little interpretation of a welcome in the Shire, rather than an attempt to reproduce a particular scene exactly.
The irony is that someone who is not a committed fan has taken a kit sold as Hillside Cottage and deliberately made his version even more recognisably Lord of the Rings.
First impressions: Fifijoy keeps getting better
I have said this in my recent Fifijoy reviews, but it deserves repeating: I have been delighted by the brand’s progress throughout 2026.
Kit after kit, I have seen improvements in design, material quality, printing, laser-cutting precision and the way the structures go together. Hillside Cottage continues that journey beautifully.
I particularly appreciate the use of properly arranged locating surfaces and perpendicular structural parts. They help you assemble something square and sturdy, without constantly worrying that a little pressure in one place will knock something loose somewhere else.
This is an unusual structure, combining a hillside, two levels of accommodation and substantial transparent sections. Yet the engineering behind it feels well thought out. The scenery may be whimsical, but the way the kit fits together is reassuringly precise.
It is one of the best kits I have built. Quite possibly one of the very best.
What comes in the box?
The supplied materials include MDF sheets, acrylic panels, printed and adhesive sheets, tiny stars and butterflies, grass mats, green scenic material and purple landscaping powder. The electrical components include LEDs identified by coloured heat-shrink sleeves.
The accessory selection is generous too: a small hammer, tweezers, sanding stick, scissors, adhesive pads and a wax block for the geared door mechanism.
There is enough supplied scenery to finish the kit in its intended style. My version uses additional landscaping materials and printed figures, so the photographs and video show a customized build rather than a straight out-of-the-box assembly.


The build: scrolls first, naturally
The opening stages introduce the usual suspects: scrolls, books and open books.
Those who have followed my recent posts will know that scrolls are not necessarily my favourite way to begin a kit. Fortunately, my quilling tool made short work of them, and I could move on to the furniture.
There are cabinets, shelves, tables and several different chairs. Normally, delicate little MDF chairs are another item I approach with limited enthusiasm. They can look rather rough, and assembling them is not always enjoyable.
These were different. The three chair designs have fine components, excellent fit and convincing proportions. They were actually fun to build. The tables are equally impressive: what first looks like a small furnishing becomes a miniature assembly involving a surprising number of details, including everything arranged on its surface.
This is one of Hillside Cottage’s strongest features. The interior is not simply a backdrop behind the landscape. It is a detailed miniature world in its own right.
The fireplace: one small change makes a big difference
The fireplace uses translucent paper to diffuse the light behind the flames. It is a good starting point, but it also brings me to my main criticism of the kit.
Fifijoy has used slowly breathing LEDs for the fireplace and the purple fireworks effect. I have raised this in previous reviews: for my eyes, a smooth fade in and out does not look as convincing as an irregular flicker in these applications.
I added a small yellow flickering LED to the fireplace, soldered alongside the original LED and angled towards the flames. Behind it, I fitted and shaped aluminium foil as a reflector, directing the light across the whole fireplace opening.
The improvement was immediately worthwhile. Rather than a small bright spot, I had a much more evenly illuminated fireplace with the movement I wanted.
There was an interesting secondary effect on my particular build: the added flickering LED also caused the purple fireworks light, which shares the electrical feed, to fluctuate. With one added LED, I ended up with movement in both places.
That is an observation from my modified circuit, rather than a guaranteed result for every build. What I would like to see from Fifijoy is a deliberately designed irregular lighting effect for both features straight out of the box.
That missed opportunity is the reason this kit finishes at 99/100 rather than 100/100.
Excellent instructions—and wire routing that deserves attention
The instructions are excellent, but this is a kit where following the sequence really matters.
Several stages require wires to pass through holes before the next structural assembly goes into place. Take the time to study the diagrams, identify the route and thread the wires when instructed. It is much easier than discovering later that you have closed off their intended path.
The coloured sleeves on the LEDs are particularly helpful. The instructions identify both the light and its colour coding, making it easy to select the correct component. It is a simple, practical improvement that I am very pleased Fifijoy has continued using.
As the lower rooms develop, the partition goes into place, the wires are secured with the little horseshoe-shaped clips, and more shelves, pots, books and other furnishings fill the interior.
There is also a cleverly designed chest with an open lid. I tend to be sceptical of stickers used as construction elements, but here the adhesive quality and the design work very well together.
A vaulted ceiling with remarkable precision
Once the lower rooms are furnished, the ribs for the barrel-vaulted ceiling begin to establish the shape of the structure.
Before closing it up, you build a surprisingly elaborate chandelier from a collection of small parts. At this stage, you may find yourself wondering why you are putting so much work into an unlit chandelier that appears destined to disappear inside the lower floor. As soon as everithing comis together and you see what beautiful work does the warm white diode shining directly on the chandelier, the reason for that attention to detail becomes much clearer.


The ceiling itself uses flexible, accordion-like MDF sections arranged around the supporting structure. The vaulted surface is assembled in four sections, and the way they locate and click into place is impressive.


This is worth highlighting because complex curved assemblies can so easily become a fight. Here, the cutting precision makes the process satisfying.
The lower level has lighting for the fireplace, the rear room and the front room. With the structure completed, those little furnished spaces start to feel wonderfully cosy.
Upstairs: hillside stairs, tiny mushrooms and a working door
The next stage develops the upper structure and the grassy foreground where the cart will eventually stand.
The touch switch is mounted on an internal holder. Personally, I prefer arrangements where the sensing element is secured directly against the operating panel, because its position relative to the surface can matter for sensitivity. I would check the response before closing everything up. This is a design preference and an assembly point to watch, rather than a confirmed failure on my finished kit.
The upper floor includes the geared mechanism that opens and closes the cottage’s blue door. You operate it from outside, which is a lovely interactive detail.
Then come the hillside stairs, decorated with little acrylic mushrooms. I enjoyed this section very much. The flexible side pieces create the shape, and the staircase begins to connect the cottage to its landscape.
The instructions introduce some scenic material here, but I postponed my landscaping until the main hillside surfaces were complete. That let me treat the whole exterior as one scene.
Inside the upper cottage, you build a bench, a chest and another remarkably detailed bookshelf. The shelf involves a surprising amount of work for something that ends up largely hidden.
Did that stop me painting the edges and taking care over the details? Of course not. I know they are there, even if the viewer has to work a little harder to find them.
Another warm LED lights the upper interior, and more flexible MDF creates its roof and enclosure.
Even the battery-compartment latch has personality: its release button echoes the profile of the hillside cottage. It is a tiny detail, but it made me smile. Someone clearly enjoyed designing this kit.
Grass mats, trees and the beginning of the landscape
I hesitated over the supplied grass mats because I already knew I wanted to customize the hillside quite extensively.
In the end, I used them as a base. I glued them down carefully, paying particular attention to the edges and trying to minimise visible gaps. They provided a useful starting surface for the additional scenery.
Two rather characterful trees sit towards the top of the build. The instructions use the supplied green material on their branches. I combined that material with small scenic leaves from my railway-modelling supplies, giving both trees fuller, greener canopies.


That is the pleasure of a kit like this: you can follow the intended approach or use it as the foundation for your own landscape.
Gandalf, his horse and a cart full of fireworks
The cart was one of the parts I studied before starting serious construction, because the printed figures had to fit the physical model.
Matching the height of the original flat Gandalf was only part of the task. His seated width also had to fit between the sides of the cart. I used those constraints when creating the model in Meshy, and the resulting figure fitted the available space very well.
The horse needed a little more accommodation. Its generated proportions were somewhat broad for the cart’s arrangement, so I carefully reduced the thickness of the relevant inner MDF faces to make room. With that adjustment, the combination looked convincing.
The printing itself took about two and a half hours. While that was happening, I could continue working on the kit. Before I had progressed very far into the main assembly, Gandalf, the horse, Bilbo and Frodo were ready for the next stages of preparation and painting.


Pay particular attention to step 155
There is an important wire-routing detail here: the fireworks LED needs to pass through two holes on its route to the cart. Check step 155 closely and thread it correctly before continuing.
Positioning the LED also deserves care. The idea is to direct the light into the edge of the acrylic fireworks detail. If it is aligned well, the acrylic produces a much more effective illuminated display.
I positioned mine with the tip of a craft knife, applied a small amount of UV resin and cured it while holding the LED in place. That made it possible to secure the alignment accurately.
It is a small operation, but it makes a visible difference to the finished effect.
Painting the figures and creating my own scene
Alongside Gandalf and the horse, I printed Bilbo and Frodo at sizes that suited both the cottage and the wizard.
I was pleased that the scale worked on the first attempt. These are small figures, and painting them was not easy. I did not attempt competition-standard faces or elaborate detailing. I wanted believable little characters that belonged in the scene.
After painting, I used a matte varnish to remove the unwanted shine. Gandalf took his seat in the cart, the horse went in front, and Bilbo and Frodo stood on the stairs to welcome their visitor.
Is this a frame-perfect recreation of a film scene? No. It is my scene, made to suit this little hillside, and I am very happy with how it turned out.


Regular readers will already know that I have become rather enthusiastic about creating figures and using my new resin printer. This kit gave me an especially satisfying reason to do it.
You certainly do not need a printer to enjoy Hillside Cottage. The supplied figures are part of the original design. But having the ability to make replacements, I was hardly going to leave that opportunity unexplored.
Landscaping: a natural hillside rather than a flower garden
Once the figures were positioned, I could build the scenery around them.
I used a mixture of grass tufts, small shrub-like clusters, different green scenic materials and patches of earth. Their placement helped break up the uniformity of the grass mats and connect the steps, cottage and cart to the surrounding hillside. Alhough it may look like, I have not used any wines. Everything is made from supplied or my own lose particles.
The supplied purple powder turned out to be useful too. I applied small patches of Aleene’s Tacky Glue with a fine applicator, sprinkled on the powder, allowed it to dry and brushed away the loose material. Used selectively on both levels, it suggested little areas of natural flowering growth.


I was tempted to add more flowers and turn the scene into a richly blooming garden. In the end, I stopped myself. I preferred the quieter effect of a green hillside with scattered purple colour.
The result is colourful without becoming overly ornamental, and closer to the atmosphere I wanted.
For anyone who enjoys landscaping, this is a wonderful playground. You can change the density of the foliage, the character of the trees, the ground textures and the overall mood without having to redesign the structure.
The acrylic enclosure: a strength with a practical trade-off
After completing the remaining side details, including the opening viewing window and its little shelf, the enclosure comes together.
The acrylic sections locate in slots around the structure. Initially, I was concerned about how securely they would hold and expected that some gluing might be necessary.
It was not. On my kit, the tabs and slots fitted so precisely that the panels stayed in place simply by being assembled as intended. That level of accuracy in the acrylic components deserves real credit.
The transparency is a major part of the design’s appeal. It lets you appreciate the relationship between the hillside and the furnished spaces inside it.


The practical trade-off is cleaning. Clear acrylic looks wonderful when clean, but fingerprints and dust are easy to see. Handle it carefully during assembly and think about access for cleaning as you finish the model.
The kit also offers fluorescent stars and butterflies for the exterior. I used some of the supplied decorative material inside, but left the stars and butterflies off the outside because they did not suit my more natural landscape.
If you use them, be patient when lifting them from the backing sheet. A sharp craft knife helps with the small shapes.
Slide the front dust cover into place, and the hillside is complete. Here is the video.
Edge colouring makes a substantial difference
As usual, I strongly recommend colouring the exposed MDF edges throughout the build.
The green edges around the exterior panels are particularly noticeable. Matching them to the surrounding surfaces makes a substantial improvement, especially once the landscape is complete.
Inside, furniture markers work well on many of the brown components. I could use them for roughly half to three-fifths of the edge-colouring work, with coloured acrylic paint or markers reserved for the parts that needed a different finish.
It is easier to do this as you assemble each item than to reach awkward corners afterwards. Even when some details eventually become partly hidden, the overall finish benefits from that consistency.
How does it compare with Anavrin’s Whispering Hollow?
Whispering Hollow appealed to me for much the same initial reason: its landscape and the opportunity to create a little world with a familiar fantasy atmosphere.
I still appreciate it as a different and enjoyable build. However, if I compare my own experience of the two kits, I prefer Hillside Cottage overall.
The decisive factors are its interior detail, component precision and the clever way the structure comes together. There is a lot to enjoy beyond the exterior scenery. The furniture, curved construction, working door and transparent enclosure all contribute to a build that remains interesting from start to finish.
Glue is still part of the process, but the accurate locating features make assembly feel controlled and satisfying.
That combination of good engineering and playful miniature detail is something Fifijoy is doing extremely well at the moment.
Ratings
| Category | My rating |
|---|---|
| Design | ⭐⭐⭐⭐⭐⭐⭐⭐⭐⭐ 10/10 |
| Component quality and precision | ⭐⭐⭐⭐⭐⭐⭐⭐⭐⭐ 10/10 |
| Instructions | ⭐⭐⭐⭐⭐⭐⭐⭐⭐⭐ 10/10 |
| Electronics and lighting effects | ⭐⭐⭐⭐⭐⭐⭐⭐⭐☆ 9/10 |
| Customization potential | ⭐⭐⭐⭐⭐⭐⭐⭐⭐⭐ 10/10 |
| Recommended experience | Intermediate to advanced |
| Overall verdict | 🏆 99/100 — Highly recommended |
The category scores describe individual aspects of the kit. The overall verdict is my assessment of the complete building experience, rather than a mathematical average of those scores.
What I liked most
- Exceptionally precise MDF and acrylic components.
- Richly detailed interiors on both levels.
- Clever structural design, particularly the vaulted ceiling and flexible sections.
- An externally operated opening door and other thoughtful little mechanisms.
- Clear instructions and practical colour coding for the LEDs.
- Extensive opportunities for landscaping, figure additions and personalisation.
What could be better
- Irregular flickering effects would suit the fireplace and fireworks better than the supplied slow breathing effects.
- The clear acrylic needs careful handling and will show dust and fingerprints.
Final verdict: 99/100—and very close to perfect
Should you buy Hillside Cottage? Absolutely yes. If you are a Lord of the Rings fan or a Fifijoy enthusiast, this is a kit you absolutely must have on your shelves. Even as someone who is not a devoted Tolkien fan, I found it an exceptional build and a wonderful opportunity to create my own little landscape.
Hillside Cottage is an outstanding kit. I loved the precision, the wealth of interior details and the way its unusual structure came together. It also gave me exactly what I had hoped for when I first saw the photographs: a landscape I could make my own.
I would recommend it to intermediate and experienced builders, particularly anyone who enjoys foliage, scenery and customization. A complete beginner could find the fine parts, wire routing and layered construction demanding, so I would choose something simpler as a first project.
My finished version goes beyond the supplied design, with printed characters, additional landscaping and a modified fireplace. Those changes reflect my interests, but they also demonstrate how much creative room the kit offers.
Fifijoy, this is another excellent step in the journey I have been watching throughout 2026. Give the fireplace and fireworks the irregular flicker they deserve, and I would struggle to find a reason to withhold that final point.
Build #60: Hillside Cottage by Fifijoy. My rating: 99/100.
And yes, apparently I can thoroughly enjoy building my own little corner of the Shire without becoming a devoted Lord of the Rings fan.
Gallery


Leave a Reply