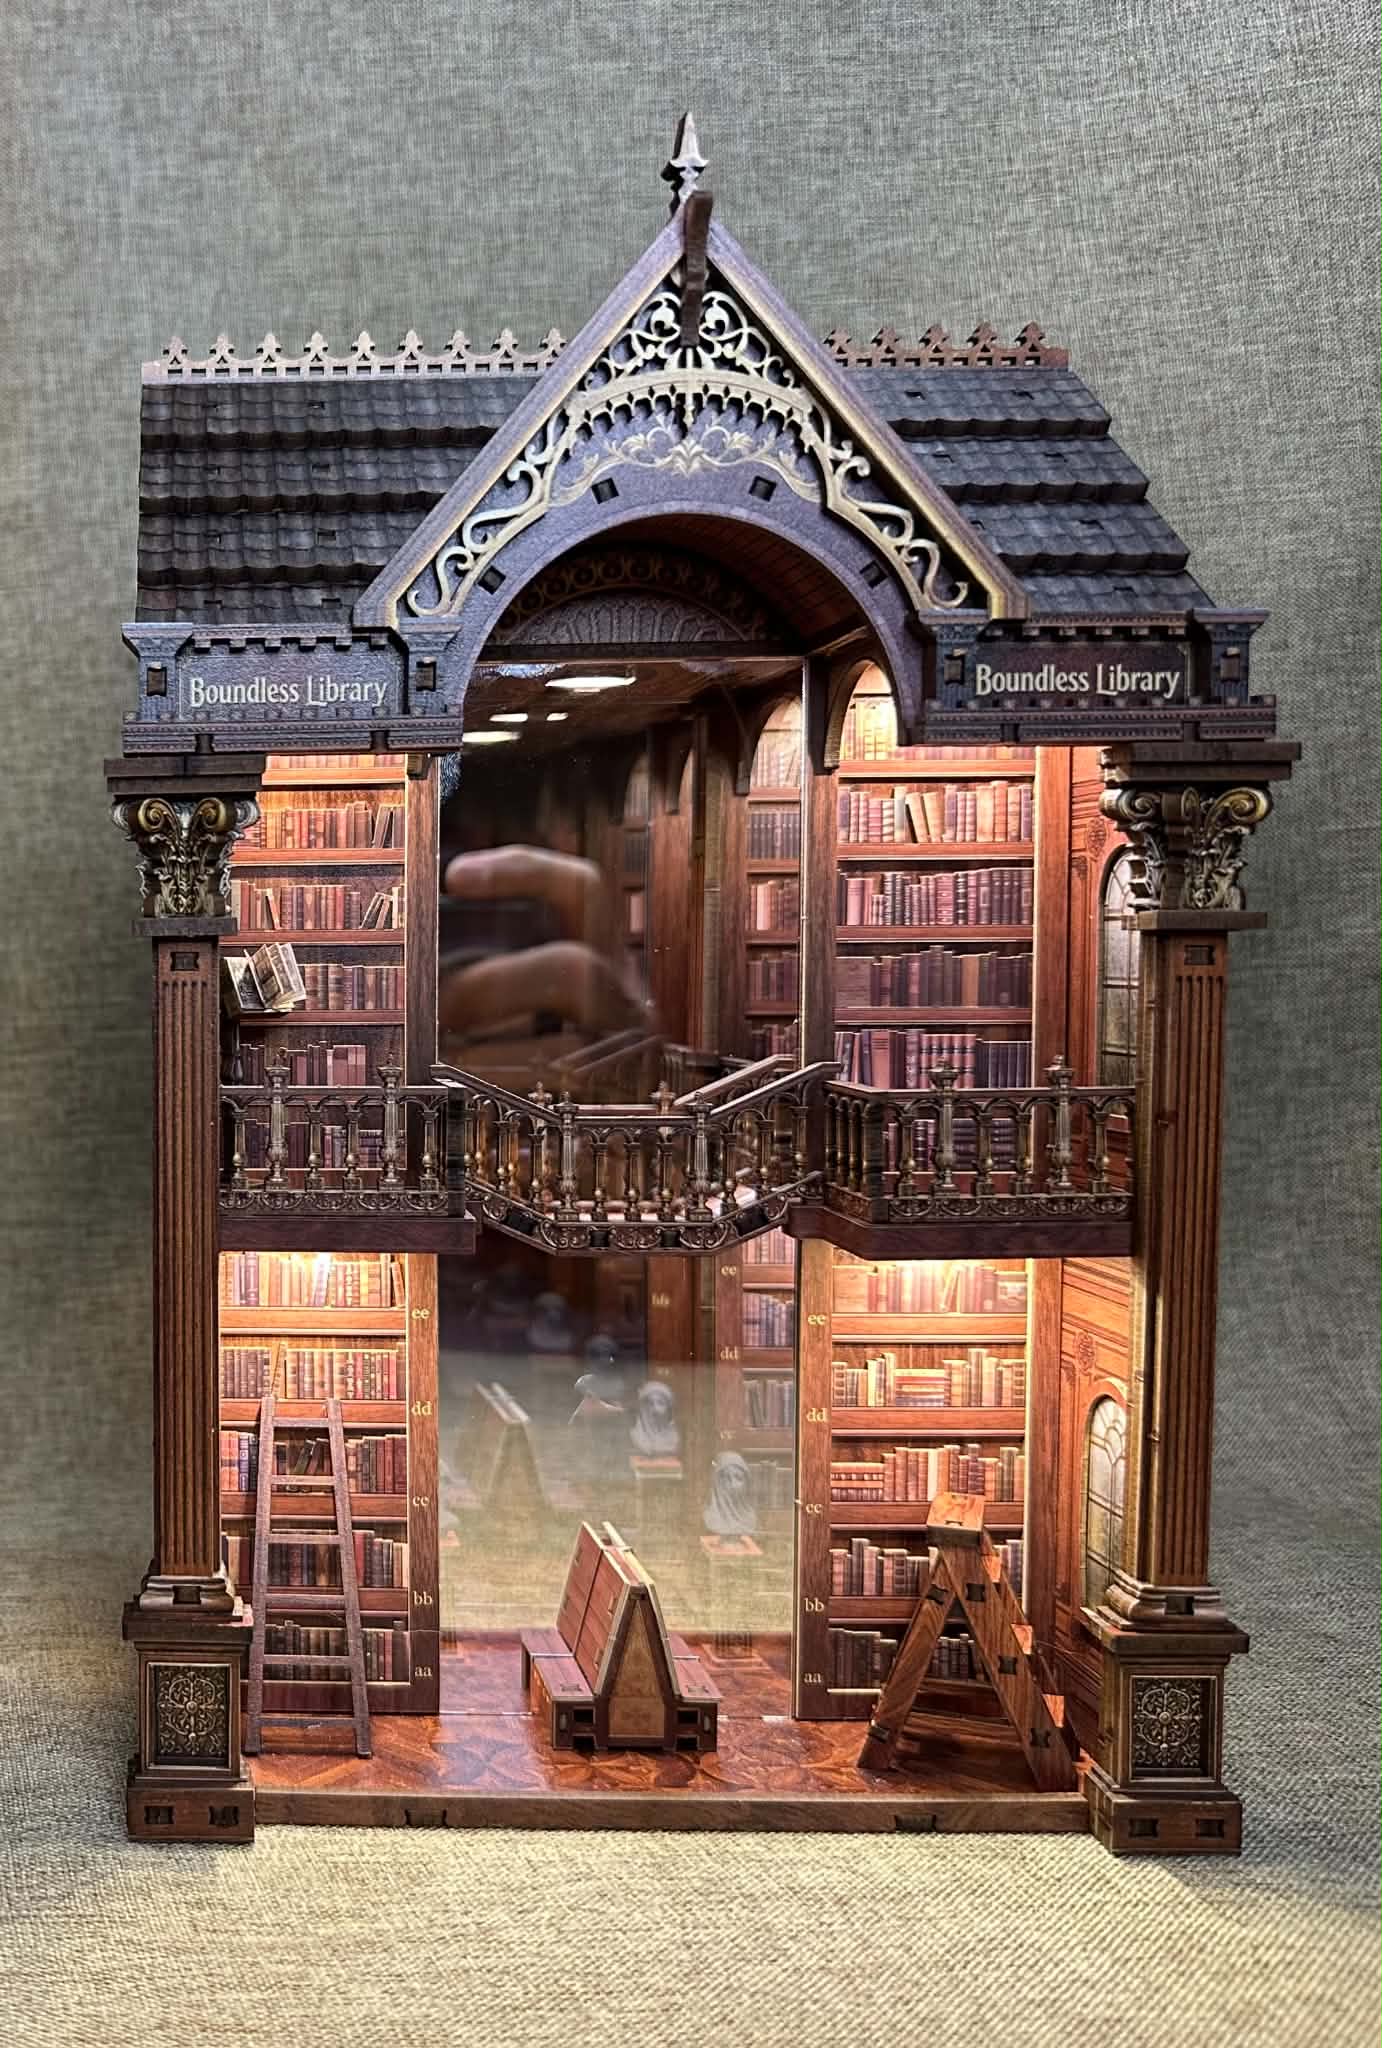
Built & reviewed by D.J. Gibson Build #187

My Boundless Library book nook review began with a kit that promised something a little different from the usual miniature library. I purchased this Timory & LORENOOK kit on Amazon from LORENOOK, and its combination of bookcases, an upper gallery and infinity mirrors immediately gave me something interesting to explore. A library is a familiar book nook subject, but this one uses light and reflections to make the interior feel as though it continues far beyond the physical model.
The finished result is attractive, with good print work throughout and backlit windows that give the exterior a life of its own. My experience was not entirely trouble-free: my prerelease kit arrived with a cracked rear mirror, and the window paper had a printing issue. However, the way LORENOOK responded deserves a proper mention alongside the build itself.
What is included in the Boundless Library kit?
I found a mixture of printed MDF, printed oil paper, printed cardboard, self-adhesive printed components and acrylic panels. The materials work together to create both the structure and the decorative finish, while the mirrors and lighting provide the illusion of extra depth. The box contained:
- 8 MDF sheets
- 3 cardboard panels
- 1 oil paper sheet
- 1 sticker sheet
- 1 acrylic mirror
- 2 two-way mirrors
- A lighting kit with four LED strips, one single LED board, a touch-control panel and a battery case
- Glue
- Tweezers
I liked that the kit supplied both glue and tweezers. The combination of MDF and printed decorative layers also gives the build more variety than assembling an undecorated wooden shell. Much of the finished appearance depends on the quality and placement of those printed components, and I thought the overall print work was a strong point.

Building the side walls and bookcases
I began with the side walls, adding the oil paper window coverings and the printed self-adhesive cardboard window frames. These windows are worth taking care over because they remain a visible part of the finished exterior, especially when the lights are on. I would check the printed paper before attaching it, given the issue I encountered with my prerelease sheet.
Next came the bookcases, assembled from MDF and printed self-adhesive cardboard components. I used the second-floor pieces to connect the bookcases on each side, then ran the first LED strips beneath those upper-floor sections. Railings completed the second floor. At this stage, the kit started to look like a library with real architectural structure: shelving below, a gallery above and lighting built into the spaces between them.

The bench, columns and upper bridge
I then built the central bench and the two columns topped with busts. These were installed on the floor panel, followed by the first-floor two-way mirror positioned over the bench. The decorative columns and busts give the interior a more formal library character, while the bench helps anchor the scene.
The bridge between the two second-floor panels connected the bookcase assemblies. Once joined, the whole arrangement was installed onto the floor. I particularly liked the way this creates a complete interior rather than a single wall of shelves. The upper bridge, railings and lower-level details give the reflections something substantial to repeat.

Fitting the ceiling, lighting and roof
The ceiling panel received the single LED board, the two remaining LED strips and the arched wall pieces that help secure the walls evenly. After installing the ceiling, I placed the extra lengths of LED strip where the instructions indicated and plugged the lights into the touch-control panel. This panel sits on the side wall marked with the switch indicator.
I constructed and installed the front arch next, then built the roof using stacked shingle panels. The exterior adds another layer of interest to the kit; it is more than a plain enclosure for the mirror effect. Once the upper structure was complete, I attached the battery door to the rear wall with hinges and fitted that wall to the back. The two front columns were the final construction stage.

Instructions: clear overall, but one mirror detail needs explaining
I found the colour instructions easy to follow overall. The construction sequence made sense, and I could follow the progression from the side assemblies through to the roof and rear wall. There was, however, one point where I wanted a clearer explanation.
The instructions tell me to pay attention to the orientation of the two-way mirror panels, but they do not explain how I am supposed to identify the correct orientation. I tried the panels both ways and did not notice much difference. That is my experience with this kit, rather than proof that orientation never matters. I would have appreciated a diagram or a simple identification method instead of a warning without the information needed to act on it.
My advice is to check the mirror arrangement and lighting before permanently closing everything up. With a kit built around reflections, I would much rather confirm the appearance while the interior is still accessible.
How well does the infinity mirror effect work?
For me, the Boundless Library infinity mirror effect looks best in the dark. With the internal lights on and less surrounding light entering the front, the repeated library scene is much more convincing. Exterior light softens the effect, so I would choose its display position with that in mind.
I see this as a model that rewards an evening viewing. The shelves, upper floor and architectural details provide the scene, but the balance between the interior lighting and the room lighting determines how strongly the illusion comes across. I would not judge the mirror effect solely by looking at the kit in a brightly lit room.
Lighting, backlit windows and practical display points
The lighting arrangement uses four LED strips and a single LED board, controlled by a touch panel and powered through a battery case. I thought it worked well with the design. All the windows are backlit from inside the kit, so there is something to enjoy from the exterior as well as through the front opening.
I did notice small light leaks between the stacked roof panels. They were not enough to detract from the front view, although they are worth mentioning for anyone who prefers a completely light-tight finish. I would describe them as a minor feature of the roof construction rather than a major problem with the display.
There is no front dust cover. The opening remains exposed in front of the two-way mirrors, which is something I would consider when choosing where to display it. I would favour a spot where I can enjoy the lighting without exposing the front to unnecessary dust.

My prerelease problems and LORENOOK’s response
My first kit was a prerelease version, and the rear mirror arrived with a noticeable crack. A damaged mirror is particularly disappointing in a kit where reflections are central to the finished result. I contacted LORENOOK, and an entire replacement kit was on its way to me the next day.
I also received an oil paper sheet that had been printed twice, leaving a shadow image of the window frames. LORENOOK explained that this had been missed in a few of the first kits and had since been corrected. I can report what happened to my kit and what I was told; I cannot independently confirm the contents of every later box.
I give LORENOOK credit for responding promptly and offering positive resolutions. Problems can happen, especially with an early release, but the response matters. In my case, I did not have to spend days chasing a reply or arguing over a replacement.
Who would I recommend Boundless Library to?
I would recommend this kit to someone who enjoys library book nooks and wants a different visual treatment, particularly a builder who already likes infinity mirror displays. The bookcases, upper gallery, bust-topped columns and illuminated windows give it enough character to remain interesting beyond the reflection effect itself.
For a first-time builder, I would pay particular attention to the lighting stages and the mirror instructions. I found the instructions approachable overall, but I would not promise a completely question-free build because of that missing explanation about mirror orientation. I have not supplied a build-time estimate because I did not record one.
For more practical preparation advice, I would start with the Book Nook Workshop Start Here page. I would also check the members’ offers page before buying a kit, without assuming that a discount is available for this particular model.
Final verdict
I enjoyed the finished Boundless Library. It is a good-looking library book nook with strong print work, an interesting multi-level interior and lighting that supports both the scene inside and the windows outside. The infinity mirror effect is its main attraction, and I think it deserves to be seen with the lights on in a darker room.
The unclear mirror-orientation instruction, open front and small roof light leaks are the points I would want to know before buying. My prerelease mirror and paper problems also belong in an honest review, alongside LORENOOK’s quick response and replacement. Taken together, I consider this an attractive addition to an infinity mirror collection, with a satisfying design and customer support that handled my issues positively.
Buy Boundless Library on Amazon
Interested in building this library? Check the current price and availability on Amazon using my affiliate link below.
Affiliate disclosure: As an Amazon Associate I earn from qualifying purchases, at no extra cost to you.
Boundless Library photo gallery


Leave a Reply