Beautifully Engineered Garden Miniature
Built & reviewed by David Richards
Rose Manor is only the second Timory kit I have built. The first was the jointly branded Timory/Funpola Venice Night Starlit, which managed the rather inconvenient feat of scoring 100%. That does set expectations at a level normally reserved for Olympic finals, Michelin-starred restaurants and British weather forecasts that accidentally turn out to be correct.
So Rose Manor had quite a lot to live up to. It did not quite achieve perfection, but with a final score of 96/100, it came remarkably close.
Timory Rose Manor at a glance
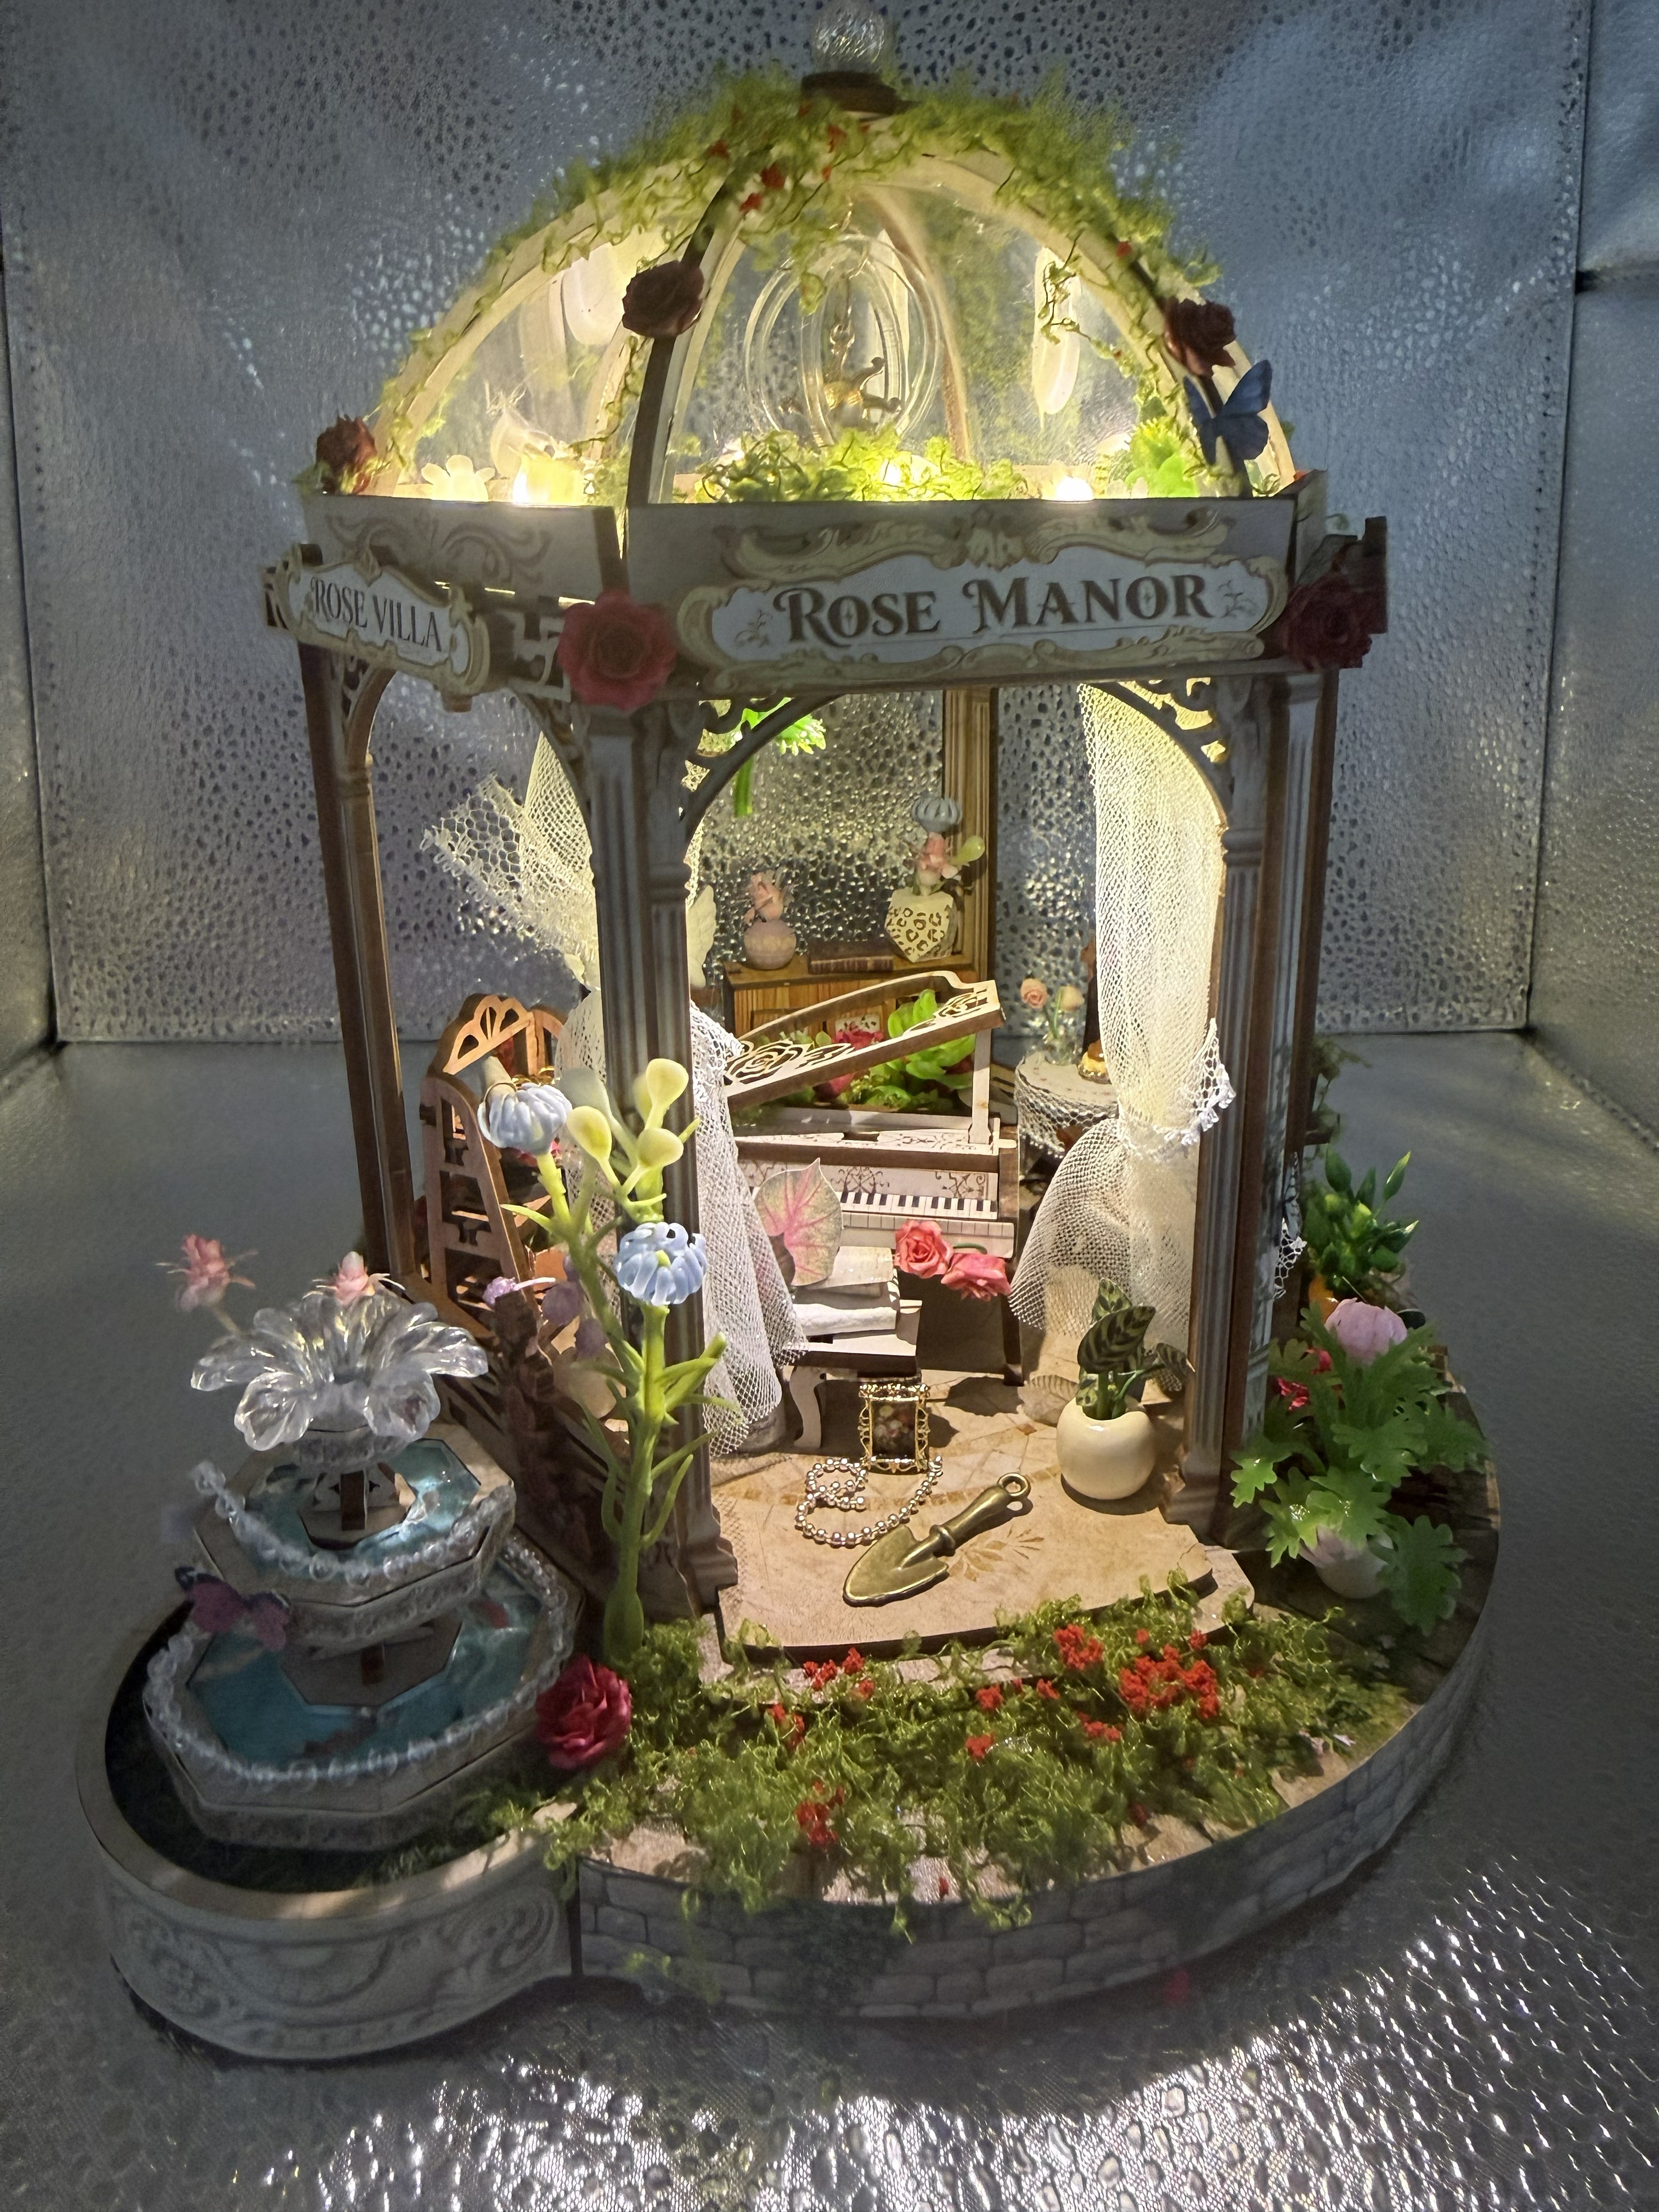
Rose Manor is a decorative miniature house with a strong garden-room feel, packed with furniture, flowers, foliage, lighting and even music. It is built around a hexagonal structure with a domed roof and a particularly attractive grand piano as its centrepiece.
The finished model is elegant rather than gimmicky. There is plenty going on, but it never feels as though Timory simply emptied the accessories cupboard into the box and hoped for the best.
What is included in the Rose Manor kit?

Inside the box you get:
- 6 MDF template sheets
- Numerous bags of 3D accessories
- A large selection of flowers, foliage and other garden decoration
- Cardboard templates
- Stickers
- Acrylic parts
- Water-ripple acrylic
- PVC components
- Battery compartment
- Touch-control PCB
- One standard LED
- A light cable containing multiple mini LEDs
- A speaker
The instructions are excellent. Timory uses a large A4 manual with clear diagrams rather than photographs, and that makes a noticeable difference. Photographic instructions can occasionally leave you staring at a tiny beige component wondering whether it goes behind another tiny beige component. Here, the diagrams are clean and unambiguous.
Test the electronics first
As always, I recommend testing the complete lighting system before beginning the build. Rose Manor makes this particularly easy because the manual includes a very clear wiring diagram.
One useful thing to know before assuming you have been supplied with the wrong PCB: some of the connection slots are covered by small lids. These need to be removed before the cables can be inserted.
It sounds obvious once you know. Most things do.
Building the interior

The build begins with some of the smaller decorative items, including books, valley-fold open books and scrolls.
What I particularly liked was the way Timory organises the construction sequence. The accessories for each item of furniture are assembled first, followed by the furniture itself, and then those accessories are fitted to it before moving on.
That may sound like a small detail, but it means you are not surrounded by hundreds of mysterious miniature objects waiting patiently to be lost, sat on or attached to the wrong cupboard.
The clip-and-snap engineering is excellent. Much of the furniture fitted together so firmly that glue was unnecessary. Where glue is required, the instructions show precisely where it should be applied.
The cardboard boxes are equally well considered, with perforations for the folds and clear guidance showing where glue should go.
The grand piano steals the show

The grand piano is the visual centrepiece of Rose Manor and contains a surprisingly large number of parts.
Despite that, it fitted together beautifully. The curved side gives it a much more convincing appearance than a simple flat-sided piece of miniature furniture, and once installed it immediately gives the interior a sense of grandeur.
After all the furniture has been completed and fitted to the base, the five walls are installed, followed by the first roof layer. The fit here was superb. Everything aligned exactly as it should, which is one of the main reasons Rose Manor scored a full 10/10 for engineering and precision.
A very clever LED flower ring

The lighting design is one of my favourite features of the entire kit.
Each mini LED on the string is pushed into an individual flower, eventually creating an illuminated floral ring around the roof. It is a clever idea and, more importantly, looks lovely when finished.
Builder’s tip: I used a craft knife to enlarge the hole in each flower very slightly. This made inserting the LEDs much easier and avoided the traditional modelling technique known as pushing harder until something breaks.
The separate LED is then fitted and its wires glued into position.
How to hide wires properly
One of my recurring complaints with miniature kits is visible wiring. Nothing quite destroys the illusion of a beautiful miniature room like a cable wandering across it as though someone from Openreach arrived halfway through the build.
Rose Manor handles this brilliantly.
Once the wires have been glued in position, you actually construct a pair of lace curtains specifically designed to conceal them. Further roof fittings disguise the remaining light wires.
The contrast with kits that simply leave their wiring exposed could hardly be greater. This is thoughtful design rather than an afterthought.
Touch sensor placement is refreshingly foolproof
The positions for the PCB and touch sensor are clearly marked underneath the model. That ensures the sensor ends up precisely where it should be after final assembly.
This is another small engineering detail that makes the build much more enjoyable. There is no measuring, guessing or repeatedly waving a finger over the base while muttering things that would upset the grandchildren.
Freddy Fatfingers versus the hanging sun
The hanging sun inside the acrylic globe was one of the trickier stages for me.
Closing the little loop rings in a confined space is perfectly achievable, provided your fingers bear some resemblance to precision instruments. Mine do not, hence the long-established nickname Freddy Fatfingers.
It is not a fault with the kit, but it is one of the areas where a little patience and a good pair of tweezers will help.
Watch those PVC windows

The curved roof beams are added next, followed by six PVC windows.
This is one stage where you really do need to pay attention to the instructions. The six panes initially appear identical, but they are actually two sets of three with their locating tabs in different positions. They alternate around the model so that they do not try to occupy the same slots.
I discovered this after attempting to fit the third pane. Naturally, I had first explored every possible explanation other than the obvious one: I had not read the instructions properly.
I would recommend fitting the panes from the top down.
Turning Rose Manor upside down: the moment of truth
Because Rose Manor is hexagonal with a domed roof, you eventually need to turn the model onto its side to complete the electronics underneath.
This is also the exact moment when you discover whether all those decorative pieces you thought were securely glued actually were.
If something falls off, consider it a surprise quality-control inspection.
The speaker is fitted into the base and all four electrical leads are then connected to the PCB. And yes, the speaker actually plays some rather pleasant music.
The three-tier fountain

The fountain is another standout feature. It uses the rippled acrylic to create the impression of water across a three-level grand fountain.
The overall effect is excellent, although I found the adhesive on the stickers used around the edges was not especially strong. I reinforced them with B-7000, and I would recommend doing the same with the other stickers if necessary.
All the external furniture is then assembled before the final mass of flowers and foliage is added around the outside and onto the roof.
One small criticism
There is very little to complain about, but I was not particularly keen on the stickers used to cover the gaps between the base and floor.
I would have preferred a flexible wooden strip similar to the material used for the curved side of the grand piano. It would have produced a slightly more premium finish and felt more in keeping with the quality of the rest of the kit.
It is a relatively minor criticism in an otherwise extremely well-engineered model.
Is Timory Rose Manor suitable for beginners?
I would not make Rose Manor somebody’s very first miniature kit. Most of the build is extremely straightforward, but the hanging decoration, lighting installation, domed roof and some of the finer exterior details require a little dexterity.
For anyone who has already completed a few kits, however, it is very approachable. The excellent instructions and exceptionally good component fit remove most of the frustrations that can make a complicated-looking model difficult.
Final verdict
Timory Rose Manor is a gorgeous model and one of the best-engineered miniature house kits I have built.
The furniture construction is logical, the fit is outstanding, the instructions are superb and the lighting has been integrated into the design rather than simply added because apparently every miniature kit must contain an LED somewhere.
The floral roof lighting, grand piano, fountain, concealed wiring and musical speaker all give the finished model genuine character.
Anyone who enjoys garden-themed miniatures, flowers or detailed interiors should find plenty to love here. It falls just short of the perfect score achieved by Venice Night Starlit, but 96/100 is hardly a national emergency.
Interested in building Rose Manor yourself? Check the latest price and availability on Amazon.
Rose Manor review scores


Leave a Reply