
Built and written by Martin Seidler as the Build # 56
Manufacturer: FifiJoy
Overall rating: 96/100
Recommended skill level: Intermediate to advanced
SHORT VERSION – REVIEW AT A GLANCE
In this FifiJoy Gelateria Bella Vista review, I examine one of the most luxurious and generously furnished miniature kits I have built. Bella Vista combines an extraordinary number of ready-made 3D details with beautiful Mediterranean styling, excellent lighting and exceptionally precise construction.
The kit shares its larger scale and detailed approach with FifiJoy’s Shamrock and Harp Pub. Together, these two models could become the foundation of a future series of shops and restaurants in the same or a very similar scale.
Bella Vista uses relatively few flat MDF imitations of three-dimensional objects. FifiJoy includes a remarkable selection of miniature gelato tubs, bottles, glasses, mugs, cups, cones, spoons, flowers, desserts and other accessories. Colourful acrylic details add even more visual richness to the shelves and displays.
The finished model looks charming from the outside and absolutely stunning inside. Warm-white, cold-white and RGB lighting reveal an interior filled with counters, mirrors, gelato, desserts, bottles and tiny utensils. The kit creates an exceptionally convincing result even without customization.
Two small issues prevent a perfect score. Some acrylic pieces show slight fogging near the laser-cut areas, although this has little effect under normal viewing conditions. The three pendant lights also prove unnecessarily difficult to secure and align. UV resin solved that problem for me in approximately 15 minutes.
Main strengths
- Exceptionally rich selection of ready-made 3D accessories
- Beautiful Mediterranean design inside and outside
- Excellent cutting, printing and component quality
- Outstanding combination of warm-white, cold-white and RGB lighting
- Perfectly functioning touch sensor
- Very precise fit of the main structure
- Clear and well-designed instruction manual
- Impressive finished result even without customization
Points to consider
- Minor fogging appears around some laser-cut areas of the acrylic sheet
- The pendant-light attachment makes alignment unnecessarily difficult
- Numerous small and delicate details make the kit less suitable for a complete beginner
- The richly furnished design leaves less creative work for builders who prefer to make every object themselves
- The windows make good photography and filming surprisingly difficult
Short verdict: Gelateria Bella Vista offers an exceptionally attractive, richly equipped and enjoyable building experience. It looks almost perfect straight from the box, yet still provides opportunities for plants, food details and figures. Final rating: 96/100.
FULL REVIEW
A Little Taste of Gelato History
The story of gelato reaches back much further than the modern ice-cream shop. Ancient civilizations used snow and ice to chill drinks, while Arab culinary traditions helped develop sweetened and flavoured sorbets.
The decisive step towards modern gelato came during the Italian Renaissance. Historians commonly credit Florentine architect and artist Bernardo Buontalenti with developing an egg-and-cream frozen dessert. Sicilian Francesco Procopio Cutò later introduced sorbets to a much wider public at his famous Paris café during the seventeenth century.
The Carpigiani Gelato Museum provides an excellent overview of this long and fascinating development.
Today, a traditional gelateria centres on its gelato counter. Many shops use an open glass display filled with visible trays of colourful flavours. Others prefer the traditional pozzetti system, which keeps the gelato inside covered metal containers.
Cones, cups, toppings and small desserts complete the typical scene. Many gelaterias also offer a few tables inside or outside. Some serve espresso and the classic affogato—gelato topped with espresso—but a coffee machine does not define a gelateria. Bella Vista therefore remains perfectly believable without one.
FifiJoy presents Bella Vista as a freestanding Mediterranean-style pavilion. Its striped awnings, blue accents, ornamental rooftop railing, café furniture, flowers and warmly illuminated interior create the atmosphere of a small gelateria discovered on a summer evening.
Introduction
Gelateria Bella Vista represents the second FifiJoy kit that could one day form part of a complete series of shops and restaurants in the same or a very similar scale. The first was the Shamrock and Harp Pub, which I built and reviewed recently.


The two kits have more in common than their size. Both offer a similar building experience and include an almost unbelievable quantity of three-dimensional accessories.
Bella Vista uses relatively few standard flat MDF imitations of miniature objects. FifiJoy provides many genuine 3D accessories instead. The kit also uses sharply printed acrylic pieces for smaller shelf decorations.
Those acrylic details remain flat, but their crisp colours, glossy surfaces and optical depth create a surprisingly convincing effect. Once you arrange them on transparent shelves or place them behind the service counter, they no longer look like simple flat components.
From the moment I opened the box, Bella Vista felt like the most luxurious FifiJoy kit I had received. Now that I have completed it, I would go even further. In terms of ready-made 3D objects, this may be the most generously furnished kit I have built so far.
That approach will naturally divide builders.
I enjoy arranging and refining a large collection of realistic accessories. Other builders prefer the traditional, fiddly experience of making almost everything themselves from paper, wire, beads and wood. Those builders may feel that Bella Vista leaves them too little to manufacture from scratch.
I do not consider that a flaw. It simply reflects a different design philosophy. Fifi Joy created Bella Vista so well that a careful builder can achieve an excellent result without adding any customization at all.
What Is in the Box?
The box includes:
- 12 MDF sheets
- One sheet of acrylic components
- Two PVC sheets containing window glazing and other transparent parts
- One sheet of stickers
- One sheet of mirror acrylic
- One integrated lighting set containing an RGB LED strip, three decorative pendant lights, several prewired warm-white and cold-white LEDs, colour-coded wiring, a touch sensor and a battery box for two AA batteries; the kit does not offer a USB power option
- Several bags of miniature accessories and decorative materials
- Flowers, greenery and vines
- Miniature alcohol bottles
- Gelato tubs complete with gelato and serving spoons
- Ice-cream cones
- Cups, glasses and mugs in several styles
- Tiny teaspoons
- Beads and decorative pieces for cakes, desserts and toppings
- Tweezers, scissors, a ruler, a sanding stick and adhesive tape
The sheer quantity of small accessories immediately impresses.
Fifi Joy does not simply provide the structural pieces for a gelateria and ask the builder to simulate its contents with printed MDF. The counters, display cases, shelves and tables receive recognizable miniature objects that give the interior genuine depth.
The kit includes so many accessories that the completed gelateria looks busy and active even before you add any figures.
Materials and Manufacturing Quality
Bella Vista offers excellent overall component quality.
Most MDF parts retain a natural and slightly muted surface rather than using aggressively vibrant colours. This choice suits the interior very well. The structural colours do not need to shout, while the food, signs, flowers, blue architectural details and decorative acrylic pieces provide all the brightness the design needs.
The printing looks clean and precise. The laser cutting also reaches a very high standard. Every MDF component came out of its panel smoothly, and I encountered no broken parts, damaged corners or stubborn cutting tabs.
The main structure demonstrates equally impressive accuracy. When I joined the sides, ceiling and rear wall, everything aligned with a satisfying “click-click.” I never had to force a major panel into position or correct a significant dimensional error.
Some acrylic pieces show slight fogging near the points where the laser entered or left the material. I noticed a similar issue on the acrylic bar components in the Shamrock and Harp Pub.
FifiJoy already knows about this problem and continues to work on it. The fogging deserves a mention, but it does not seriously affect the completed model. Under normal viewing conditions, the rich interior, reflections and lighting draw far more attention than these small cloudy areas.
The Instruction Manual
The instruction manual deserves full marks. It is large format, similar as Shamrock & Harp Pub, pretty much twice as big as legacy Fifijoy’s manuals.
It uses large, clear pictures and shows enough detail to guide the builder through the more complicated assemblies. The steps follow a logical sequence, and I found no major errors or confusing jumps.
The manual even warns the builder about the sharp triangular acrylic supports used under the awnings. That warning matters because the points and edges can feel genuinely sharp.
Only one section needs more precise guidance: the three pendant lights. The manual tells the builder to adjust their hanging length as desired, but it provides no suggested measurement or visual reference for the ideal height.
That omission contributes to the difficulty of aligning the lights, although the main problem comes from their attachment method rather than the manual itself.
Overall, the instructions support the build extremely well and earn an easy 10/10.
Building the Service Area
The construction starts with the cabinets and displays around the main service area.
You gradually fill these units with cups, gelato cones, thermal bottles, a cash register, menu boards, fruit trays and many other tiny objects. This early stage immediately establishes the character of the kit: Bella Vista focuses heavily on furnishing and visual detail.
One of the first delicate tasks involves making the small rolled wafer sticks that decorate the gelato cups. Builders who enjoy rolling miniature scrolls will probably like this step. Those who dislike making tiny paper tubes may feel differently.


I used a small-diameter quilling tool, which helped me create tight and reasonably uniform wafer rolls.
I also recommend shortening each printed sticker strip before winding it. Cut away approximately one-third and use only the remaining two-thirds. If you wind the entire strip, the finished wafer roll becomes unnecessarily thick and loses its delicate scale appearance.
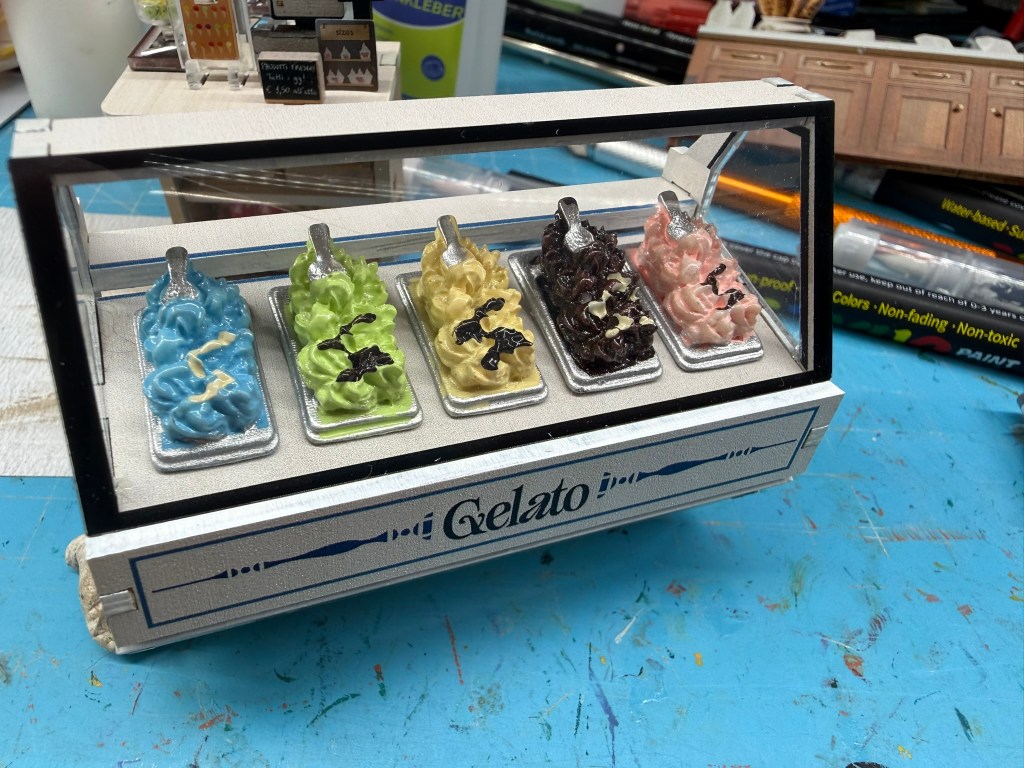
The kit provides the gelato bowls as nicely formed plastic pieces. You decorate them with coloured beads and the miniature wafer rolls. This approach creates convincing individual servings without forcing the builder to sculpt every portion of gelato from scratch.
The refrigerated gelato display case comes next. It combines MDF, acrylic and PVC with the supplied ready-made gelato tubs.
The construction itself remains straightforward. Careful edge painting makes a major difference, however. Once I covered the visible edges, the separate layers began to read as one clean piece of furniture rather than a laminated MDF assembly.
The following steps add several menu boards and counter accessories. You then construct a corner display cabinet from an MDF frame and transparent acrylic shelves. Tiny cakes, cupcakes and similar desserts fill the completed cabinet.
The right-hand section contains working surfaces and equipment for producing the cones, together with an adjacent cupboard. By this stage, you have completed enough counters, shelves and accessories to begin arranging the interior on the baseboard.


Interior Tables, Seating and My First Customization
The next stage adds the interior tables, chairs and benches.
I applied my standard edge treatment to these pieces. I broke and slightly rounded every accessible exposed edge before colouring it.
This job proved particularly easy on the interior furniture because the original edges used a brown colour. A brown furniture repair marker covered the rounded areas perfectly without disturbing the appearance or changing the intended colour scheme.


This relatively simple treatment immediately improved the furniture. Rounded and coloured edges make miniature tables and chairs look far less like flat pieces cut from layered MDF.
The standard design also places a flat two-dimensional plant on the left side of the rear wall. I decided to replace it with a proper three-dimensional plant in one of my own pots.

The change may seem small, but it adds depth to an area that remains visible through the windows. A real plant also matches the quality of the surrounding 3D accessories much better than the original flat version.
Bella Vista does not need a major redesign. Small and carefully chosen improvements can nevertheless make an already rich scene even more convincing.
Walls, Doors and Windows
The walls use relatively simple construction.
Decorative pieces along their upper edges gradually create the ornamental rim that gives the gelateria much of its Mediterranean character.
The PVC glazing offers a welcome improvement over the equivalent pieces in the Shamrock and Harp Pub. Fifi Joy provides a generous border around the visible window areas, so the builder has enough material for a secure adhesive connection.
This extra margin makes installation much easier and reduces the risk of the glazing coming loose later.
The transparent acrylic inserts for the doors and entrance require more care. Avoid cyanoacrylate superglue near visible transparent areas because the fumes can cloud or fog acrylic.
I recommend a suitable clear adhesive or thin double-sided tape instead. Both options allow you to secure the transparent parts without damaging their appearance.


The completed entrance and side panels fit neatly into position. Small acrylic door handles add another effective detail and look surprisingly convincing in the finished model.
After completing the walls, you can install the remaining flowers, tables and chairs inside the gelateria.
Building the Back Wall
The rear wall becomes one of the strongest visual elements in the entire model.
The first section uses a relatively simple rack filled with miniature alcohol bottles. The central display then adds much more complexity and visual depth.
Gold-coloured MDF frames surround mirror panels and transparent acrylic shelves. Numerous colourful acrylic details fill those shelves.


This combination works beautifully. The mirrors multiply the contents and create extra depth, while the transparent shelves keep the display visually light. The result looks far more sophisticated than a standard MDF shelving unit.
A small hanging plant combines greenery with a bead that forms its container. I managed to lose the supplied bead, so I replaced it with a small golden cone from my own supplies.
The greenery hides almost the entire replacement part. Nobody looking at the finished display will recognize the substitution or notice that I used a different component.
At first, the upper transparent shelf appears pointless because the surrounding frame hides it from normal view. The following step reveals its purpose.
You attach the LED strip to this hidden acrylic shelf. The shelf supports the strip and directs its light down across the display area. This clever arrangement illuminates the shelves without exposing the lighting hardware.
The rear wall also receives several small decorative utensils and another blue-grey MDF cupboard. Colourful acrylic details fill its shelves and complete the right-hand working area.
At this point, the interior already begins to look remarkably rich.
Awnings and Their Supports
The striped awnings contribute strongly to Bella Vista’s Mediterranean appearance.
Orange triangular acrylic brackets support them. These components have extremely sharp points and edges, so builders should take the warning in the manual seriously.
The main challenge does not come from assembling the individual brackets. You need to keep every bracket aligned in exactly the same plane.

If one triangle sits at a different angle, the rigid acrylic awning cannot rest evenly across all its supports. A small error at this stage may twist the completed awning or leave a visible gap.
I recommend fixing the brackets with a small amount of cyanoacrylate or another strong adhesive. Check their alignment carefully from several angles before the glue cures.
Once all the supports share the same angle and position, the awnings fit correctly and create a very attractive finished effect.
Lighting and Electrical Installation
The electrical section begins after you fit ceiling piece K7.
Fifi Joy identifies the individual lighting circuits with different colours of heat-shrink tubing. This colour coding makes every lead easy to recognize and greatly reduces the chance of routing the wrong wire to the wrong location.
Some LEDs require a bend of approximately 90 degrees before insertion into their circular openings. Other LEDs must remain straight because they pass through two layers of material and need to sit deeper inside the structure.
Pay particular attention to the light above the entrance and the light inside the corner cabinet. If you bend either LED too early, it may illuminate only the first structural layer instead of reaching its intended opening.
The kit provides enough U-shaped retainers to organize the wiring. It also includes self-adhesive stickers for securing the cables and LEDs.
As usual, I preferred UV resin for the LED mounting points. UV resin gives me much greater control and creates a firm, clean connection within seconds.


The completed lighting looks outstanding.
Warm-white LEDs dominate the interior and create a welcoming evening atmosphere. Selected cold-white lights emphasize working and display areas, while the RGB strip adds colour and visual depth.
The hidden LED strip above the mirrored shelving works particularly well. It illuminates the display without revealing the strip itself.
The touch sensor worked perfectly from the first test. Two AA batteries power the complete system. The kit does not include a USB socket or any alternative USB power option.
I would have appreciated USB compatibility, but the battery system works reliably and keeps the model independent from a cable.
The Three Pendant Lights: The Only Difficult Design Detail
The three decorative pendant lights form the only part of the kit that I consider less than perfectly engineered.
Each LED already carries a small conical lampshade. The manual asks the builder to wind approximately 10 cm of the supplied black wire around the existing LED cable.
This black wire improves the appearance and adds some stiffness to the otherwise flexible lead.
I first wound the black wire around all three cables as instructed. The task itself caused no difficulty, although I had to wrap the wire neatly because the completed cables remain visible.
The real problem started when I passed the three lights through the ceiling holes.
The manual allows the builder to choose the hanging length but gives no reference dimension. If you hang the lamps too high, the shades become difficult to see. If you hang them too low, you may not have enough wrapped cable available to support them properly.
The supplied tape could not hold the cables firmly enough. The lights continued to move from side to side, and the flexible sections made vertical alignment extremely difficult.
I tried to straighten all three pendants and establish a consistent height, but the attachment points kept moving. Every correction to one light seemed to disturb another.
I reached this stage at around midnight. After struggling with the installation for some time, I went to bed convinced that I would need to redesign the complete pendant-light assembly in the morning.
I considered removing the original cables, replacing them with thinner wires and rebuilding the entire suspension system.
After sleeping on the problem, I looked at the lights again in daylight. Their actual appearance did not trouble me as much as it had the previous night. The lampshades looked acceptable, and the black wrapping created a reasonable visual effect.
The design did not need a complete replacement. It simply needed a much stronger ceiling attachment.
That realization led me to UV resin.


I first positioned all three pendants at the height I wanted. I then placed several small drops of UV resin around the first cable where it passed through the ceiling opening.


I cured each application before adding the next. This gradual process filled the opening and created a rock-solid anchor around the cable.
Once the ceiling held the cable firmly, I could adjust and straighten the visible section without moving the attachment point. I repeated the same procedure on the remaining two lights.
Within approximately 15 minutes, UV resin solved the entire problem.
All three pendants became firm, straight and properly aligned. What had looked like a complete redesign at midnight became a quick and effective correction the following morning.
Builders who feel comfortable with soldering could still replace the relatively thick leads with finer 30 or 32 AWG wire. They could also hide those thinner wires inside very narrow decorative tubing.
That modification might create a more delicate appearance and make the pendants easier to manipulate. However, I ultimately decided that the supplied lights did not need such extensive customization.
Once the UV resin secured them properly, I felt reasonably happy with their appearance and saw no reason to replace them.
The pendant lights themselves look attractive, and they contribute positively to the finished interior. Their ceiling attachment causes the problem. Fifi Joy could improve this area by giving the cables a firmer mounting point that allows builders to straighten and align the lamps easily.
This detail alone prevents me from awarding a perfect engineering score.
Completing the Ceiling and Roof
After completing the lighting, you reinforce the ceiling and attach the left and right walls.
The excellent dimensional accuracy makes this part remarkably easy. The major structural components fit together almost effortlessly, without force or corrective sanding.
A second ceiling layer creates the floor of the small rooftop structure. You then construct its supporting frame and install the roof panels.
This structure neatly hides the battery compartment and wiring while preserving access when you need to replace the two AA batteries.
The decorative rooftop railing requires far more time than its appearance suggests.
Ten small pillars surround the roof, and each pillar consists of six individual components. The pillars alone therefore require the assembly of 60 separate pieces.
After completing them, you fit the railing panels between the pillars.
Builders who ignore the visible edges may complete this stage relatively quickly. For somebody as obsessed with edge perfection as I am, the railing becomes a small project in its own right.
I applied three layers of acrylic colour to every visible edge. This treatment added approximately 30 to 40 minutes to the build, but it gave the entire railing a much cleaner and more unified appearance.
Without edge treatment, the many laminated parts would reveal their construction immediately. With careful colouring, they read as ornamental architectural elements.

Exterior Furniture and Final Details
The final stage adds the outdoor chairs, sofa and tables, together with more gelato cups, bowls, wafer rolls, strawberries, plants, miniature lamps and other decorative pieces.
The kit also includes a small white dog. It sits on one of the chairs and gives the otherwise empty seating area a touch of life.
The exterior furniture required a different edge-treatment approach from the interior pieces.
Coloured pieces with reinforcing rear layers form the outdoor chairs and sofa. These reinforcements imitate metal construction but make easy edge rounding almost impossible.
Any aggressive rounding would risk damaging the structure or disturbing the appearance of the reinforcing elements. I therefore left the chairs and sofa more or less as Fifi Joy designed them.


The two exterior tables allowed more extensive treatment. I rounded their exposed edges, but this process removed part of the original colour.
I therefore repainted both tables completely with a purple acrylic marker. The new finish covered the worked edges and preserved a colour that matched the rest of the exterior seating.
Adding the Climbing Roses
Once I had installed the furniture and standard decorations, I felt that the exterior still needed more greenery.
I originally wanted to add bougainvillea. Its bright flowers and vigorous Mediterranean growth would have suited the architecture perfectly.
Unfortunately, I did not have foliage that represented bougainvillea convincingly. I therefore chose to create two climbing roses instead.
I placed a rectangular planter at each front corner of the gelateria. Two ready-made shrubs from my supplies formed the base of the plants.
Those shrubs had remained in my collection for a long time because I had never found the right project for them. Bella Vista finally gave them a purpose.
I wound pinkish-white flowering vines through the shrubs and allowed the combined plants to climb along the front corners of the building. The layered greenery and flowers create a convincing impression of mature climbing roses.
I like the roses very much, although I admit that the rectangular planters do not represent the most natural solution.


In real life, roses of this size would probably grow directly from the ground rather than from relatively small containers. A narrow planting bed around each corner would have looked more realistic.
I could have created a small stone border and filled the enclosed area with material representing soil. That approach would have made the roses look as if they genuinely grew from the ground.
However, I already had the rectangular boxes available. Their colour and appearance matched the gelateria reasonably well, and I did not feel creative enough at that moment to construct convincing ground-level planting beds.
The planters therefore represent a small compromise in my customization. I can accept that compromise because the completed roses add so much life and colour to the exterior.
I also considered adding flowers to the rooftop railing. I even prepared several corner planters and tested their position.
Once I saw them together with the climbing roses, I decided against using them. Additional rooftop flowers made the design feel too busy and started to hide the architecture.


I returned those planters to my storage box.
Customization does not always mean adding more. Sometimes the most important decision involves knowing when to stop.
My Edge Treatment and Colours
Readers of my reviews already know that I cannot tolerate raw MDF edges or visible laser marks. Bella Vista therefore received extensive and meticulous edge treatment.
A warm cream or cream-beige dominates the building and much of the interior. I used mainly this 003 colour throughout the main construction.
Mediterranean ocean blue covered the characteristic blue architectural details. I also used silver and gold on selected shelf frames, decorative elements and small fittings.
The brown furniture repair marker worked particularly well on the interior tables, stools and chairs. Because the original furniture already used brown edges, the repair marker blended into the design without changing its intended appearance.
The exterior tables required a different approach. After rounding their edges, I repainted them completely with a purple acrylic marker.
I left the exterior chairs and sofa largely unchanged because their reinforcing rear pieces made satisfactory edge rounding too difficult.
The accompanying photograph shows all the markers I used during this build. The selection includes the standard acrylic markers for the cream, blue, purple, gold, silver and other coloured details.

It also includes the brown furniture repair marker and a chrome marker. I used the chrome marker on the electrical socket and several other small metallic details.
Edge treatment makes a major difference on Bella Vista.
A builder can certainly assemble the model without rounding or colouring anything, and the design will still look attractive. However, raw MDF edges and visible laser marks interrupt the visual unity of the architecture and furniture.
Careful edge treatment allows the structure to support the miniature scene instead of distracting from it. On a highly detailed and luxurious kit such as Bella Vista, that extra effort produces a much more convincing final result.
Future Customization: Bringing Bella Vista to Life
My recently arrived resin 3D printer opens the door to one important future addition: people.
The gelateria already contains several interior and exterior seats, but the little white dog currently remains its only customer.
Once I master the reliable creation and printing of miniature figures, I plan to add several visitors enjoying gelato at the tables. I particularly want to populate the outdoor seating area.
A few carefully positioned figures will transform the beautiful but empty setting into a living scene. They will also provide an immediate sense of scale.
Bella Vista offers several other customization possibilities:
- Additional gelato, desserts, cakes, coffee cups and food accessories
- Handmade resin foods created with miniature moulds
- Alternative flowers, vines and planting arrangements
- More utensils and details in the cone-production area
- Staff figures behind the counter
- Customers at the interior and exterior tables
- Subtle weathering around the pavement and exterior
- Additional rooftop flowers for builders who prefer a richer decorative style
The shelves and working surfaces already contain many objects, so every addition requires restraint. Bella Vista rewards selective detail, but it does not need indiscriminate filling.
I felt tempted to add more greenery to the rooftop area. Corner flowerpots would fit easily along the railing.
However, the climbing roses already create a strong floral feature. More plants would overpower the original architecture, so I decided to leave the roof unchanged.
How Difficult Is Bella Vista?
I would not recommend Bella Vista as an ideal first miniature kit.
The model contains no single step that an attentive beginner could not complete. A patient newcomer could certainly finish it.
However, the large number of tiny objects, delicate acrylic components, visible glue joints and highly detailed interior areas make previous experience valuable.
The pendant lights and awning supports also require more control than the corresponding parts in a straightforward beginner kit.
Builders who already know how to apply glue neatly, handle small components, install transparent glazing, organize wires and treat MDF edges will have a much better chance of achieving the exceptional result that the design deserves.
A complete newcomer might finish the structure successfully but leave visible glue, raw edges or laser marks. Those details would significantly reduce the impact of the otherwise sophisticated model.
The build therefore falls into the intermediate-to-advanced category.
Its logical construction and precise fit keep it from becoming truly difficult. The challenge comes primarily from completing the large number of small and highly visible details neatly.
The Finished Result
Bella Vista looks charming from the outside.
Its cream-and-blue Mediterranean architecture, striped awnings, ornamental rooftop railing, flowers and café furniture create an attractive freestanding display.
The interior, however, takes the model to another level.
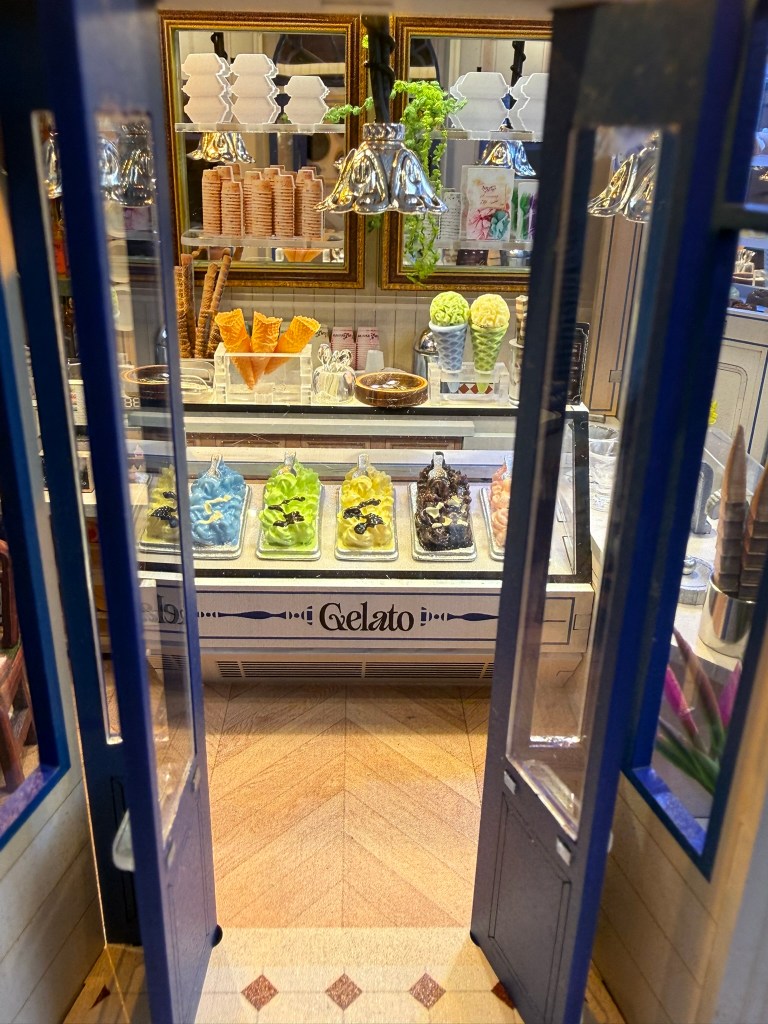
Warm illumination reveals layers of gelato, desserts, bottles, mirrors, shelves, plants and tiny service equipment. Every viewing angle reveals another detail.
The mirrors extend the visual depth, while the transparent shelves prevent the displays from looking too heavy. The lighting highlights individual areas and makes the gelateria feel open and welcoming.
Ironically, this rich interior makes Bella Vista difficult to photograph and film.
The windows and structural openings do not provide easy camera angles. A camera cannot capture the same close and natural viewing experience that the human eye enjoys.
Producing photographs and videos that show every important detail therefore proved surprisingly difficult.
Viewed in person from close range, however, the interior gives tremendous pleasure. Builders and visitors will want to keep looking through the windows to discover everything that Fifi Joy placed inside.
Ratings
| Category | Gold stars | Score | Why I gave this rating |
|---|---|---|---|
| Instruction manual | ⭐⭐⭐⭐⭐ | 10/10 | Large, clear illustrations, good detail, logical sequencing and useful safety warnings guide the builder effectively. Only the pendant-light section could give a more precise hanging length. |
| Material and component quality | ⭐⭐⭐⭐⭐ | 9.5/10 | Excellent MDF, printing, cutting and ready-made accessories create a premium building experience. Minor fogging around some laser-cut acrylic areas costs half a point. |
| Cutting accuracy and fit | ⭐⭐⭐⭐⭐ | 10/10 | Every MDF piece came out cleanly, nothing arrived broken, and the main structure aligned with outstanding precision. |
| Artistic design and final appearance | ⭐⭐⭐⭐⭐ | 10/10 | Mediterranean architecture, rich interior details, mirrors, displays and atmospheric lighting create an exceptional finished model. |
| Engineering and buildability | ⭐⭐⭐⭐½ | 9.5/10 | Logical construction and excellent precision make most stages enjoyable. The troublesome pendant-light attachment prevents a perfect score. |
| Lighting and electronics | ⭐⭐⭐⭐⭐ | 9.5/10 | Warm-white, cold-white and RGB lighting create an outstanding effect, and the touch sensor works perfectly. The pendant attachment and lack of USB power cost half a point. |
| Customization potential | ⭐⭐⭐½ | 7/10 | Figures, greenery, resin foods and additional details offer good possibilities, but the already busy interior leaves less to create from scratch. |
| Difficulty | ⭐⭐⭐⭐ | Intermediate to advanced | No single step proves impossible, but the numerous delicate details, acrylic components and precise gluing reward previous experience. |
| Overall rating | ⭐⭐⭐⭐⭐ | 96/100 | An exceptionally luxurious, beautifully designed and richly furnished kit. Minor acrylic fogging and the pendant-light attachment keep it just below perfection. |
Fifi Joy Gelateria Bella Vista Review: Final Verdict
Gelateria Bella Vista ranks among the finest Fifi Joy kits I have built.
Its component quality, cutting accuracy, fit, lighting and instruction manual all reach an excellent standard. The extraordinary quantity and variety of included three-dimensional accessories place the kit in a class of its own.
Bella Vista will particularly appeal to builders who enjoy arranging, refining and personalizing a richly designed environment. Builders who prefer to manufacture every cup, bottle and dessert from raw materials may find the design less involving.
The interior looks exceptionally convincing straight from the box. The exterior also carries enough architectural character to work as an attractive display from every angle.
Minor acrylic fogging appears mainly during construction and around some laser-cut areas. Under normal viewing conditions, the rich details and lighting make it difficult to notice.
The pendant-light installation caused the only genuine frustration. However, the lights themselves look perfectly acceptable once correctly aligned.
After worrying overnight that I would need to redesign the complete assembly, I solved the attachment problem with UV resin in approximately 15 minutes the following morning.
Careful edge treatment and neat assembly allow Bella Vista to reach its full potential. My climbing roses brought additional colour and life to the exterior, even though their rectangular planters represent a small compromise.
Future 3D-printed customers will eventually complete the scene and turn the empty tables into a living gelateria.
My Fifi Joy Gelateria Bella Vista review therefore concludes with an excellent overall score of 96/100.
Final score: 96/100.
Gallery




Leave a Reply