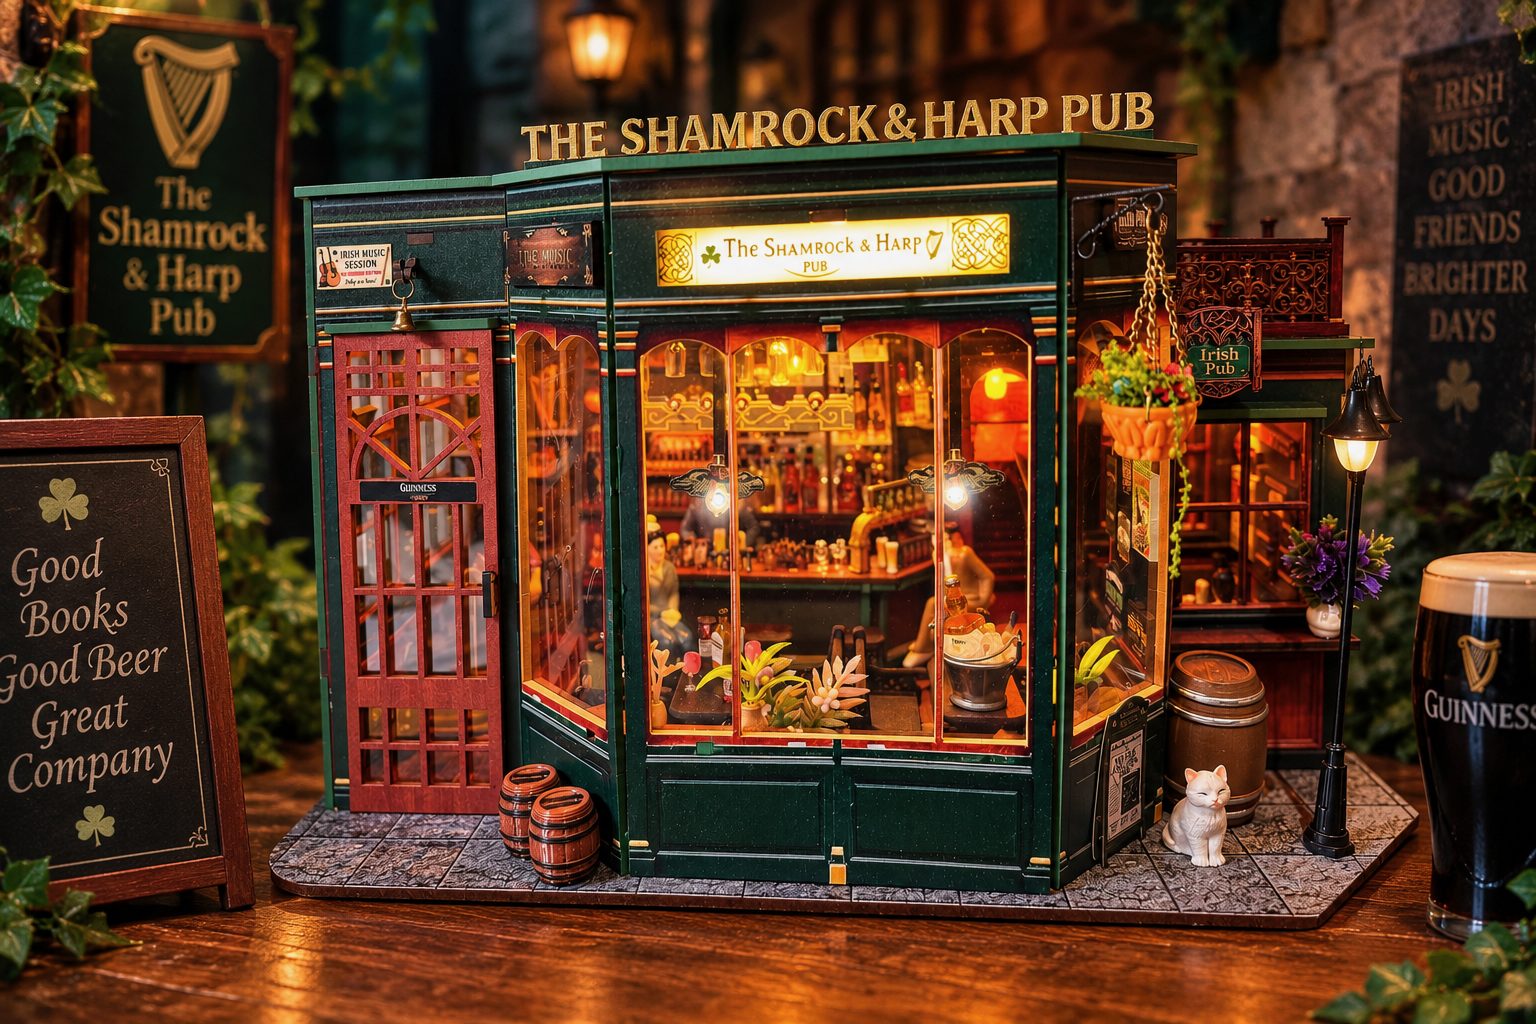
Built and reviewed by: John A. MacInnes – Build number 69.
Shortened Precis Review
For those who don’t want to, or don’t have the time to read a full review, then here’s my precis just for you.
Fifijoy’s Shamrock & Harp Pub is a substantial miniature build that has impressed me from first sheet of MDF to finished pub. At 31cm wide, it has a footprint approaching three times the width of a standard book nook, so this is one that needs shelf space. The 308-piece kit is well packed, the 2.5mm MDF is excellent quality and I had no broken pieces. The laser cutting is clean, the printing is sharp and the parts release from the sheets without drama.
The 34-page, A4, full-colour manual is one of the better ones I’ve worked with, although there are points where you need to pay attention. I found several areas where rushing in with the glue could create problems, particularly around the bar, fireplace wiring, door and left-hand wall. None were deal-breakers, but worth knowing about.
The lighting is straightforward and reliable, with warm-white LEDs giving the pub the cosy atmosphere it needs. I replaced the slow-pulsing fireplace LED with red and yellow flickering LEDs, and that made a big difference. The surprise is the accessories. Fifijoy have included genuine 3D bottles and glasses rather than relying entirely on printed MDF versions. That adds to the realism.
There is plenty of scope for customisation, which I took full advantage of by adding people, a street lamp, hanging basket, improved barrels, rounded furniture, upgraded fire lighting and a bespoke soundtrack. The only negatives are a few basic accessories and the oversized ice bucket.
The incorrectly cut mirror could have been a nuisance, but Fifijoy’s customer service was excellent, with a replacement reaching Scotland from China in six days.
Overall, this has been an excellent build, with superb construction quality, plenty of detail and shelf presence. It’s a kit I’ve thoroughly enjoyed, and one I was sorry to finish.
Full Review Introduction:

Well, here we go again with another book nook review, and this one certainly made an entrance before I had even opened the box. The packaging is seriously substantial, with a huge, very sturdy box arriving on the doorstep. In fact, it proved to be considerably tougher than the courier’s delivery technique, who decided that the best place for it was to lob it over the top of our security gates. Remarkably, despite being treated to an impromptu flight, the box arrived without a mark on it.
Had I been a little quicker getting to the gate, the courier might have received a few choice words about the fact that throwing parcels over gates is not generally what I would describe as a “safe place”, despite apparently being perfectly happy to mark it as delivered satisfactorily.
Anyway, back to the box. Inside, the contents had been given plenty of protection, with two layers of bubble wrap inside a waterproof bag, followed by another layer of bubble wrap inside the box itself, providing a very well-cushioned journey for everything inside.
This time around, we are heading somewhere a little more familiar — the local Irish pub. There are few buildings quite as instantly recognisable as a traditional Irish pub, whether it is the colourful exterior, the welcoming entrance, the pub sign hanging outside or the promise of a good bit of craic once you step through the door. Of course, being a book nook, we don’t actually get to step inside this one for a pint, but the kit certainly looks to have captured the character and atmosphere that makes the Irish pub such an iconic part of village and town life. So, with that in mind, let’s get on with the build and see just how well this little pub comes together.
This is one of Fifijoy’s latest kits, and before we even get to the contents, the first thing that strikes you is the size of the box. Measuring a rather substantial 10″ x 16″ x 2.5″, it is certainly not a small package for a book nook. Whether it really needs to be quite that large is something I’m not entirely convinced about, but there is no denying that the contents have been packed extremely well. Inside, everything is neatly organised in a plastic insert, with dedicated storage for all the various accessories, including the lighting, plant material, barrels and all the other small pieces that make up the finished pub. So, while the box may be somewhat on the generous side, at least nothing has been rattling around loose inside it.
Fifijoy is certainly no newcomer to the book nook hobby and has established itself as one of the main players in the market, with a sizeable catalogue covering everything from traditional scenes and libraries to fantasy, cafés, taverns and much more. Their current book nook catalogue runs into the hundreds of listings, so there is certainly no shortage of choice if you fancy having a look at what they have to offer. This latest release gives us the chance to see what Fifijoy can do with something a little closer to home — a traditional Irish pub. Time to get the glue out and see if they have managed to capture the character of the real thing.
Fifijoy describe this one as a DIY Miniature House rather than a book nook, and for once the word “miniature” is doing a fair bit of heavy lifting, because this is easily the largest kit of this type I’ve ever come across. What we have here is very much a miniature Irish pub, complete with all the little details you would expect to find in one, and judging by what is spread across the workbench, there is going to be plenty to keep us occupied. With the box opened, the pieces organised and everything accounted for, there is really only one thing left to do — start building the pub and see what Fifijoy have come up with.
Well, actually, I didn’t start building straight away. First, I had a good read through the instruction manual because, already, my customisation nose was twitching. I could see a soundtrack being built specifically for this one, and once I started looking at the details, the ideas began to come thick and fast. Adding a few people should give the scene a more realistic look, perhaps a hanging basket around the entrance, and how about a newspaper A-frame sitting on the pavement? I was also already looking at the rather basic wooden street lamp and wondering whether that could be replaced with something a little more realistic. In other words, I hadn’t even reached the first piece and the customisation list was already starting to grow.
There isn’t an official piece count displayed on the kit box, but an online check reveals it has 308 components. What we also know is that when finished, the pub measures 31cm wide, 18.5cm deep and 18.8cm high. Now, a standard book nook is roughly 11cm wide, 18cm deep and 23cm high, so you can see that this one is quite a bit wider, although not quite as tall. For a bar or restaurant build, though, that extra width is no bad thing and I reckon this one will have plenty of shelf presence once it’s finished.
Recommended for builders aged 14 and over, the kit sits comfortably in the lower intermediate category, but interestingly, a star rating was not provided to show the difficulty level.
This kit was kindly provided by Fifijoy for review purposes. That doesn’t mean they get a free pass, though — I’ll still be putting it together as I would any other kit and giving you my honest thoughts on how it builds, what works well, what doesn’t, and, of course, where my customisation nose takes me along the way./h
Unboxing:

So, what do we actually get for our money? Quite a lot, as it turns out.
Fifijoy lists 308 components in the kit and, having opened everything up, I can see why. There are the usual tools to get you started, along with the various wooden sections, acrylic pieces and all the bits and pieces needed to turn this into a rather convincing Irish pub.
Then we have the lighting kit, which I’ll come back to later, because there is quite a bit to talk about there.
The accessories are where this one really starts to get interesting, with a great selection of bottles, glasses, ice cubes, flower vases, barrels and even a little cat. There’s also the plant material, printed stickers to add some extra authenticity to the pub, window PVC sheet, a mirror section and another acrylic sheet containing lamps, the flames for the fire and a microphone on a stand — presumably waiting for the band to finish their drink at the bar. And that’s before we’ve even started building it. At around £64.19 retail price in the UK, there is certainly a lot in the box for your money, and at first glance I have to say it looks like pretty good value.
Instruction Manual:

The instruction manual is another pleasant surprise. It’s A4, full colour and runs to 34 pages, with everything laid out in a nice, sensible order. The first couple of pages give you the board layout, the accessories and the wiring system, including colour coding for the various wires. Now, regular readers will know I’ve often resorted to my paint markers to put a bit of colour on the lighting wires myself, so it looks like more manufacturers are finally catching up with me and my markers may soon be looking for another job.
The actual build instructions take you through the process step by step, with clear illustrations and enough information to see what’s expected at each stage.
I’ve had a good read through the manual before starting and, at this point, I can’t see anything that looks as though it’s going to cause any undue headaches. Of course, that’s always easy to say when everything is still sitting neatly on the bench and nothing has been glued to the wrong piece.
We’ll see how I feel once we’re several stages in, but for now the manual gets a thumbs up from me. At least I don’t think I’ll need to add a crystal ball to the toolkit just yet.
The kit as supplied:

First impressions of the wooden parts are pretty good. With a kit like this, you always hope that the first thing you see when you open the sheets isn’t a collection of badly cut pieces surrounded by enough MDF dust to redecorate the workbench. Thankfully, that’s not what we have here.
The boards are 2.5mm MDF and the laser cutting looks clean and well defined, with the individual pieces easy to identify. In fact, board H is probably the best testimony to just how clean the laser cutting is. Two sections decided they had had enough of being part of the board and simply dropped out when I lifted the sheet — always a good sign when pieces are removing themselves without being asked. There doesn’t appear to be any excessive scorching around the cuts either.
One of the first things that has impressed me is just how well the individual pieces release from the boards. In many cases, there is little or no need to sand the attachment points or remove burrs, as the pieces pop out cleanly and are easily removed without any damage. The only exception is with some of the very smallest pieces, where a little assistance from a craft knife or scalpel may be needed to free them safely.
Importantly, I haven’t encountered any damage, splintering, chipping or incorrectly painted sections on the pieces, which is a very good indication of the care that has gone into manufacturing the kit.
Moving on to the printed boards, and these are looking very good indeed on first inspection. The colours are sharp, clean and well defined, with everything sitting neatly within the print margins. There is no obvious bleeding, colour overflow or fuzzy edges, which is exactly what you want to see. I always think you can tell a lot about a kit from the quality of the printing on the boards, and this is one of those occasions where it is pretty obvious that you’re dealing with a professional manufacturer using the right technology for the job.
The detail has a crispness to it that should hopefully translate into a very good-looking finished build, but as always, we’ll find out just how good it really is as the build progresses and those pieces start coming together.
Lighting Kit:

Right, let’s have a look at the lighting, and thankfully this isn’t going to involve a degree in electrical engineering. Power comes from a three-AAA battery box, although the batteries aren’t supplied, and there’s a touch-pad sensor to switch the system on and off. One thing I’m particularly pleased to see is that the sensor has been encapsulated, protecting and strengthening the solder joints. That’s a small detail, but one that makes sense when you consider how much handling these wires can get during a build.
There are six warm-white LED heads supplied with the kit, which are just right for this type of pub. A place like this should have that warm, cosy and comfortable feel when the lights are on, rather than looking like you’ve walked into a supermarket at three o’clock in the morning.
The warm white gives the interior exactly the sort of glow you’d expect from an older-style Irish pub, while the two warm-white LED strips illuminate the bar area and shine down onto the shelving, so there should be plenty of light once everything is installed. One of the LEDs is for the fireplace and it has a slow pulsing effect rather than an actual flicker. It’s not bad, but as soon as I saw it working I knew I would be changing it. I’ll be putting at least one proper flickering LED into the fire because, well, if we’re going to have a fire, it might as well look like one.
Before I did anything else, though, I put the three batteries into the box and carried out a full test. No point getting halfway through a build only to discover that something doesn’t work. I’m pleased to say that every LED fired up, including the strips, so everything is working as it should at this stage. That’s another job ticked off the list before I’ve even picked up the first piece of MDF.
The build:

Unlike some other builds, where you can spend what feels like several weeks making tiny components in what seems to be an unusually cruel form of punishment for your language, the Shamrock & Harp Pub gets straight down to business. You’re already building the floor panel and one of the upright walls, and by step four on page four you’re fitting one of the LED heads. That’s exactly the sort of start I like to see — you’re actually building something almost immediately, rather than wondering how many more microscopic pieces you have to assemble before you get anywhere.
Once this bit is built, it looks like we’re creating the private “snug” area of the pub, tucked away from the main bar. And let’s be honest, that’s probably where you’d find me if this were a real pub.
Now, here’s one to watch out for, and I’m grateful to one of the Book Nook Workshop build team for pointing out a potential problem.
When you get this section of the pub assembled, resist the temptation to reach for the glue and fix it to the base. Leave it loose for now, because the rear wall comes into play later and needs a bit of wiggle room to get everything lined up properly. There are several slots and grooves that all have to meet up, it’s fiddly work and you’ll need to be able to move the section around ever so slightly to get that rear panel sitting correctly so that the tenons meet their respective mortises.
Once you’ve got it all together it makes a very solid bit of construction, but trying to do it with everything already glued in place is going to make life unnecessarily difficult. So, put the glue down and leave this one alone until the instructions tell you otherwise.
From there, things move along in a nice, sensible order. Here we move into the main bar area, so the pub is starting to take shape now. Once the bar section is in place, the build moves over to the left-hand side, including the shelving, before we get to the fireplace section and then finish off that side of the pub.
There’s a bit more interior work to do after that, before the attention turns to the side sections of the building. The roof of the main building comes next, followed by the windows and the main front structure of the pub. By this stage there’s not a huge amount of actual building left, with the final stages concentrating on adding the various accessories and all those little details that will hopefully bring the whole thing to life.
There are a lot of components in this kit, and once you have them all laid out on the workbench it can look a bit daunting. But don’t let the sheer number of pieces fool you, as the build itself is pretty straightforward. The instructions take you through it in a sensible order, with the pub gradually building up rather than throwing everything at you in one go. If you’re fairly new to book nook or miniature builds, I don’t think this is one you need to be afraid of. Just keep the small bits together in containers as I do, because there are plenty of them, and losing one under the workbench carpet could turn into a very expensive game of hide and seek.
My fellow builder and colleague, Martin Seidler, showed me a cracking little trick for making flat 2D artwork look much more like a 3D item, and it’s simply a case of rounding off the edges of square pieces. Now, if I hadn’t actually tried this myself and seen the difference, I wouldn’t have believed it either. But it works, it really does. So that’s another job I’ve created for myself. First, I have to sand off all the little burrs and the points where the pieces were attached to the board, then colour the edges, and only then can I get the little cordless tool out and start rounding the corners. All this because I can’t just leave well enough alone. Who said book nook building was supposed to be a relaxing and stress-free hobby?
WARNING: A wee word of warning here, particularly if you are going to be making any modifications that involve sanding or cutting the MDF. MDF dust is not something you want to be breathing in, so I use a portable desktop dust extractor along with a filtered face mask to keep the dust under control and protect myself while working. If you intend on trying this yourself, please make sure you have the relevant safety equipment in place before you start. If you haven’t, then my advice is simple — leave well alone. It really isn’t worth taking chances with your health for the sake of a miniature.
The First Section:

The floor piece marked K gives you a pretty good idea of what we’re dealing with size-wise, because this is easily the largest floor section I’ve come across in a kit. Once that’s in place, we move on to a couple of steps — and I mean that quite literally — as the entrance starts to take shape with the steps leading up to the doorway. The right-hand wall is fitted around this stage too, but before putting it upright there is a nice selection of well-printed signs and posters to add. One wee bit of advice here: let the glue dry properly before you stand the wall up. Ignore that and you’ll soon have a rather attractive collection of Irish pub signage all stuck together in one big, jumbled mess.
If you are building this exactly as it comes out of the box, you’ll probably make fairly quick progress. Me? Not so much. By now the pieces are coming off the boards and I’m already thinking about what I can do with them before they get anywhere near the glue. That means sanding the edges, dealing with the little attachment points, deciding what needs colouring and then, of course, deciding what colour I’m actually going to use. So while someone else might be well on the way to assembling the pub, I’m still sitting at the bench with a pile of bits, sandpaper and paint, wondering why I can’t just build something without messing about with it.
Then comes the bit that always takes far longer than it should — deciding what colour to use. I’ve got a ridiculous number of pens at my disposal, so you’d think that would make things straightforward. Quite the opposite. I start with the obvious choices, then find myself comparing shades that I wouldn’t normally give a second thought to, holding them against the MDF and wondering which one will look best once it’s all assembled. Before I know it, the build has barely moved and I’ve spent far too long choosing a colour that will probably only be noticed by me anyway. This is the problem with customising — you can make a simple job into a whole new project without even trying.
The two little pint glasses, part E4 on page 5, step 8, also got the rounding treatment, although this is where you need to be a bit careful. The pieces are tiny, and unless you fancy sanding your fingertips along with the edges, you need something better than just trying to hold them between your fingers. Once I’d finished with them, I think the extra bit of work in sanding and colouring had really brought them to life. The “lager” printed on the glasses certainly looks the part, too — although whether anyone would actually drink a pint that size is another matter.
First Tip of the Day:

Page 4, step 5, is where the first lamp goes in, and this is one of those little things worth getting right before you glue everything in place. The light is meant to spill across the PVC window insert, E2, giving a nice even glow rather than having one bright spot staring back at you. So, take a bit of care with where you position the LED and don’t have it sitting directly behind the window insert. Get it too close and you’ll end up with a very obvious point of light. I did consider using an LED filament to give that even glow; however, on checking with the lamp illuminated, the softer illumination we’re after is spot on. It’s a small detail, but it will make a difference once the pub lights are on.
Tip Number Two:

The PVC window inserts are a nice snug fit, and there isn’t a great deal of spare room around the window opening to be messing about with glue. I fitted the first one with glue and, while it worked, I wasn’t entirely happy with the finish. Then I remembered the double-sided adhesive strips I’ve saved from previous builds. Out came a small piece, onto the rear of the window it went, and it fitted perfectly without glue spreading over the actual PVC insert and giving it that cloudy effect. Not using glue leaves the PVC crystal clear, just as the manufacturer intended, and of course lets the nosy people on the street look in. Much cleaner, no glue where it shouldn’t be, and another wee problem solved before it became a bigger one.
Tip Number Three:

Step 50 on page 12 involves fitting a cover piece designed to hide the light run that supplies the fireplace. Part F42 fits onto the two notches on E14, which forms the doorway. One thing you may notice here is that the two tenons on F42 are a very slack fit in the corresponding notches. Don’t immediately assume that something is wrong or that the part doesn’t fit properly — it does.
I simply applied a small amount of glue to the two tenons, positioned F42 carefully so that it was straight and correctly aligned, and then left it to dry. The reason the fit is intentionally a little loose becomes clearer when you move on to the next stage. The designers have provided H19, a decorative piece that closes in the doorway and attaches to F42, effectively firming up and strengthening the whole assembly.
So, if you reach this stage and find yourself thinking that F42 is far too loose and wondering whether you have the wrong part, don’t get too anxious. It does fit — it just relies on the additional pieces to firm everything up and complete the assembly. It’s one of those occasions where the construction becomes much clearer once you see how the surrounding pieces come together.
Lighting Tip:

Now we get to the fireplace, and this is where I decided the supplied LED wasn’t going to make the final cut. I’d already tested it and, while it has a slow pulsing effect, to my eyes it didn’t really do much to replicate the look of a roaring open pub fire. So, me being me, I cut it off!
This is the point where you say a wee prayer to the book nook gods and hope you haven’t just messed things up. I cut the supplied cable fairly short because the two flickering LEDs I was using, one red and one yellow, already had long tails attached, and I really didn’t want to end up with a load of spare cable to somehow hide behind the bar. In hindsight, I should probably have used LEDs with thinner tails, because once the two cables were running together, I found I needed to do a bit of careful filing to give them enough room to pass through.
It’s not a huge job, but it’s something worth checking before you start making changes to the build. Thankfully, it all worked out fine, and once the two flickering LEDs were in place, the difference was remarkable. The combination of red and yellow gives a much more convincing flame effect through the printed acrylic flame piece, with a proper flicker rather than the supplied slow pulse. It works, and I think it makes the fireplace look considerably more realistic when it’s lit. Another little modification that has turned out to be well worth the effort.
Bar Fitting Tip:

Right, here’s one to watch because I came across a wee problem with the bar. Part F1, which is fitted on page 12, is described as a gap cover to hide the cable running behind the bar unit. It fits onto A21 perfectly well, so at that point you think all is good.
The problem comes when you try to fit the completed bar onto the floor. Because of the cream decorative strip, F23, which was fitted back in steps 30–33, the end of the bar needs to slide underneath it before the rest of the tenons can drop into their mortises.
In my case, it simply wasn’t having it. Rather than start modifying the bar by removing the décor strip, or cutting it and risk making things worse, I fitted the bar first and then put F21 in place as best I could. Once I was happy with it, a little UV resin was used to secure it. Not exactly how the instructions intended it, but it worked and, more importantly, the cable is hidden and the bar is firmly in place.
And while we’re on the subject of fitting the bar, here’s another wee warning. The cable for the fireplace has to pass through the hole in part D21, so make sure you feed it through before you fix the bar into position. Once the bar is in place, getting your fingers anywhere near that hole is going to require the sort of contortionist skills Freddy Fat Fingers here definitely don’t possess. Do it first and save yourself a lot of frustration — and probably a few choice words as well.
Bar Shelving & Build:

The shelving section went together without any real problems, although you do need to make sure the side supports are lined up properly with the main structure before you start fitting the acrylic shelves. Get that right and the shelves will fit just fine. I did have one support that seemed determined to keep popping away from the adjoining shelf pieces, but a wee dab of B7000 and a clamp soon convinced it that it was staying where it was supposed to be. Problem solved.
Another small thing to watch out for is the “glass” shelving behind the bar. The acrylic pieces do have a couple of very minor blemishes where they have been laser cut, with a tiny bit of cloudiness at the cutting points. Once you remove them from the sheet, a very light sanding will also be needed to get rid of any little nubs from where they were attached. None of this is going to cause any problems with the build, and to be honest, once the shelves are loaded up with all the bottles, glasses and other accessories supplied, you’re hardly going to be sitting staring at the acrylic anyway. One thing you do need to pay attention to, though, is which way round the shelves go. The manual is very clear about their orientation, so follow it carefully — there’s a reason they show you which way they go.
So here I was fretting over how unstable that wall behind the bar was, but as it turns out, I needn’t have worried. Once you get to part F19 on page 18, the bracing structure that sits across the top of all the shelving, everything suddenly locks together. What felt a bit wobbly earlier is now as solid as a rock, and I have to admit, Fifijoy knew exactly what they were doing with this bit of the construction.
Fireplace Build:

There’s a wee bit of confusion on page 15 when you get to steps 66, 67 and 68. F49 is correctly identified on both the actual piece and in the illustration, so no problem there. It’s step 68 where things go slightly awry, as the piece shown in the picture isn’t the correct shape. By step 69, however, the correct piece appears in the illustration, so you can see what should actually be there. It’s not a major issue, but it may have you scratching your head for a few minutes wondering if you’ve somehow picked up the wrong piece. You haven’t. Part F48 is correctly marked F48 on the F board, so a quick check back to the board will confirm you’ve got the right bit.
Indoor Décor:

One small gripe I have is with the bucket of ice supplied with the kit. I think it would have looked much better if Fifijoy had included a proper stand for it, rather than having it sitting on top of one of the tables. As it is, the bucket looks far too large and, to my eye, pushes it outside the 1:24 scale you’d normally expect to see in book nooks, dioramas and these small buildings. It’s only a small detail, but a little stand would have made it look more convincing in addition to reducing its size. I also made sure I ‘set’ the ice cubes using some superglue and a fine nozzle; otherwise, the first time you lift, or worse, knock the kit, you just know they’re gonna end up like skittles — everywhere.
Left Side Wall Fitting:

Page 25, step 128, and here’s another one I managed to get wrong so you don’t have to.
This is where the posters and signs start going onto the base of the left-hand wall, including E26, the one proudly declaring “Irish Pub”. Now, I stuck mine down without giving much thought to exactly where it was going, and that came back to bite me when I tried to fit the wall.
The tab on B1 has to drop into the base plate and, if E26 is sitting too far to the right, it gets in the way and the wall won’t sit flush. It doesn’t take much to cause the problem, either. So, before you reach for the glue, have a look at where that tab is going to land. Go on, ask me how I know this. Let’s just say E26 and I had a wee disagreement before we reached an understanding.
Bar Décor:

Step 154 on page 31. Now this is something I have never seen before, and remember, this is build number 69 for me. I’ve built more cafes, restaurants and pubs than I care to remember, and there has always been one thing they all had in common when it came to the drinks. The bottles, glasses, wines, beers and everything else were printed onto a piece of wood. Some were printed better than others, but at the end of the day it was still a 2D piece of MDF pretending to be a bottle.
Not this time. Fifijoy have gone the extra mile here and supplied actual 3D bottles, along with the labels to put on them, glasses for both the tables and the bar, and liquor bottles in different colours, shapes and sizes. And the difference is huge. Once these are sitting in the bar area, they look like proper little bottles and glasses rather than flat bits of wood. It gives the whole bar a much more realistic appearance and, for me, is exactly the sort of thing that takes a kit up another level. Great job Fifijoy, and hopefully other manufacturers will take note and follow their lead. If we’re going to spend hours building these little scenes, then give us props that make them look the part.
PVC Window and Door Inserts:

The PVC window inserts are clear and bright, with a protective film on them which keeps them nice and clean until you’re ready to fit them. The laser cutting is good and the individual pieces release from the sheet easily. Just be careful once you’ve removed them and peeled off the film, because PVC attracts dust and debris like a magnet does iron filings. One minute you’ve got a lovely clean window, the next you’ve got half the contents of your workbench stuck to it. Keep them covered until you’re ready to fit them and you’ll save yourself a bit of cleaning.
Band Stage:

The music stage is another nice little addition, with a floor mic, guitar, speaker, music stand and stool all included. Having spent time in Irish pubs in Dublin, I know that live music is very much part of the atmosphere, and it doesn’t always involve a band being booked for the night.
Quite often a couple of musicians will simply turn up with their instruments, have a few drinks and before you know it there’s a traditional session going on. That got me thinking about how I could bring a bit of that atmosphere into this build, because just having the instruments sitting there wasn’t going to be enough for me. So, yes, another modification was on the cards. It took me well over an hour to find the right elements for the soundtrack, followed by another good half hour cutting, mixing and fitting everything together into an MP3.
It was a bit of a faff, but when I finally got it playing with the build, I knew it had been worth the effort. I hope you’ll agree when you see and hear the finished result. This build just deserved it.
Outside Décor:
Moving on to the outside of the pub, and I’m still not entirely sure what the barrels and the cat are doing out here, but they do fill what would otherwise be a fairly empty area because of the size of the main floor base.
So, they can stay. I did, however, decide to replace the wooden street lamp with a non-lighting 3D model. There’s absolutely nothing wrong with the supplied one, but a model that continues the 3D effects seems right. I also added a hanging basket to the outside of the pub, which gives it a bit more realism and, importantly, adds a nice splash of colour to what is otherwise quite a lot of wood panelling.
The Bar Door:

Now, page 26 and steps 130 and 131 look simple enough on paper, but this is one of those places where you need to watch what you’re doing. Part C17 is the top door lintel and it fits into D15, the door frame. The problem is that if you simply glue the lintel into position while the door frame is lying flat, it can end up sitting too far forward.
Once you come to fit the door, D24, you’ll then have a much bigger gap on the left-hand side of the frame than there should be. And that’s the sort of thing you don’t discover until the glue has dried and you’re standing there wondering what the hell happened.
I found an easy way around it. I put the door into the frame first and held it in position with clamps on either side. That gave me the correct position for the door, so I could then move the top lintel until it was sitting square with the door. This leaves a small section of the lintel sticking out at the back of the door frame, but that’s exactly what you want.
It also allows you to line up the tenon on the top left of the door with the corresponding hole in the top left of the lintel. Once everything was lined up properly, I could glue it in place knowing the door was going to sit where it should. So, a wee bit of thinking, a couple of clamps and resisting the temptation to reach for the glue immediately saved me from creating another problem that would probably have involved a lot more swearing later on.
Sticker Sheet:

The sticker sheet is one of those things that had me having a proper look because the quality is seriously good. The colours are spot on, bright where they need to be and nicely muted where they should be, and the HD printing has picked up an astonishing amount of detail.
Some of the bottle labels are so tiny that I had to get the magnifier out, and even then I could still read the writing. That’s impressive at this scale. We’ve all peeled off stickers from kits before that are so dull and fuzzy you could stick them on a box at a boot sale or a packet of pork sausages and nobody would know the difference. Not these. They look the part, and they actually stick as well, which is always a useful feature for something described as self-adhesive.
But Fifijoy have also thought about something else that has annoyed me on plenty of other kits — the fixing point. You know the one. You’ve carefully fitted your lovely little poster or sign, stepped back to admire your handiwork, and there it is, a great big bit of the fixing point sitting there like it’s proud of itself.
With this kit, Fifijoy supply printed, self-adhesive covers that go over the wooden poster fixing point. Look at the three examples here, and there are more supplied in the kit. The cover hides the fixing completely and leaves you with what looks like a properly finished sign rather than something that’s been stuck on with a drawing pin. It’s a ridiculously simple idea, but why don’t more manufacturers do it? Genius. Sometimes it’s the wee things that make all the difference.
Customer Service:

The mirror for the back of the bar shelving appears at section 82 of the manual on page 18. Now before I had even started on this kit Fifijoy actually got in touch with me.
During one of their quality control checks, they had discovered that a small number of kits had been supplied with an incorrectly cut mirror, and unfortunately mine was one of them.
Now, this is where I have to give Fifijoy some serious credit, because their customer service has been quite simply the best I’ve come across from a book nook manufacturer. I had a named customer service advisor who kept in regular contact with me by email and arranged for a replacement mirror to be sent out.
It was then put on an expedited air shipment and arrived here in Scotland from China in just six days. Impressive? Absolutely. Effective? Yes. Helpful? Without question. What’s not to like?
And the good thing was that it didn’t really hold the build up anyway, as there were plenty of other jobs I could get on with while I waited for the replacement to arrive, like chairs, stools and the band kit, and it gave me the time to put my mini sander into action on the chairs and tables. But that’s what I call sorting a problem before it becomes a problem.
Customisation:

There has been a fair bit of customisation going on with this build, which probably won’t come as any surprise to anyone who has read my previous reviews. The first job was to take the sharp, square edges off the two benches, four chairs and two tables in the main bar area, as well as the other two benches and a table in the private ‘snug’ area of the bar. A few minutes with the little cordless tool and those very blocky-looking pieces suddenly have a much more rounded, almost 3D appearance. It’s a simple trick, but it really does make a difference.
But I also have a warning: you MUST wear appropriate protection and not risk breathing in any of the MDF dust created by this task. See my warning in the section titled: The Build.
Then I decided the snug looked a bit too empty, so I went looking for a couple of beer drinkers. I found two suitable candidates, put them in the snug and gave them a free pint. They haven’t moved since, but they do prove the point that adding people to a scene like this can make such a difference.
The pub immediately looks more lived-in, and I’ve carried the idea through into the main bar area by adding a few more characters and a barman behind the bar. Suddenly it looks like somewhere people actually want to be, rather than a pub that has been mysteriously abandoned five minutes before opening time.
Next up for the customisation treatment was the fireplace. The supplied acrylic flames look perfectly fine and the original LED does its job, but it has that slow pulsing effect rather than a proper flicker. For me, there was only one answer — change it. The fire now has a much more convincing movement when the lights are on.
The bar got a little attention too. I rounded off the edges of the little pints of lager and Guinness on the bar top, and I also gave the beer taps on the right-hand side a chrome finish. Over in the rooftop beer garden, the tops of the balustrades got the rounding treatment as well, taking away that rather sharp, square look. None of these changes are particularly difficult, but put them all together and they make a noticeable difference to the finished scene.
Now we come to the music stage, and Fifijoy have supplied the lot — microphone, guitar, speaker, music stand and stool. I almost picked up the accordion and rattled out a set of jigs myself. Having spent quite a bit of time in Irish pubs in Dublin, I can tell you that live music is almost part of the furniture.
It doesn’t necessarily mean there’s a band booked for the night either. Give a couple of musicians a guitar, a few pints and somewhere to sit and, before you know it, you’ve got an impromptu traditional session going on. So, looking at this little stage, I started thinking that having a guitar and a microphone sitting there doing absolutely nothing wasn’t really going to cut it. They needed to earn their keep.
And that’s where my customisation brain kicked in again. I decided this pub needed its own soundtrack, so I set about finding the right mix of music and pub atmosphere to bring it to life. That little exercise took me over two hours, followed by another good half hour chopping, mixing and generally making a nuisance of myself until I had everything fitted together as an MP3. Was it necessary? Absolutely not. Did it take far longer than it should have? Without question. Was it worth it? Damn right it was. The moment I switched on the sound and the music started playing, the whole pub changed. Suddenly the microphone wasn’t just sitting there looking pretty, the guitar had a reason for being there and the pub sounded like a pub. Now all I need is somebody to spill a pint on the floor and shout for another round. This build deserved its soundtrack, and I think it makes all the difference.
I also decided that the two roof hanging lights in 2D wasn’t good enough, so out came the drill, a couple of white micro leds, and the result was, to my mind, far superior.
Then I tackled the sign on top of the bar. It was already yellow, but I just could not help myself and blinged it up with a gold metallic marker. Now it sits proudly on top, practically screaming at passers-by, ‘look at me, this is the sort of pub you want to frequent.’ And of course the gold matches the typical green and gold of the kit, and Ireland.
I replaced the flat 2D barrels, which were supposed to be glued onto the wall to the right of the door, with mini 3D models that work perfectly.
And, finally, to finish things off, I added the outdoor lamp and a hanging basket of flowers.
My Thoughts

And now it’s finished, one thing that really hits home is just how big this thing actually is. In terms of footprint alone, it’s easily the largest kit I’ve ever completed, coming in at almost three times the width of your standard book nook. This isn’t one you’re going to tuck away on a shelf and forget about — it wants its own bit of real estate.
One thing I’ve been keeping an eye on throughout the build is the condition of the MDF, and I have to say Fifijoy deserve some credit here. Not one broken piece happened during the build, which at this stage is quite an achievement given the amount of handling, sanding and fitting that’s gone on. It says a lot about the quality of the MDF being used, but also the quality of the laser cutting. The pieces released cleanly and, more importantly, they’re staying in one piece when you actually want them to. It’s something you perhaps don’t notice when everything goes well, but believe me, it’s much better than finding you’ve just snapped the bit you need five minutes after you’ve removed it from the board.
As for the construction quality, I really can’t fault it. From the first piece going together to the final part being fitted, everything has gone together exactly as it should. There hasn’t been any need to drown the joints in glue, I haven’t had to reach for the clamps to persuade anything into position, and, best of all, there has been none of that pushing, squeezing and forcing pieces together while wondering whether you’re about to break something. The fit has been spot on throughout, which, when you’re dealing with this many individual pieces, is pretty impressive. This is what good laser cutting and properly manufactured parts should look like.
So, where do I stand with this one? Quite simply, I’ve loved building it. From the first piece coming off the board right through to the last little accessory going into place, the build has been exceptional. Everything was there, nothing was missing, the MDF and laser cutting were first class, and the lighting all worked as it should. Yes, there are a couple of things I’d change, and I’ve already done some of that myself. The people have made a huge difference to the atmosphere inside the pub, and I really hope Fifijoy might consider including a few characters in future kits, because they really do bring a scene to life.
And then we have the mirror. Yes, it was wrong, but I’m not going to mark the kit down for that because of the way Fifijoy dealt with it. They spotted the problem, contacted me, gave me a named person to deal with and had the replacement in Scotland from China in six days. That’s how you deal with a problem. Add in the fireplace, the soundtrack, the people and all the other bits I’ve messed about with along the way, and I’ve ended up with a pub that I think not only looks stunning, but reminds me of the many I have personally visited In Ireland, and for a kit to do that is nothing short of miraculous. I’ve enjoyed this one from beginning to end, and that’s probably the biggest compliment I can give it — I really didn’t want to get to the point where I had to put the tools away and call it finished.
Pros
- Very strong overall design — it has a convincing Irish pub character without looking like a generic pub kit.
- Excellent level of detail. The bar, bottle shelving, pumps, fireplace, furniture, signage, menus and wall decorations give it a lot to look at.
- Good use of colour. The dark green, burgundy and copper/gold combination works particularly well and gives the finished build a traditional pub feel.
- The printed artwork is a real strength. The menus, signs, advertisements and drinks labels add considerably to the finished appearance.
- The lighting adds a great deal to the finished scene. The warm illumination behind the bar and fireplace creates a much more atmospheric result than an unlit build.
- There is plenty of scope for customisation. The flowers, hanging basket, figures, drinks and other small details allow the builder to give the finished pub some individuality.
- The finished model has genuine depth and visual interest rather than simply being a flat book-nook interior.
- The kit clearly rewards careful edge painting and finishing.
Cons
- There is a considerable amount of small-scale work. The photographs show just how many tiny components, decorative pieces and individual details have to be dealt with.
- Some of the more intricate components will require patience and a steady hand, particularly the furniture, decorative panels and small accessories.
- The lighting installation isn’t simply a case of switching on a finished model. There is wiring, positioning and testing involved, so it adds another layer of work to the build.
- The amount of detail can make the build quite time-consuming. For someone looking for a quick assembly project, this is unlikely to be that sort of kit.
- The finished model is visually busy. That’s a positive from a display point of view, but it also means that careless placement of accessories could easily make the interior look cluttered.
- The quality of the finished result is likely to depend heavily on the builder’s finishing work. The kit provides the material and printed detail, but painting, assembly, wiring and positioning all have a significant effect on the final appearance.
Gallery:


Leave a Reply