built and written by Martin Seidler as the Build # 52
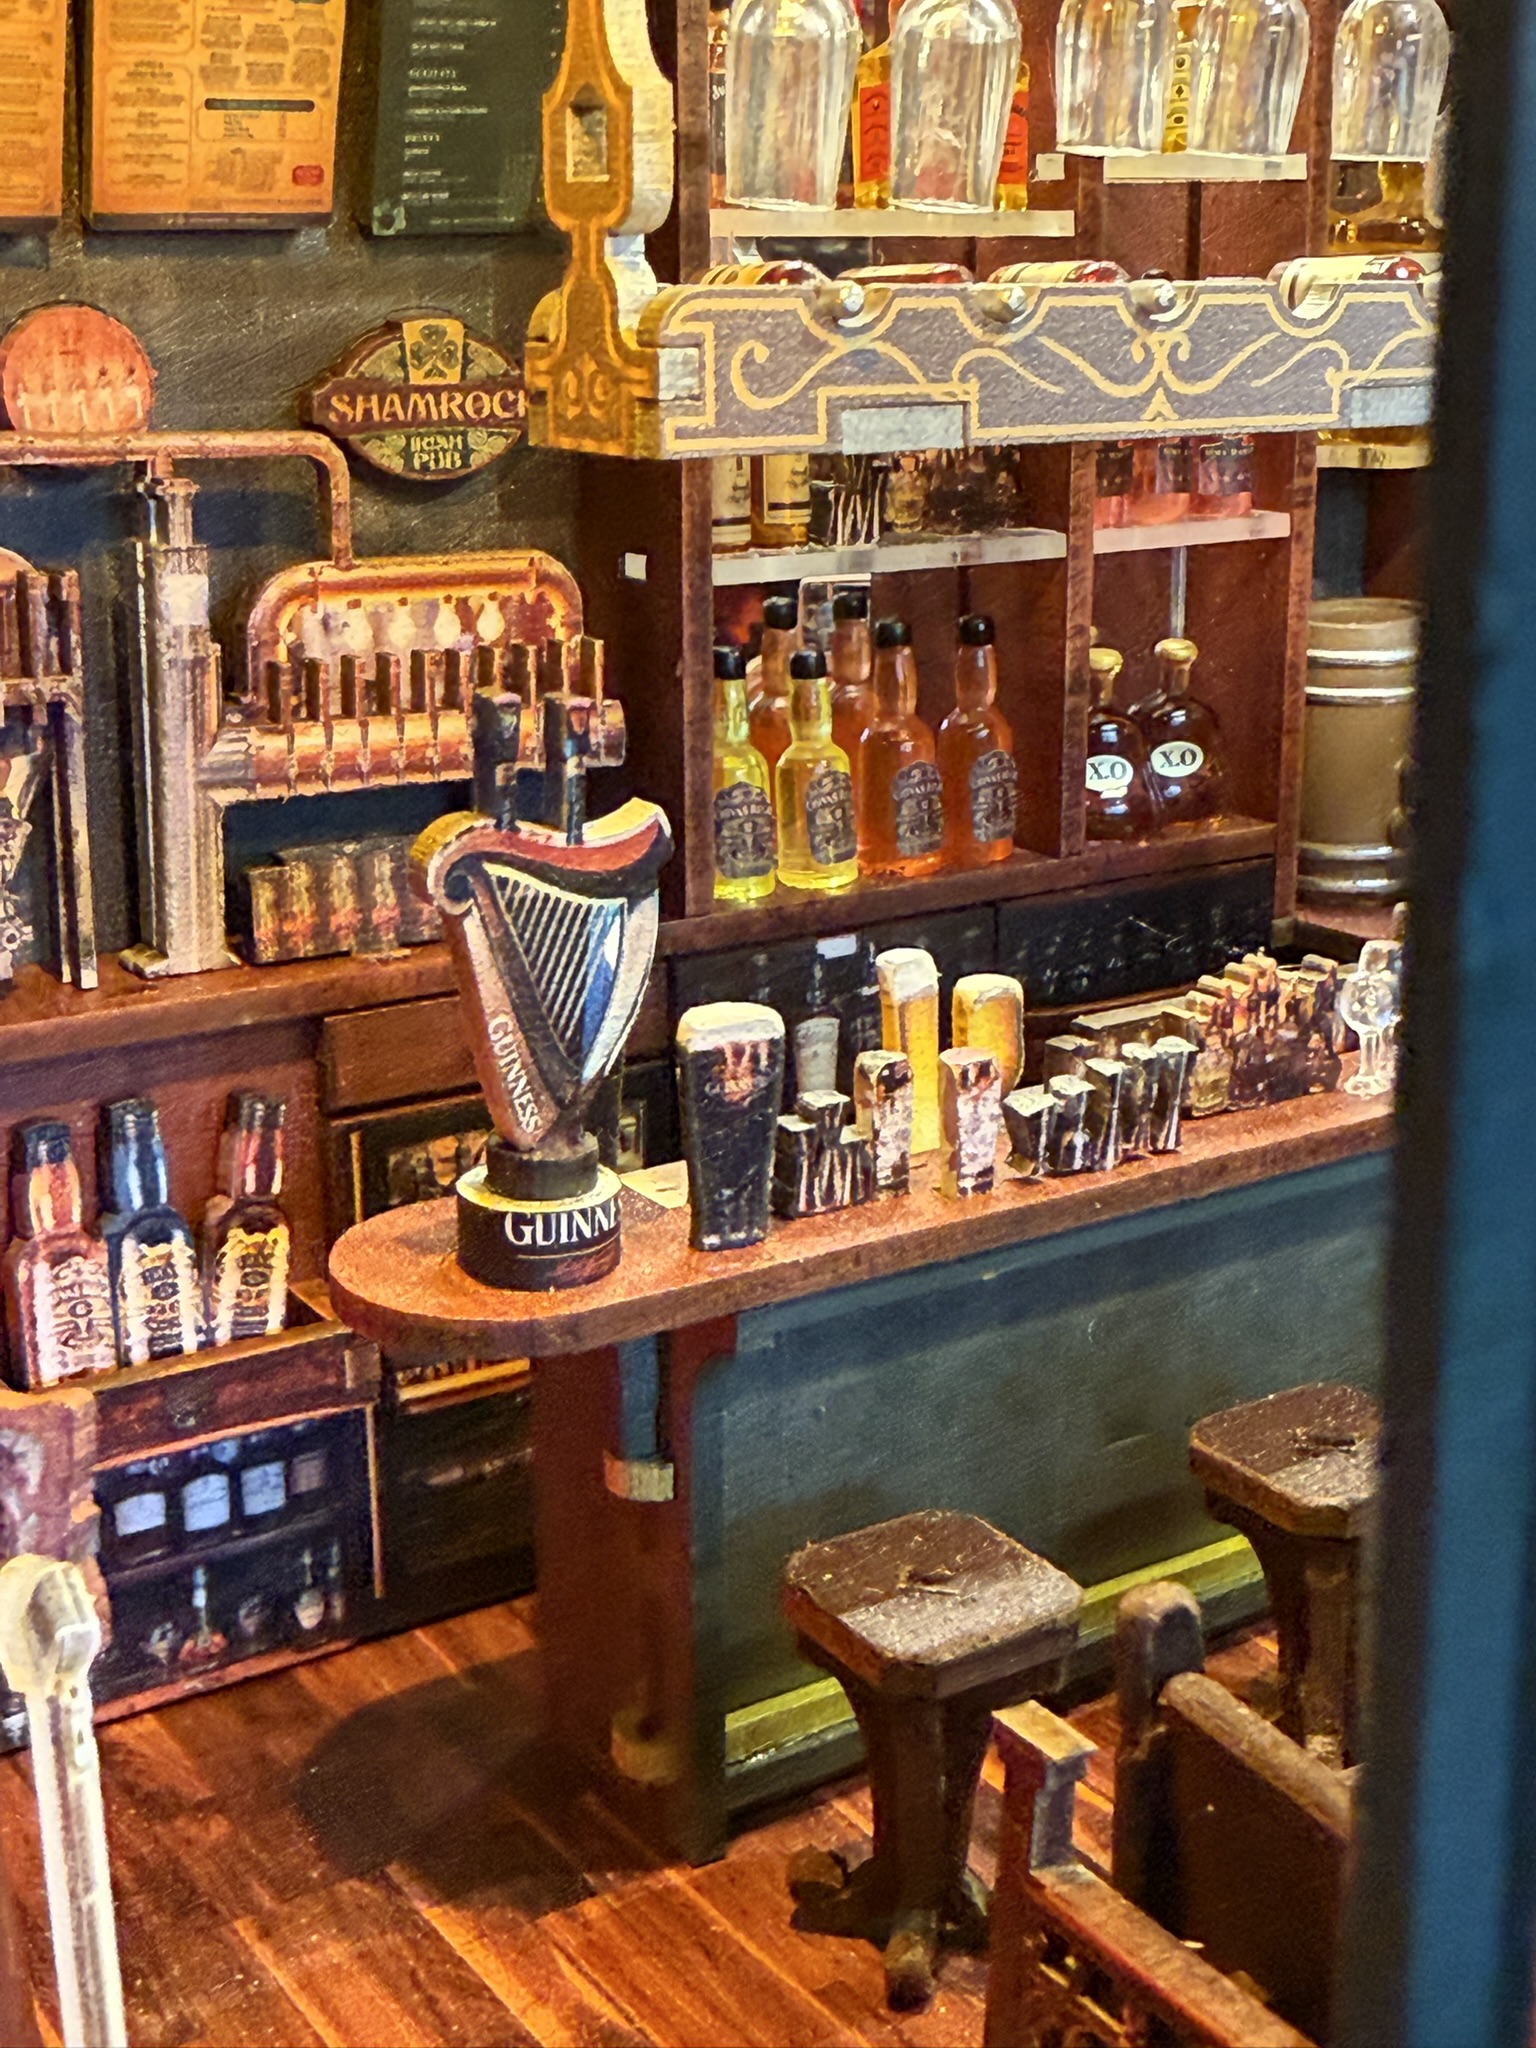
The Shamrock and Harp Pub by FIFIJOY is a fully enclosed, free-standing miniature of a traditional Irish pub. As you would expect, the design is dominated by classic Irish green and gold, with a richly furnished interior, a large bar, a fireplace, seating areas and an impressive quantity of tiny pub accessories.
However, the first thing that makes this kit unusual is its size.
The Shamrock and Harp Pub appears to be approximately 30% larger in scale than most similar restaurants, pubs and shops currently available from other manufacturers. By total volume, the completed model occupies almost as much space as three standard book nooks.


I am not entirely sure why FIFIJOY selected this scale or whether the Shamrock and Harp Pub is intended to be the beginning of a new series of similarly sized buildings. But confirmed from Fifijoy, that is probably not the case. The larger scale certainly allows the designers to include more detail and create a more realistic interior. On the other hand, it also means that the finished model may not fit naturally alongside the smaller shops and restaurants already in your collection.
It is beautiful, detailed and impressive—but it is also massive.
What Is in the Box?
The Shamrock and Harp Pub arrives in an unusually large, flat box. Apart from some Tonecheer Story Frames and a few exceptionally large Rolife products, I do not remember receiving many miniature kits in a package of this size.
Fortunately, the contents are very well protected inside a precisely cut foam insert, so the risk of transportation damage should be minimal.
Inside the box, you will find:
- Eight MDF boards
- A sheet of acrylic components
- PVC window components
- A lighting system with a battery box for three AAA batteries
- A touch sensor
- Two LED strips and several individual LEDs
- Plastic barrels
- Numerous bottles of different alcoholic drinks
- Goblets, glasses and cups
- A small bell
- A bucket with transparent pieces representing ice cubes
- Materials and plastic components for the plants
- A street lamp
- A cat
- Many additional miniature accessories for furnishing the pub


The number of small accessories is one of the strongest features of this kit. The bottles, glasses, barrels, beer taps, musical equipment and other small items make the build varied and enjoyable, while giving the finished interior a much more realistic atmosphere.
Materials and Manufacturing Quality
The MDF components are generally well laser-cut, and the dimensional precision is reasonably good. I did not encounter any widespread tolerance problems or large numbers of loose joints.
However, the UV-printed surface proved to be more brittle than I would ideally expect. On several smaller details, the printed colour started chipping away around the edges. It was not a serious or unrepairable problem, but the printed layer was noticeably more fragile than on the best kits I have built.
The most significant quality issue concerns the acrylic and PVC components.
Some areas of the acrylic sheet were locally fogged, probably as a result of the laser-cutting process. This is less noticeable on the transparent shelves behind the bar because they are installed against the rear wall and partly covered by bottles.
The PVC windows are a more visible problem. They are not as clear and transparent as such a detailed kit deserves. The pub has a beautifully furnished interior, but the slightly cloudy windows limit the clarity of the view into it.
I would not necessarily say that the plastic parts fall dramatically below the general market standard. However, on a kit with this much interior detail—and at this price and scale—better window transparency would significantly improve the final result.
The overall precision is still fairly good, although it did not feel quite as refined as the excellent engineering I experienced with the FIFIJOY Abandoned Gothic Church and Abandoned Asylum.
The Lighting System
The lighting system consists of a battery box for three AAA batteries, a reliable touch sensor, two LED strips and several individual LEDs.
The selected light temperature is very good. The warm lighting suits an old-fashioned Irish pub perfectly and helps create the cosy atmosphere the design requires. All leds are color coded, so orientation during installation is veru easy.
My only criticism is the LED used for the fireplace. FIFIJOY selected a slowly “breathing” warm LED, similar to the solution previously used in the Jungle Adventure kit.
A slowly pulsing LED is certainly better than a permanently illuminated one, but it does not reproduce the irregular movement of a real fire nearly as effectively as a randomly flickering LED.
Naturally, I was tempted to customize it.
Beginning the Build: The Side Room
The construction starts with the base and several elevated floor panels. You then build the separate room situated on the right-hand side of the pub.
As is common with book nook and miniature kits, the walls are decorated with additional frames, posters and pictures glued over the printed surfaces. I am sometimes unsure how much depth these tiny extra layers genuinely add, but it is a standard technique used by almost every manufacturer, and it works reasonably well here.
The side room is furnished with two benches and a table. This was also where I began manipulating the furniture edges.
I rounded and softened the exposed MDF edges and coloured them with a matching furniture repair marker. The difference between a completely untreated piece and the finished furniture is quite remarkable when viewed closely. I used the same technique on the flat beer glasses and other small printed components to reduce their obvious two-dimensional appearance.


Admittedly, some of these details become difficult to see through the windows once the model is closed. Nevertheless, I still believe the additional work improves the overall result.
Once the furniture is installed, the room is closed with its ceiling and finished with a small railing. The remaining lighting wires must then be carefully routed through the provided opening because they will be used later in the build.


The adjacent wall is again decorated with several glued-on frames and pictures. I successfully used Aleene’s Tacky Glue for almost all these details. The only exception was the tiny plastic darts on the dartboard, for which I used B7000.
Important Warning: Do Not Glue the Side Room Down Too Early
At this stage, do not permanently glue the completed side room to the base.
The rear wall must later fit simultaneously into grooves in the bottom, the side wall and behind a small notch on this separate room. If the room has already been permanently glued down, you may not have enough movement to install the rear panel correctly.
I understand the designer’s intention: the resulting structure is extremely rigid. However, requiring one large panel to enter several perpendicular grooves at once is not the most builder-friendly mechanical solution. Once assembled, it is strong and stable, but getting it into place can be a beast.
Building the Main Bar
The next major stage is the central bar.
The construction itself is relatively conventional, but the green colour makes careful edge painting especially worthwhile. Untreated MDF edges would be very visible here.
The decorative lines and ornaments also invited further customization. I highlighted them with a gold marker, which works particularly well with the green surfaces and strengthens the traditional green-and-gold Irish colour scheme.
The top of the bar is furnished with beer taps, glasses and various accessories. I rounded many of the edges and used bronze, copper and other metallic markers to enhance the taps and fittings.


Several of the beer glasses are printed flat components. Edge rounding and colouring cannot turn them into fully three-dimensional objects, but it does make the flat construction considerably less obvious.
After completion, the entire bar is set aside temporarily while the rear cabinets are built.
The Rear Bar and Transparent Shelves
The rear section starts with the lower cabinet structure. The main bar is then installed in position, followed by the printed bottle racks, cabinets and drawers.
These are largely made using familiar layered MDF construction. Some elements remain visibly two-dimensional, but the combination of printed details and real plastic bottles works quite well in the finished scene.
The upper shelves are made from acrylic, with MDF side supports. The transparency is a good design decision because it allows the lighting and mirror behind the shelves to remain visible.
As mentioned earlier, some of my acrylic shelf components were fogged by the cutting process. Fortunately, this is not particularly noticeable once the shelves are installed against the rear wall and filled with bottles.
After the shelves and counter have been furnished, the build proceeds to one of its most challenging components: the corner fireplace.
The Fireplace and My Main Lighting Customization
The fireplace is a rather delicate assembly, and some of its tolerances are tight. Take your time and pay careful attention to the LED and its wire.
The LED must be positioned correctly during the initial fireplace construction. If the wire is routed incorrectly, accessing it later will require at least partial disassembly of the lower fireplace structure.
Instead of relying only on the supplied breathing LED, I added two miniature flickering LEDs—one yellow and one red.
I placed the original warm LED at the top, the yellow flickering LED in the centre and the red flickering LED at the bottom. I then joined the three LEDs into one compact cluster, fixed them together with UV resin and soldered the additional LEDs into the original wiring.
The complete LED cluster was carefully positioned behind the transparent flame component so that the different colours and patterns of light passed through the flames as naturally as possible.
I consider this customization a success. The fireplace now combines the slower movement of the original LED with the irregular yellow and red flickering of the additional LEDs. The effect is much closer to a real fire and can be seen clearly in my video.
Flickering LEDs can sometimes influence other lights connected to the same circuit because of their changing current consumption. In this case, however, the two added LEDs had no visible effect on the remaining lighting. The original circuit appears to have sufficient capacity to support them without creating unwanted pulsing elsewhere.
I also rounded and coloured the edges of the gramophone. The photographs show the difference between the untreated and completed component.


Installing the Rear Wall
Once the fireplace and remaining rear details are completed, the mirror is installed behind the transparent shelves and the rear panel can finally be fitted.
This is where the earlier warning about the side room becomes important.
The rear panel must engage with grooves in the floor and side structure while also fitting behind the notch on the separate room. The result is very strong once everything is assembled, but the installation itself is unnecessarily demanding.

Do not force the panel aggressively. Check each groove and contact point individually and retain enough flexibility in the side-room assembly to move it slightly when required.
Bottles, Music Corner and Interior Furniture
The kit supplies an excellent selection of miniature plastic bottles.
Some arrive with their labels already applied, while others require small stickers to be attached during the build. This is a nice combination: the stickers add detail without forcing the builder to label every single bottle.
The instructions provide a chart showing where each bottle should be placed. I followed the suggested arrangement, although there is no practical reason why you could not create your own display.
The small music area on the left includes a loudspeaker, music equipment, a guitar, a microphone and a chair. These details add storytelling and suggest that the pub hosts live music—an almost essential part of the atmosphere of a traditional Irish pub.
Four additional chairs or stools are then built for the bar.
The front seating area contains another four chairs, two benches and two tables, using essentially the same design as the furniture in the side room.
Once again, I rounded all exposed edges and coloured them with a walnut furniture repair marker. The marker was almost an exact match for the printed wood colour, making this a very easy and effective customization that I strongly recommend.
The tabletops are furnished with supplied glasses, bottles and small accessories. One particularly nice detail is the bucket containing two bottles and transparent pieces representing ice cubes.
The bucket feels slightly oversized to me, but it is still an attractive and playful addition to the scene.


Constructing the Front and Side Panels
The closing stages begin with the external wall and window panels.
The PVC glazing must first be glued into the side and front window frames. This is where the limited transparency of the supplied PVC becomes most noticeable. It does not ruin the finished model, but clearer plastic would provide a much better view of the richly furnished interior.
The left-hand panel containing the door requires particular attention.
Warning for Step 131
In Step 131, carefully align the upper component that supports the door.
Its exact position is not completely obvious in the instructions. Before the glue cures, check that the opening allows the door to sit correctly in the centre of the surrounding panel. A small alignment error here will become very visible later.
This assembly was also the scene of the greatest disaster during my build—but this one was entirely my fault.
I used a powerful spring-loaded clamp while the glue was curing. The clamp failed and effectively exploded the completed assembly into several pieces. I recovered most of them, but not all, and had to reconstruct part of the railing.
Fortunately, the doors and plastic glazing survived intact. On the finished model, it is almost impossible to tell that the entire component was once smashed into pieces. Nevertheless, it was a useful reminder that excessively strong clamps are not always the best tools for delicate miniature assemblies.
A small bell is installed above the door to complete this section.
Ceiling Structure and Upper Lighting
The large H1 component is prepared in Step 134. Two flat lights are attached to it.

I rounded the bulb shapes, but otherwise left them as designed. For builders who particularly enjoy lighting customization, the construction almost invites the installation of two miniature LEDs behind these light fittings.
I considered doing this myself. However, after looking at the general lighting arrangement, I did not feel that the additional LEDs were genuinely necessary, so I decided to keep this part standard.
Take care when installing H1. Several surrounding components have already been assembled, and the panel must engage correctly with multiple slots and structures. Study the geometry before applying pressure and make sure each joint is aligned.
The remaining upper LEDs are then installed, together with the LED strips used to illuminate the front pub sign. The warm light provides very pleasant and appropriate illumination throughout the interior.
Roof, Hanging Glass Rack and Final Assembly
Several reinforcing ribs are added to the ceiling before the hanging rack for glasses, goblets and wine bottles is constructed.
This rack is made from a combination of MDF and acrylic components and is one of the more attractive details in the upper part of the pub. Once furnished, it is attached beneath the roof panel.

The roof can then be installed on the completed building.
Here I must recognize the overall precision of the kit. All seven joints engaged correctly without any significant struggle. The connections are tight enough to hold the structure firmly, but they did not require excessive force. The roof simply clicked into position and locked the assembly together very effectively.
The large laser-cut Shamrock and Harp Pub sign is installed at the top. Its printed surface is golden, so I used a gold marker on the edges to remove the unfinished MDF appearance.

The final exterior details include a barrel, plants, the street lamp and the cat positioned on the right-hand side.
The kit supplies relatively simple plastic greenery. Normally, I am not a great fan of this kind of plant, but it looks adequate here. More realistic flowers could certainly be substituted, although the plants are not the main attraction of this model. With such a richly furnished pub interior, I did not feel any strong need to invest additional time in rebuilding the flower arrangements.
The cat is nicely made. As a major cat fan, I am normally pleased to see cats included in miniature kits, although I am not entirely convinced that this particular scene needed one. I suspect it was added mainly to prevent the exterior corner from looking empty.


The street lamp is also quite simple, but it looks reasonably good once assembled and balances the composition.
My Customizations
Most of my work focused on removing the flat appearance of the MDF components rather than fundamentally changing the design.
My principal customizations were:
- Rounding and colouring the edges of the furniture
- Softening the edges of printed glasses and smaller details
- Colouring the bar edges green
- Highlighting decorative lines with a gold marker
- Adding bronze and copper finishes to the beer taps and metal fittings
- Improving the gramophone
- Painting the edges of the large pub sign
- Adding yellow and red flickering LEDs to the fireplace
- Carefully positioning all three fireplace LEDs behind the transparent flames
The fireplace modification is by far the most visible functional customization. However, the repeated edge treatment probably has the greatest cumulative influence on the realism of the interior and exterior.
Customization Potential
The Shamrock and Harp Pub offers moderate customization potential.
Edge treatment is the easiest and most useful improvement. Because many of the components are relatively large, raw MDF edges are visible unless they are painted or rounded. Fortunately, the green and walnut colours are easy to match.
The fireplace is another obvious opportunity. Replacing or supplementing the supplied breathing LED with randomly flickering LEDs produces a noticeably more realistic result.
More ambitious builders could also:
- Add miniature LEDs behind the two flat upper lamps
- Replace the supplied plastic greenery
- Add additional exterior weathering
- Rearrange the bottles and table accessories
- Add extra glasses, food or pub decorations
- Introduce three-dimensional characters
The greatest potential improvement would be adding people. A bartender and several guests sitting at the tables would completely transform the atmosphere and storytelling of the model.
This is not a criticism specifically aimed at FIFIJOY, because good three-dimensional characters are generally not available in miniature kits. However, I believe this represents a major opportunity for the entire industry.
Manufacturers could offer optional character packs or downloadable STL files specifically designed for each kit. Builders with access to a 3D printer could then print, paint and install the bartender, musicians and pub guests themselves.
A furnished pub of this size is almost asking to be populated.
Customization potential: 6/10
What Could Be Improved?
The kit has several weaknesses, but none of them is serious enough to ruin the overall experience.
The main improvements I would suggest are:
- Clearer PVC windows
The interior deserves better transparency. The current PVC slightly obscures many of the kit’s best details. Also the size of the PVC details is smaller I would ideally want to see. I understand designer wanted to minimize the overlap, but the margin for glueing is rather too narrow and sensitive for proper glue application - Better-quality acrylic components
Fogging from the cutting process should be reduced, even though it is less visible on the rear shelves. - A more durable printed surface
The UV printing should not chip as easily around the edges of smaller parts. - A proper flickering fireplace LED
The slowly breathing LED is better than a static light, but a randomly flickering diode would create a much more convincing fire. - A more builder-friendly rear-panel connection
The finished structure is rigid, but inserting one panel into several perpendicular grooves is unnecessarily difficult.
These are all realistic quality and engineering improvements. They do not support the suggestion, which I have seen several times on Facebook, that the Shamrock and Harp Pub is a bad kit. It is not at all.
However, I can understand why some builders may have reacted less favourably to it. Having already built quite a few FIFIJOY kits, I am familiar with the company’s usual design philosophy and approach to individual details, sub-assemblies and final assembly. Throughout this build, I repeatedly felt that the Shamrock and Harp Pub was somehow different—not necessarily worse or incorrectly designed, but simply not like a typical FIFIJOY kit.
It is difficult to identify one precise feature that created this impression. Apart from the awkward installation of the rear panel and perhaps the construction of the upper ceiling and lighting section, I would struggle to point to a single assembly and say, “This is exactly what feels different.” Nevertheless, the feeling remained with me throughout the entire build: this did not feel like the familiar FIFIJOY construction style I had experienced before.
I therefore asked FIFIJOY whether this kit had been created by a different designer, and they confirmed that it was indeed designed by someone new. This may explain the slightly strange feeling experienced by builders already familiar with the brand. A different design approach does not make the kit bad, but it may help explain why some details, sub-assemblies and construction sequences felt less natural or intuitive than in previous FIFIJOY designs.
In a broader context, this may also explain why many of us develop such strong preferences for particular brands. We are not attracted only by their visual style, themes or choice of subjects. Over time, we also become familiar with how their kits are engineered: how the parts are arranged, how the construction progresses, how the individual sub-assemblies come together and what kind of assembly logic the designer normally follows.
That familiarity becomes an important part of the building experience. Some builders remain devoted to Rolife, while others strongly prefer Tonecheer, FIFIJOY or another brand. This loyalty is not based solely on what the finished models look like. It also reflects how comfortable and natural the manufacturer’s established construction language feels in the builder’s hands. The Shamrock and Harp Pub uses a somewhat different construction language, and that may be the real reason why some experienced FIFIJOY builders felt slightly less comfortable with it—even if they could not clearly explain why.
Difficulty Level
I would classify the Shamrock and Harp Pub as an advanced-to-pro-level build.
A patient beginner could probably complete it, especially because the instruction manual is very good. However, I would not actively recommend it as somebody’s first miniature kit.
The fireplace, rear panel, front façade, door alignment, glueing the numerous rather delicate PVC window panels and large ceiling components all require careful dry-fitting and an understanding of how the surrounding pieces interact.
The large number of decorative details also makes this a fairly substantial project.
Who Is This Kit For?
If you enjoy Irish pubs, beer, whiskey, live music or traditional green-and-gold interiors, this is an easy kit to recommend.
It is distinctive, richly furnished and full of small accessories. The larger scale gives the interior considerably more presence than a typical miniature pub or restaurant.
However, potential buyers should check the dimensions carefully. If you intend to display it in a row with standard-sized miniature shops or restaurants, it may look significantly oversized. I photographed it beside the Corner Tavern specifically to demonstrate the difference.
Perhaps FIFIJOY intends to release more shops and businesses in the same scale. If so, the Shamrock and Harp Pub could become the first building in an impressive new street. For the moment, however, it stands very much on its own.
Ratings
| Category | Rating | Comments |
|---|---|---|
| Instruction manual | ⭐⭐⭐⭐⭐⭐⭐⭐⭐⭐ 10/10 | Clear and reliable |
| Lighting | ⭐⭐⭐⭐⭐⭐⭐⭐⭐ 9/10 | Excellent warm atmosphere, but the fireplace should use a randomly flickering LED |
| Material quality | ⭐⭐⭐⭐⭐⭐⭐⭐ 8/10 | Good MDF and accessories, but fogged acrylic, unclear PVC windows and brittle UV printing reduce the score |
| Design and final appearance | ⭐⭐⭐⭐⭐⭐⭐⭐⭐ 9/10 | Rich, attractive and highly detailed, with an excellent traditional Irish pub atmosphere |
| Customization potential | ⭐⭐⭐⭐⭐⭐ 6/10 | Good opportunities for edge treatment, lighting, plants and characters |
| Difficulty | Advanced to pro | Several assemblies require patience, improper glueing the PVC windows can ruin the whole model |
| Overall rating | ⭐⭐⭐⭐⭐⭐⭐⭐⭐ 90/100 | A large, impressive and enjoyable kit with several minor quality issues, but no fundamental design failure |


Final Verdict
Would I recommend the FIFIJOY Shamrock and Harp Pub?
Yes.
To be honest, I do not remember reviewing many kits that I could not recommend to somebody. Every kit has its audience, but this one should appeal to a particularly broad group of builders.
If you are a fan of beer, whiskey, Irish pubs or detailed miniature interiors, the Shamrock and Harp Pub is almost a must-have. It is attractive, atmospheric and full of distinctive little details.
It is not flawless. The transparency of the windows should be better, the printed surfaces could be more durable, and several parts of the assembly are unnecessarily tricky. The fireplace lighting also represents a missed opportunity.
Nevertheless, the negative comments and speculation I have seen on Facebook are exaggerated. This is not a bad kit. On the contrary, I consider it one of the better FIFIJOY models I have built.
Just make sure you have enough space for it.
It is not simply a miniature pub. It is a miniature pub on a grand scale.
Copyright Book Nook Workshop 2026 – All rights reserved. (Martin Seidler)
Leave a Reply