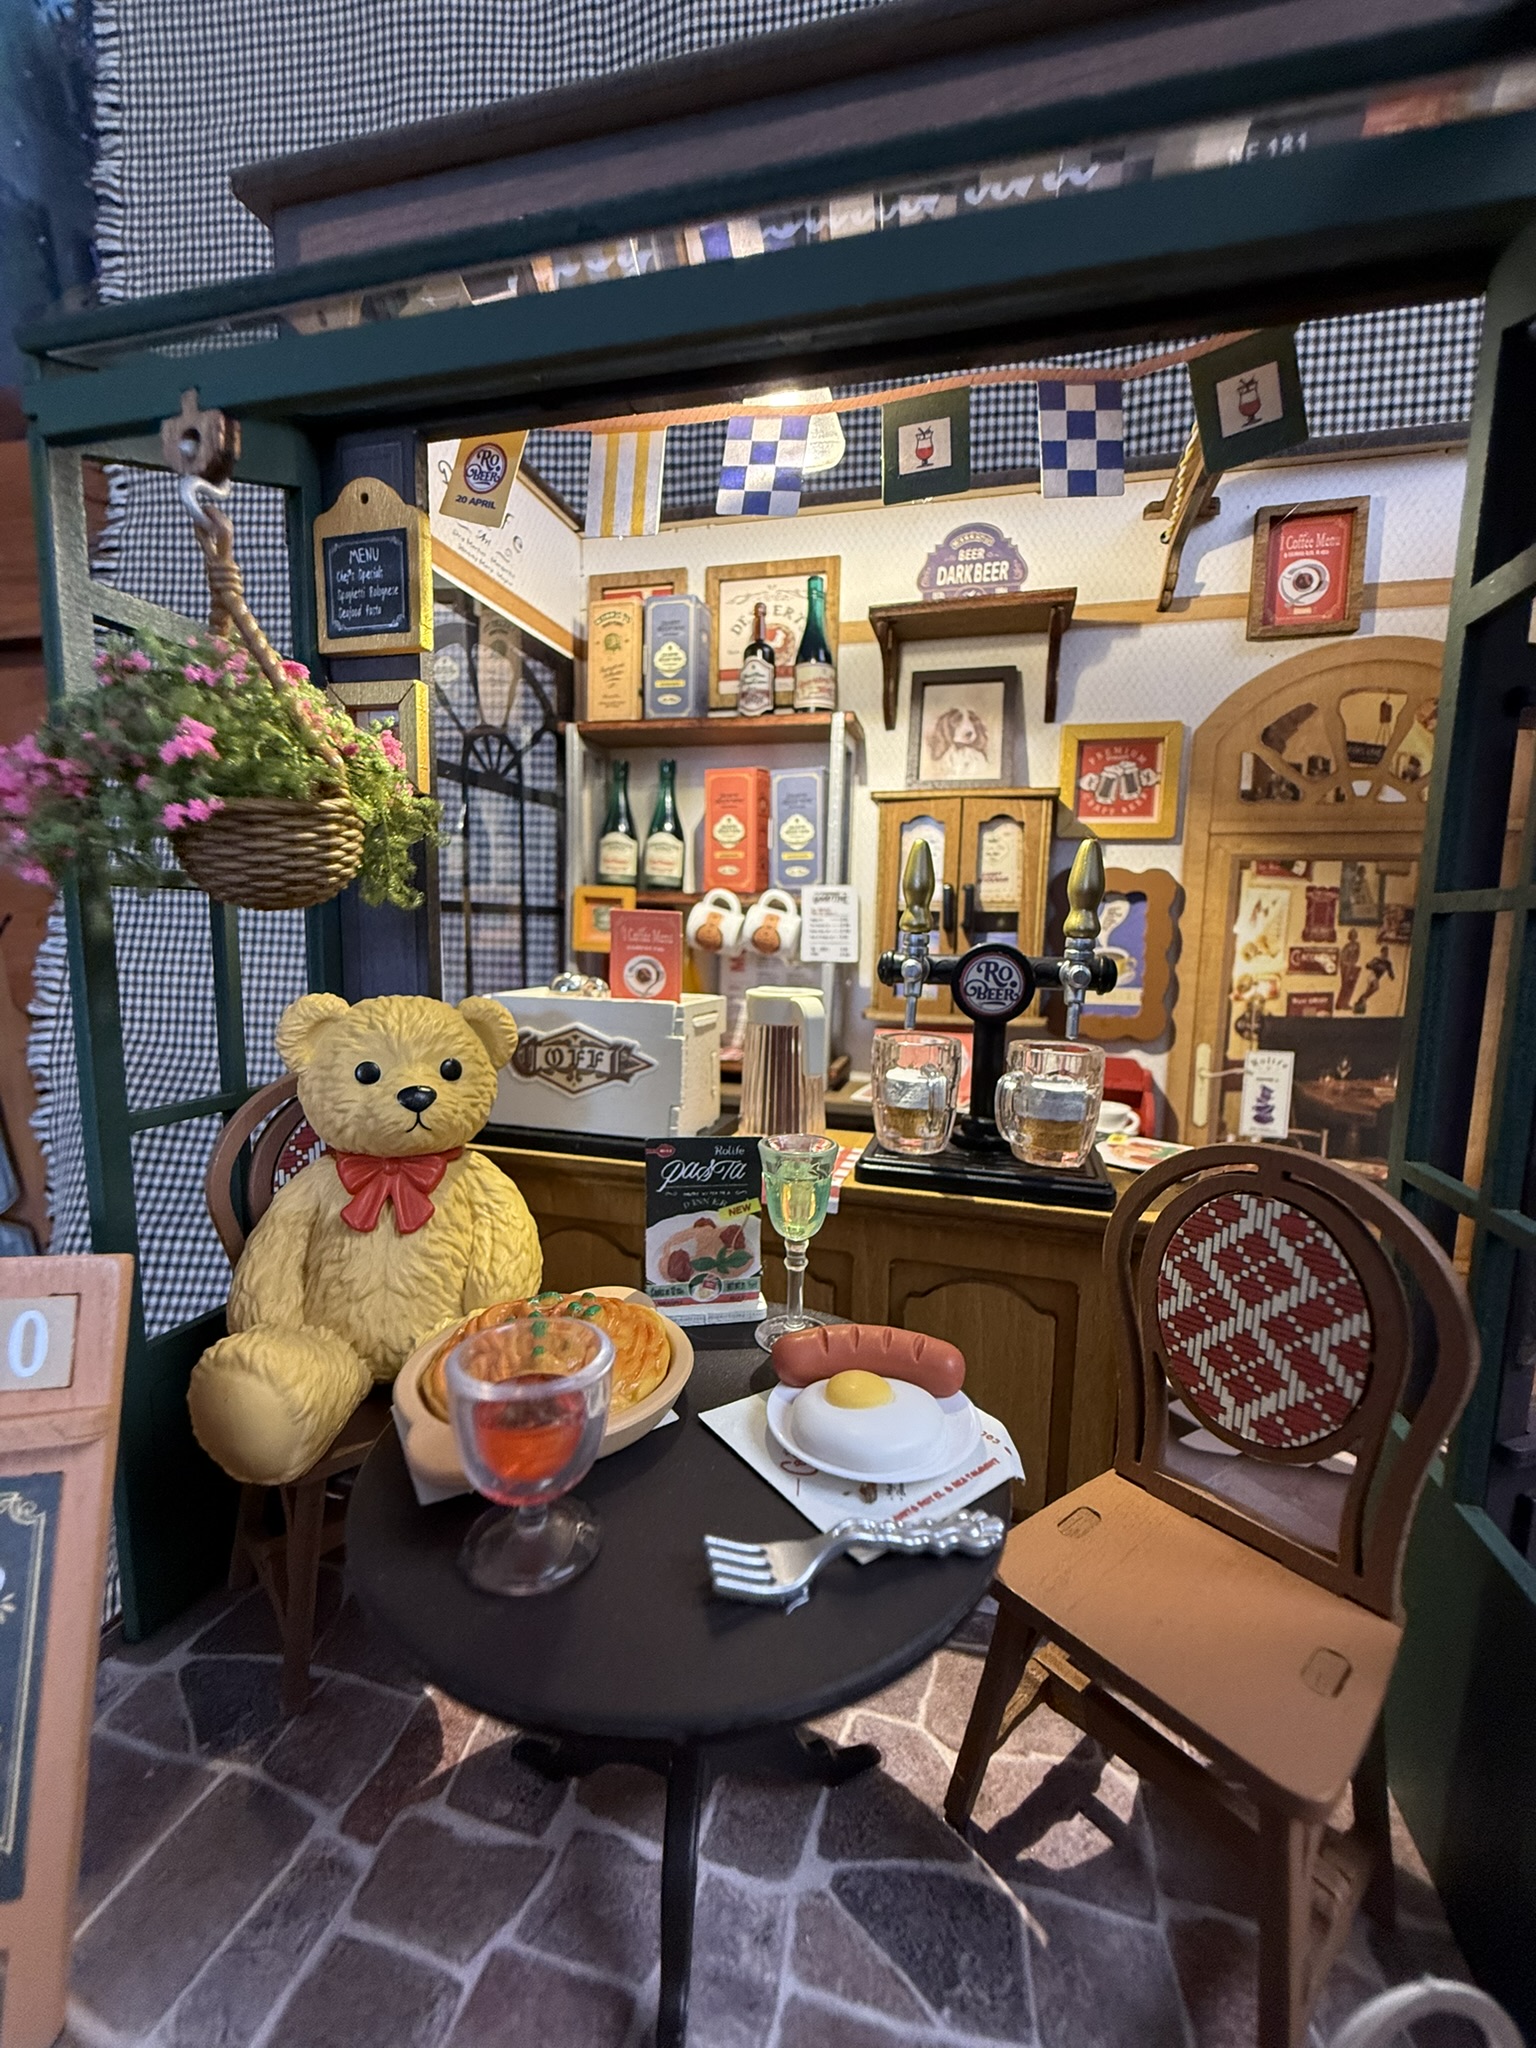
A cosy open-front restaurant with a teddy-bear guest
built and written by Martin Seidler as Build # 49
Rolife’s Tipsy Restaurant DG167 is one of the company’s recognisable open-front miniature-house designs. Instead of a traditional enclosed book nook, it presents a complete little restaurant and bistro bar with outdoor seating, a fully furnished interior and a teddy bear already waiting at the table.
The green-and-brown frontage, striped awnings, menu boards, flowers, drinks and food create the atmosphere of a small European-style restaurant. It is a cheerful and family-friendly design with an almost toy-like charm.
This is not a technically ambitious kit, but that is also part of its appeal. Tipsy Restaurant is intended to be an easy, relaxing project that concentrates on furnishing and decoration rather than complicated construction, wiring or mechanical features.
Rolife officially describes DG167 as a 297-piece, 1:16-scale kit with an estimated five-hour assembly time. The assembled dimensions are approximately 23.8 × 18 × 18.2 cm. Although Rolife gives it a three-out-of-five difficulty rating, my own experience places it comfortably within reach of a complete beginner. Further information can be found on the official Rolife/Robotime product page.
First Impressions
Tipsy Restaurant follows the familiar Rolife miniature-house formula: clearly organised components, printed wooden parts, plenty of ready-made accessories and a logical construction sequence that gradually transforms numerous small subassemblies into a busy finished scene.
The open design makes the model especially accessible. Most areas remain easy to reach until quite late in the build, and there are no narrow corridors or deep corners where furniture or wiring becomes difficult to install. Anyone who enjoys miniature cafés, bars, restaurants and shop interiors should find plenty to appreciate without facing any particularly demanding stage.
The colours are slightly less vibrant than I would ideally prefer. Nothing looks bad, but a little more saturation would have given the restaurant greater visual impact. Nevertheless, the softer colours work reasonably well with the cosy and understated atmosphere.
The finished model contains enough detail to feel lively without becoming visually confusing. The teddy bear on the chair is the obvious character feature, while the bar, shelves, bottles, food, plants and exterior signs provide the surrounding story.


What Is in the Box?
The contents are typical of a modern Rolife miniature-house kit:
- Several laser-cut MDF and plywood sheets
- Printed wooden parts for the walls, floor, furniture and structural sections
- Transparent acrylic and moulded plastic components
- Paper sheets for cartons, bags, labels, menus and other printed details
- Self-adhesive sticker sheets
- A bag of green vine material
- Plastic flowers and blue resin roses
- Other decorative accessories and ready-made food items
- One LED light, wiring and a rear battery compartment
- Double-sided adhesive tape, sandpaper and basic assembly tools

The model is designed as a glue-free press-fit build. Technically, it can be completed without conventional glue, using the prepared connections and supplied double-sided tape.
As usual, I chose to use my own glue in several places where I wanted a permanent and particularly clean connection. I still used the double-sided tape for larger flat pieces and in positions where it was the more practical solution.
No dust cover is included. Because this is a completely open restaurant rather than an enclosed book nook, dust will eventually settle on the shelves, glasses, food, flowers and other small accessories. A separate transparent display cover is therefore a very worthwhile purchase.
Materials, Instructions and Precision
The materials and engineering are very good for this category of kit. The components fit together accurately, the structural sections align properly and I encountered nothing that would prevent a first-time builder from completing the model successfully.
There is no difficult mechanism, no complicated wiring and no stage where several unstable walls must be held together simultaneously. The slightly muted printing is the main reason I would stop short of giving the materials and finish a perfect score.
The instructions follow a sensible progression. Small furniture and fittings are prepared first, followed by the walls, doors and window sections. The main restaurant shell is assembled only after most of its individual components are ready. This keeps the work manageable and allows the builder to concentrate on one small section at a time.
The numerous paper cartons and packages require careful scoring and folding, but they are cleverly designed and generally hold together using their tabs. They do not require glue. These repeated paper assemblies are not difficult, although builders who prefer structural work may find the sequence slightly repetitive.
Overall, the kit delivers what Rolife promises: accurate parts, logical instructions and an assembly method that does not require advanced tools or previous miniature-building experience.
The Build Experience
Construction begins with the smaller pieces of furniture. The first cabinet is followed by flower pots, chairs, shelves and a miniature coffee machine. Doors with transparent acrylic glazing, menu boards, picture signs and display panels gradually establish the style of the restaurant.
Another corner cabinet uses clear window panels, after which the main bar counter and its equipment are assembled. More cabinets, doors and glazed panels complete the opposite side.
None of these subassemblies is particularly demanding. The work moves quickly, and the combination of printed wood and transparent acrylic gives the furniture a clean, finished appearance without requiring painting.
Once the rear wall and individual display sections are complete, the supporting structure for the front of the restaurant is constructed. This is also where the kit’s single light is installed.
The previously completed panels—with their windows, doors and signs—are then attached to the frame. At this point, the entire restaurant begins to take shape very quickly. Printed paper is applied to the rear section, the outer shell is closed and the battery compartment is installed behind the model.
As soon as the wiring is connected, the light can be tested using the mechanical switch on the back.
Drinks, food and restaurant accessories
The second half of the build is devoted mainly to furnishing the restaurant. A selection of cups, glasses and pitchers is prepared first.
Small coloured components are placed inside some of the transparent containers to represent partially filled glasses of beer, wine and other drinks. It is a simple but effective idea that gives the bar a more convincing and occupied appearance.
Plastic components form a miniature draught-beer tower, which becomes one of the characteristic details behind the bar. Bottles receive individual labels, a coffee jar is prepared, and the shelves gradually fill with the small objects that make the restaurant look operational rather than empty.
There are numerous paper food boxes in different shapes and sizes—approximately ten in total—plus a matching shopping bag. These are made by scoring, folding and locking the printed pieces together. No glue is necessary if the folds are made accurately.
The teddy bear’s table receives napkins and a surprisingly generous meal consisting of sausage, egg and pizza. These ready-made food items, together with the glasses and bottles, give the model much of its personality and gentle humour.
The rear shelving is then filled with additional bottles, cartons and restaurant supplies.


Plants and exterior decoration
The supplied plastic flowers can be trimmed and arranged inside the small pots. The hanging baskets and climbing arrangements use the included bag of green vine material.
One larger plant follows the traditional Rolife construction method: green wire forms the stems, paper leaves are attached individually and the finished plant is placed in its pot. It is a familiar technique, straightforward to complete and effective at this scale.
Once the furniture and accessories are prepared, everything is installed inside the restaurant. Because the front and side remain open, positioning the cabinets, bar, shelves, bottles and boxes is easy.
The final porch section is completed with its side panels and roof, followed by the exterior table, chairs, teddy bear, menu boards and flower arrangements.
The last decorative stage is the rose-covered awning above the entrance. Paper leaf branches are removed from their sheet and arranged freely across the top. Nine blue resin roses are then added among the leaves.
It is a simple final step, but it provides a strong splash of colour and gives the entrance a nicely finished appearance.
Lighting and Electronics
The lighting system is extremely simple. There is only one warm LED, connected to a battery compartment concealed behind the restaurant. The only control is the mechanical switch on the battery box.
As with many Rolife kits, the wire ends must be twisted together during installation. This is a familiar and uncomplicated connection method, although a prepared plug-and-socket connection would be neater and even easier for a first-time builder.
The lighting is not sophisticated, but it does what it needs to do. The single lamp provides a pleasant warm glow and supports the cosy restaurant atmosphere without complicating the build.
A second light could reveal more of the bar and shelving, while a more accessible switch would improve everyday use. Nevertheless, the standard light is sufficient for the design and performs its intended function successfully.
For that reason, I rate the lighting and electronics at 8/10. It is a very basic system, but it works.
Customization
Tipsy Restaurant did not feel like a kit that required extensive customization. The standard design is already complete, attractive and well furnished, so I kept my modifications relatively conservative.
As always, I painted the exposed edges of the wooden parts. There was less edge painting than in many of my other builds, but I still used furniture markers and several selected colours wherever the pale laser-cut edges would otherwise remain visible.
For the overhanging vine arrangements, I supplemented the supplied green material with my own colourful flowering vines. This added more variety and gave the restaurant exterior a brighter, more naturally blooming appearance.
Although I did not feel that the model needed major changes, it still offers respectable opportunities for personalisation. The pictures and wall decorations could be replaced with family photographs or images connected to a particular place. The menus and signs could also be altered, and the restaurant could easily be given a completely personal name.
Additional table decorations, customised food and drink labels, or extra lighting would provide further options. However, the basic structure does not present the same extensive customization possibilities as some larger architectural, fantasy or mechanically sophisticated kits.
My relatively limited modifications were therefore a deliberate choice rather than a correction of shortcomings. Tipsy Restaurant looks good straight from the box while still allowing builders to add their own identity if they wish.


My Customizations at a Glance
- Edge painting using furniture markers and selected colours
- Additional colourful flowering vines
- Supplied green vine material combined with my own greenery
- Supplied plastic flowers arranged to create fuller planting
Difficulty and Recommended Experience
I would describe Tipsy Restaurant as suitable for builders from beginner through advanced level.
This does not mean that the stock construction reaches an advanced technical difficulty. It means that the kit is accessible to a complete beginner while remaining a pleasant and relaxing project for an experienced builder who wants something easier between more complicated builds.
A beginner can practise most of the essential miniature-building techniques:
- Removing laser-cut components
- Light sanding
- Press-fit assembly
- Installing acrylic windows
- Applying stickers and bottle labels
- Folding paper cartons
- Arranging artificial plants
- Connecting a simple LED light
More experienced builders may find the stock construction undemanding, but they can still enjoy the amount of furnishing and the possibilities for personalisation.
The friendly and almost toy-like design may also appeal to younger hobbyists, although Rolife officially recommends the kit for ages 14 and above because of the numerous small parts.
The only important display warning concerns dust. Anyone intending to keep the restaurant on an open shelf should plan to purchase a separate dust cover.
What I Liked Most
- Friendly and immediately recognisable restaurant theme
- Charming teddy-bear diner as the main character
- Very accurate and uncomplicated construction
- Suitable for a genuine first miniature-house project
- Equally pleasant as a quick build for an experienced hobbyist
- No glue technically required
- Plenty of bottles, glasses, food, cartons, signs and plants
- Open layout that remains easy to access during assembly
- Good balance between a quick build and a detailed final scene
- Attractive result without requiring major customization
What Could Be Improved
- The printed colours could be slightly more vibrant
- Twisted-wire connections work, but it still not the ready electrical kit
- A second light and a more accessible switch would improve the lighting system
Ratings
| Category | Rating |
|---|---|
| Design and Artistic Concept | ⭐⭐⭐⭐⭐⭐⭐⭐☆☆ — 8/10 |
| Material Quality and Precision | ⭐⭐⭐⭐⭐⭐⭐⭐⭐☆ — 9/10 |
| Instructions | ⭐⭐⭐⭐⭐⭐⭐⭐⭐☆ — 9/10 |
| Lighting and Electronics | ⭐⭐⭐⭐⭐⭐⭐⭐☆☆ — 8/10 |
| Customization Potential | ⭐⭐⭐⭐⭐⭐☆☆☆☆ — 6/10 |
| Build Experience | ⭐⭐⭐⭐⭐⭐⭐⭐½☆ — 8.5/10 |
| Final Appearance | ⭐⭐⭐⭐⭐⭐⭐⭐☆☆ — 8/10 |
| Difficulty and Suitability | Beginner to Advanced |
| Overall Rating | ⭐⭐⭐⭐⭐⭐⭐⭐½☆ — 8.5/10 |
Rating Note
For builders who enjoy cosy restaurants, teddy bears and simple decorative projects, DG167 offers very good quality, safe and predictable construction, sufficient detail and a particularly pleasant building experience.
The 6/10 customization score reflects the extent of the opportunities built into the design. It does not mean that the kit requires improvement. In fact, one of its strengths is that it produces an attractive result without needing extensive modifications.
Final Verdict
Rolife’s Tipsy Restaurant DG167 is a straightforward, cheerful and very approachable miniature-house kit. It does not rely on mechanical effects, sophisticated electronics or difficult construction.
Its appeal comes from accurate parts, a logical building sequence and a large collection of small restaurant details that gradually create a convincing scene.
The furniture and shell come together quickly. The glasses, bottles, cartons, flowers, food and signs then provide the slower decorative work that miniature builders enjoy. The teddy bear seated at the outdoor table gives the finished model an unmistakable focal point, while the bar and densely furnished shelves reward a closer look.
The single LED is basic rather than sophisticated, but it does its job and creates a warm, cosy atmosphere. The familiar twisted-wire connection and rear mechanical switch are simple solutions, but neither creates any meaningful difficulty.
The materials are good, the precision is very good and the entire project is easy and quick to assemble. There are plenty of ready-made details, and the model produces a charming result without demanding advanced skills or extensive customization.
Would I recommend it? Yes.
I would recommend Tipsy Restaurant particularly to anyone building a Rolife miniature for the first time, as well as to experienced builders who want an easy and relaxing project between more complicated builds.
Anyone who enjoys open-front cafés, teddy-bear characters and cosy restaurant scenes may like it even more than I did.
As my build number 49, it was not a technical challenge—and it did not need to be. It was a pleasant, quick and satisfying project with very good precision, plenty of ready-made details and a charming finished appearance.
Even though this style is not exactly my cup of coffee, I enjoyed building it and can recognise how strongly it will appeal to its intended audience. Add a separate dust cover, and it becomes an easy miniature to enjoy for a long time.
Overall rating: ⭐⭐⭐⭐⭐⭐⭐⭐½☆ — 8.5/10
Certainly recommended.
Gallery


Copyright Book Nook Workshop 2026 – All rights reserved. (Martin Seidler)
Leave a Reply