Reviewed by: John A. MacInnes

Price: £29.99 direct from AliExpress – Build number: 63
Introduction:

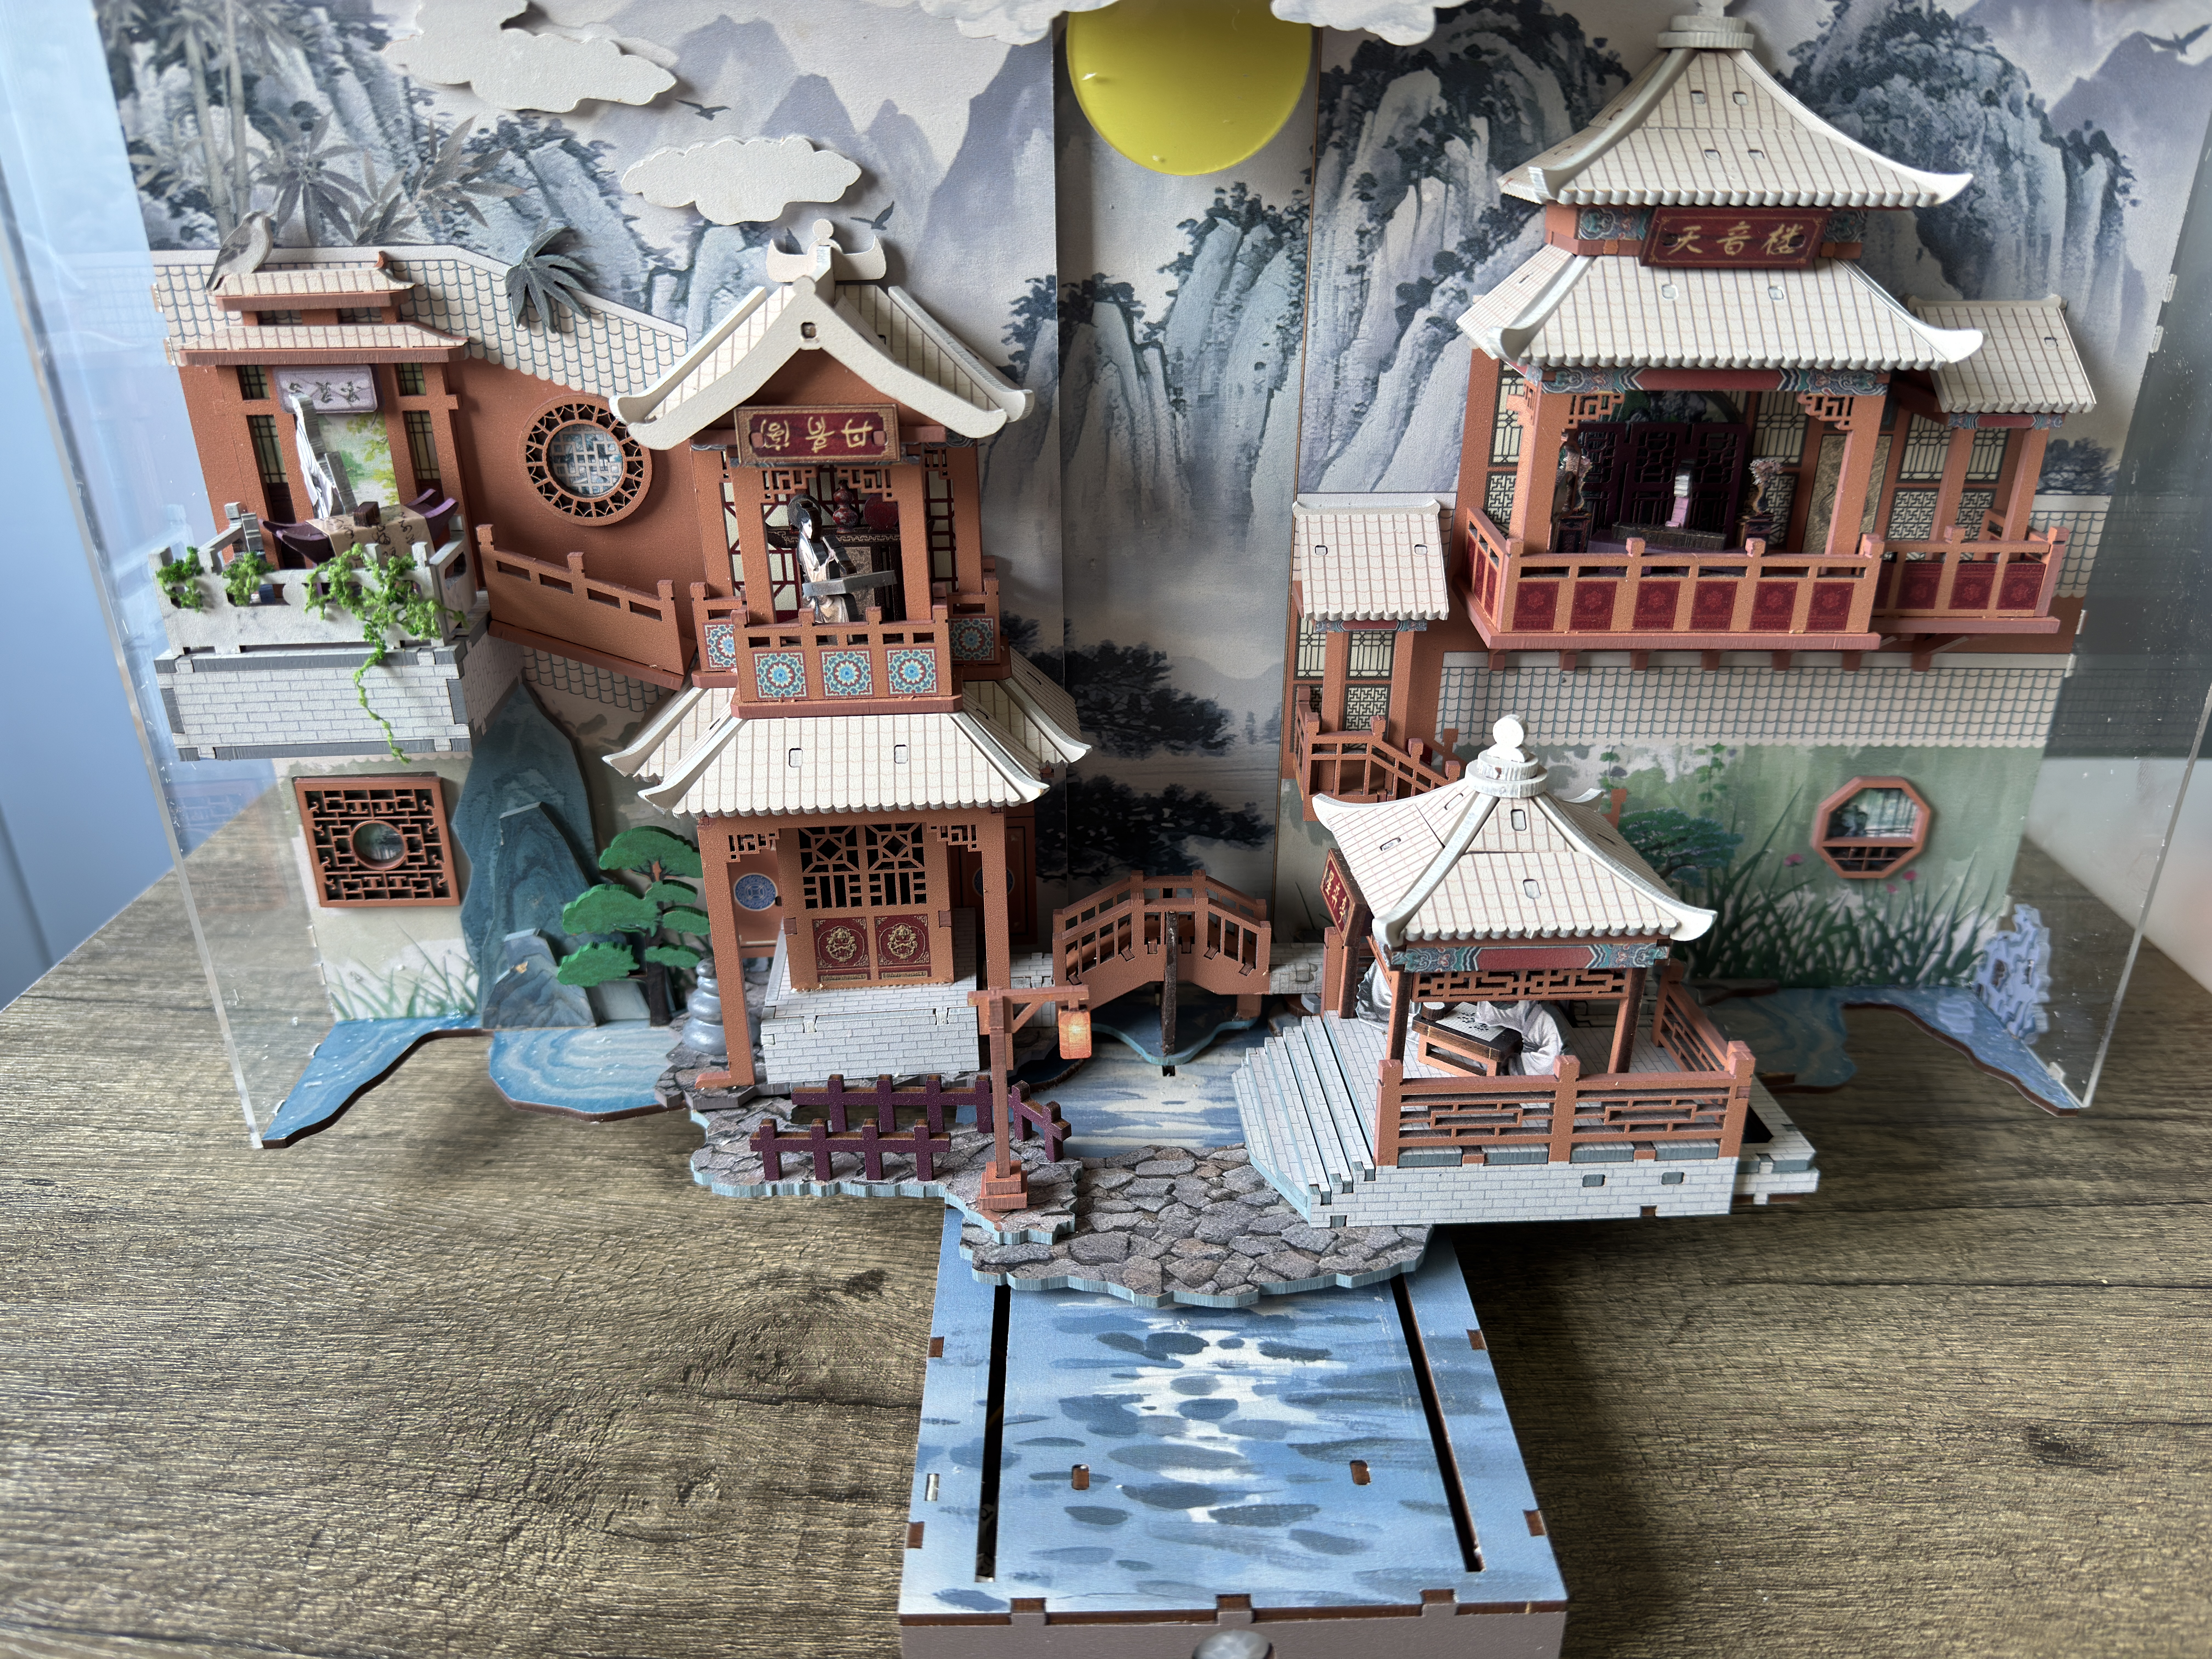
The Four Arts book nook is one of those kits that immediately catches the eye with its traditional Chinese architecture, warm lighting and dramatic mountain backdrop. Sold as the Four Arts, the model takes its inspiration from the ancient Chinese scholarly pursuits of Qin (music), Qi (strategy games), Shu (calligraphy) and Hua (painting), themes that are subtly woven into the design.
The printed lift-top box has no English to show age suitability or part count, however a translation provided some information.
The manufacturer is listed as Chao Xiaotu, the model number is MZ49-8, and it contains 365 wooden pieces. The construction uses a fibreboard composite along with acrylic components. It includes an integrated lighting system with automatic PIR light sensor, and is powered by three AAA batteries (not supplied), although it can also be powered via USB for operation.
Recommended for builders aged 14 and over, the difficulty rating shown on the box is three stars out of five, placing it firmly in the intermediate category. As is often the case with kits aimed primarily at the Chinese market, the packaging provides little in the way of marketing detail, leaving the build itself to do the talking.
Fortunately, at first glance, the attractive pagoda-style buildings, layered scenery and atmospheric lighting suggest this could be a rather enjoyable addition to any oriental-themed collection.
Unboxing and the manual debacle:

Unfortunately, my excitement lasted right up until I opened the box. Along with the usual bags of wooden sheets, lighting components and assorted bits and pieces, there should also have been one rather important item – the instruction manual. It wasn’t there. Not tucked under the base, not hidden between the boards, not folded inside the packaging and, unless it had mastered the art of invisibility, not in the box at all.
Building a 365-piece book nook without instructions is a little like being handed a 5,000-piece jigsaw with no picture on the lid and being told, “You’ll figure it out.” While missing parts occasionally happen, an entire instruction book deciding to take the day off is a new one on me.
Needless to say, before a single piece of MDF was liberated from its sprue, I was already emailing the seller in the hope that somewhere, someone had my wandering instruction manual sitting on their desk.
My first port of call was AliExpress, but that quickly descended into an exercise in international diplomacy. Trying to explain that my kit had arrived without an instruction manual was made considerably more challenging by the fact that my Mandarin extends to approximately three words, two of which are probably mispronounced.
After several messages that seemed to disappear into the digital abyss, I admitted defeat and called in reinforcements. Fortunately, fellow book nook builder Ian Horst from New York had recently completed this very kit and kindly sent me a selection of images of the missing manual, along with a warning “it’s a single sheet of teeny, tiny, diagrams, some of which look like they’d been drawn by a scratching hen.”

Whether it was an act of genuine kindness or a cunning experiment to see if I’d arrive at the same conclusions he had during his own build remains open to debate. Either way, thanks to Ian, this review was back on track.
Thankfully, with Ian’s photographs, I was at least able to zoom in far enough to make out some of the assembly steps. I use the word “manual” rather generously because, as Ian had already warned me, what you actually get is a single folded sheet of paper covered in tiny black-and-white diagrams that appear to have been photocopied several generations too many.
Some of the illustrations are perfectly serviceable, while others leave you staring at them wondering whether you’re looking at a building component or an ink blot from a Rorschach test. It’s one of those instruction sheets that seems to assume you’ve either built this kit before or possess a healthy amount of psychic ability.
Thankfully, after enough zooming, squinting and the occasional educated guess, I managed to decipher most of what was required.
The kit as supplied:

With the instruction sheet mystery finally solved, it was time to see what the kit itself had to offer. Inside the box were a whopping 13 full sheets of beautifully cut 2.5mm Fibreboard, all cleanly printed with very little scorching around the laser-cut edges.
Also included were several acrylic panels that double up as dust covers for the finished model, a welcome addition that helps keep the inevitable dust bunnies at bay.
Rounding off the contents was a bag containing the lighting kit, complete with the various wires, LEDs and electronic components needed to bring the scene to life, including a USB cable. On first inspection, the quality of the materials looked promising, giving the impression that, despite the questionable instruction manual, the actual kit had been manufactured to a far higher standard.
The actual building blocks of the kit are the 2.5mm sheets, and I’m pleased to report that the print quality is more than acceptable. Colours are vibrant, details are sharp and the artwork is crisp throughout, helping to disguise the fact that you’re assembling what is, at its heart, a collection of laser-cut wooden boards.
The laser cutting itself is equally impressive, with parts separating cleanly from the sprues and only the occasional light sanding required to remove the small attachment tags. First impressions suggested that, whatever corners had been cut on the instruction manual, they certainly hadn’t been cut on the manufacturing of the kit itself.
One thing that did raise an eyebrow, however, was the complete absence of any duplicate parts. Anyone who has built more than a handful of book nooks knows that gravity has an uncanny ability to launch tiny pieces into another dimension, never to be seen again.
We’ve all had that heart-stopping moment when a delicate bracket pings off the tweezers, ricochets off the desk and disappears into the carpet monster’s lair. Many manufacturers recognise this inevitability and thoughtfully include spare copies of the more fragile or easily lost components.
Here, however, duplicate pieces are conspicuous by their absence. It’s not a deal breaker, but it does mean you’ll want to keep a careful eye on every tiny part because, if one goes missing, there isn’t a safety net waiting for you.
From a manufacturing perspective, I really couldn’t find much to criticise. All thirteen MDF sheets had been laser cut to good tolerances, with parts fitting together cleanly and requiring very little persuasion.
Just as importantly, there was very little evidence of laser scorching around the cut edges, so you don’t end up with blackened fingers every time you remove a component from the sprue. The print quality was equally consistent across every sheet, with no noticeable overprinting, colour bleed or registration issues. Colours remained vibrant, fine detail was crisp and everything lined up exactly as it should. It’s the sort of quality control you hope to see on a premium kit and, in this respect at least, the Four Arts certainly didn’t disappoint.
Lighting kit:

Electronics can often be the part of a build that intimidates newcomers, but thankfully that isn’t the case here. Everything arrives pre-wired, so there’s no soldering iron to dust off and no tiny wires to strip or join together.
The battery box incorporates its own master switch, which not only powers the model on and off but also enables or disables both the touch sensor and the PIR motion sensor, making it easy to prevent unnecessary battery drain when the book nook is sitting quietly on the shelf.
The wiring is sensibly colour-coded, which certainly helps, although the lack of a decent instruction manual meant I spent rather longer than I’d hoped trying to work out what connected to what.
Eventually, after a considerable amount of detective work, I established that the red, yellow and black leads were for the touch pad and PIR sensor, while the two black-and-white extension cables linked the four pairs of LED lights together.
The build:

One other little trap I stumbled across was the occasional lack of guidance over part orientation. Every now and then the manual neglects to tell you which face of a component should be visible, leaving you to decide whether the printed surface belongs on the inside, the outside or somewhere in between.
It’s one of those moments where blind faith isn’t your friend. Fortunately, the accompanying 3D illustrations usually provide enough of a clue to work it out, provided you’re prepared to zoom in, squint a bit and play detective. A few extra seconds studying the diagrams can save several minutes of carefully dismantling something you’ve just proudly glued together.
All of these little quirks lead to the absolute golden rule of this build: dry fit everything before you commit to sticky fingers. Because of those tight tolerances, dodgy schematics and unmarked printed faces.
Slotting the pieces together completely dry first gives you a stress-free dress rehearsal. It lets you catch any backward pieces, test the snugness of the tabs, and ensure everything lines up perfectly before you introduce the permanent point-of-no-return that is adhesive. Trust me, your sanity—and your fingertips—will thank you.
Readers who regularly follow my reviews will already know that I’m a complete glutton for punishment when it comes to colouring the exposed edges. Yes, it probably doubles the build time and, yes, there are those who’ll say life’s too short, but I genuinely believe it’s one of those little jobs that transforms a good-looking build into a great-looking one.
Thankfully, this kit didn’t make that task any harder than it needed to be. The parts released from the sheets with very little effort, and I was pleasantly surprised to find virtually no splintering, snapped components or rough edges.
In fact, many of the pieces came away so cleanly that they barely needed any sanding at all before being fitted. It’s a small detail, but good-quality laser cutting makes the whole building experience that much more enjoyable—and leaves you with more time to spend colouring all those edges!
Part one:

Step one sees you attaching a simple flight of steps to one of the side panels. Hardly the sort of thing that’s going to have the neighbours peering over the fence in excitement, I hear you say. But hold on a minute. These are, without question, some of the best-fitting steps I’ve encountered in any book nook build.
This is a traditional mortise and tenon (click-and-fit) design, and every tenon slipped into its laser-cut slot with absolute precision. No persuasion, no trimming, no sanding, and better for all, no colourful language—just a satisfyingly snug fit, perfectly aligned to within a millimetre. It’s amazing how something so simple can bring such an absurd amount of satisfaction, but when you’ve built as many kits as I have, little victories like this deserve to be celebrated.

A quick word of warning before you charge ahead and get stuck in. When fitting parts K8, K15, D6, H15 and H20 into part I10, take your time. They’re designed to be a lovely, snug fit, but if you try to force them into place, there’s a very good chance you’ll snap the delicate top rail of the balcony. Ask me how I know… Fortunately, I managed to avoid disaster by using the flat end of a pair of tweezers to press directly on the parts themselves rather than the fragile railing. It spreads the pressure far more evenly and makes the job much safer. Consider yourself warned—there are no spare parts in the box, so if that balcony breaks, it’s entirely down to you!
Instructions for electrical work:

Up to this point, the build itself has genuinely exceeded my expectations. The quality of the laser cutting is excellent, the mortise and tenon joints fit beautifully, and the parts almost fall out of the sheets without a fight. There has been virtually no splintering and barely a burr left behind, making construction an absolute pleasure.
Then you open the instruction manual.
I’m beginning to suspect it wasn’t written by someone who actually built the model. In fact, I’m not entirely convinced they even saw it. It feels more like somebody was handed a handful of photographs, a collection of cables and told, “That’ll do.”
Entire sections are skipped over, while other steps amount to little more than a picture of a wire with absolutely no explanation. Which wire? Where does it go? What does it connect to? Your guess is apparently as good as theirs.
For a first-time builder, this would be enough to have the kettle on and the box back in the cupboard before lunchtime.
To keep myself sane, I started labelling every cable as I installed it, giving myself reference points for the inevitable occasions when the manual abandoned me completely.
Step 12 is a perfect example. You’re told to install a double LED board, but nowhere does it explain whether it remains part of the daisy chain, plugs into the PCB, or simply hangs there looking decorative. Apparently, that’s left as an exercise for the builder.
At this rate, the electrical instructions are racing towards a well-earned 1 out of 10. Which is a real shame, because the lighting hardware itself is actually rather good. If only whoever designed the electronics had been allowed anywhere near the instruction manual.

Workshop Tip – Step 21: This was the first point in the build where the lighting instructions really became confusing. The manual shows the cable from the first lamp (installed in Step 12) being sandwiched between the two B5 pieces before passing through G19 and being retained by part I2.
I wasn’t comfortable trapping the cable in this way, as it places unnecessary pressure on the insulation. Instead, I filed a small notch into one of the B5 pieces to create a dedicated cable channel, allowing the wire to sit naturally without being pinched. I also relieved part I2 slightly so it could be fitted without applying pressure to the cable. It’s a simple modification that takes only a minute but provides much better protection for the wiring and is something the instructions really should have highlighted.
Once the cable was routed correctly, I pulled through any excess slack before securing it in the relief notch with a small amount of glue. This keeps the wire neatly in place, prevents it from moving during the remainder of the build, and avoids putting any strain on the LED connection
Customisation:

Now, I have a confession to make. I seem to have completely lost the ability to build a book nook exactly as it comes out of the box. At some point during every project, a little voice appears on my shoulder asking, “Go on… what can you improve?” More often than not, I listen.
This time my attention turned to the water beneath the staircase. I briefly considered breaking out the water gel paste to create a realistic surface, but with much of the area disappearing into the shadows, it felt like overkill. Instead, I opted for a sheet of ripple-effect acetate, cut to fit the space. It catches the light surprisingly well and gives the impression of gently moving water without adding unnecessary bulk or complexity. Sometimes the simplest modification really is the best one.
Just be careful that you leave enough room on any part being fitted so it won’t stop proper flush fitting between tenon and mortise. However, as it transpired, by the time the end of the build had come this had to be removed to allow the closing sides a smooth surface.

This side was completed with the addition of two of the acrylic pieces to the top and side.
Of course, once I’d started making one modification, it was only a matter of time before the customisation bug really took hold.
The tranquil stream was crying out for a little more character, so I added some slate pieces to give it a natural focal point. One of the balconies was softened with clusters of trailing vines, helping to break up the straight lines of the structure and giving the impression that nature was slowly reclaiming parts of the building.
And finally, I added some bamboo plants to both sides of the build. None of these changes are dramatic on their own, but together they added another layer of realism and make the finished model feel that little bit more unique.
After all, if you’re going to spend hours building a miniature masterpiece, why not leave your own fingerprints on it? Was I right, no, of course not. These all had to be removed at the final stages as they impacted on the kit closing properly. Something I had not considered fully at the time.
Workshop Tip – Step 31:


Step 31 caused some confusion because the printed manual illustrates F10 as a full-length rear support. The manufacturer’s installation video, supplied following a quick email to query F10 confirms that the supplied short F10 parts (as seen above on the sheet) are correct and should be fitted exactly as supplied, without a rear leg. If you’re building this kit, don’t be alarmed if your F10 parts appear much shorter than the illustration.
The supplied F10 parts are actually intended to be short brackets, exactly as shown in the video. Once I followed the video instead of the drawing, the confusion was resolved.
By this stage I’d spent so long hunting for the elusive ‘correct’ F10 that I was beginning to think I’d accidentally joined CSI: Book Nook Unit. Every part was measured, every sheet searched, the manual scrutinised under magnification and my sanity questioned more than once.
Following my email enquiry, the seller responded quickly with an installation video, which confirmed that the printed illustration in Step 31 was incorrect rather than the supplied parts. They also thanked me for highlighting the issue and advised that they intend to revise the drawing in future editions of the manual.
It’s always encouraging to see a manufacturer willing to listen to customer feedback and improve their product.
Workshop tip – wiring:

If there’s one piece of advice I can give before you even think about touching the lighting, it’s this: label every single cable. Trust me, future you will be eternally grateful.
Without doing so, you’ll very quickly end up in a right pickle, trying to work out which lead belongs to which lamp and which ones form part of the daisy chain. The manual offers precious little help. Cable routing is barely explained, connector locations are vague, and some of the instructions you’d reasonably expect simply aren’t there.
I managed to create my own headache at Step 12 by fitting one of the double LED boards with only a single JST connector attached, when it should have had two.
That mistake was entirely mine, but in my defence, the manual is so poorly drafted that it was almost inevitable. There simply isn’t enough information to confirm what should be connected where, leaving far too much open to guesswork. In step 12 the diagram shows two single wires exiting the pagoda, but nowhere does it say that these single cables should be drawn as twin wires.

Fortunately, having built more than 60 book nooks, I resisted the temptation to throw the whole thing across the workshop.
Instead, I reached for a pen and notepad and started reverse-engineering the lighting circuit. By sketching out the wiring and tracing each connection, I eventually worked out that my Step 12 lamp had effectively become Lamp 4—the last one in the daisy chain—instead of Lamp 1 as originally intended.
Thankfully, it all worked out in the end, despite having to splice into a cable to give extra length, but it was a problem that could and should have been avoided. A few properly labelled diagrams and a clearer explanation of the lighting sequence would have saved builders a considerable amount of head-scratching.
Failed instruction manuals:

It does leave me wondering why so many Chinese manufacturers continue to fall at the final hurdle.
They’ve clearly invested a great deal of time and money into designing an excellent kit, producing precision laser-cut parts and developing some genuinely clever engineering, only to undermine it all with an instruction manual that feels like an afterthought.
Surely the cost of employing a competent translator and, more importantly, an experienced builder to assemble the kit from nothing but the draft instructions would be money well spent?
Any decent builder would quickly highlight the missing steps, confusing cable routing, vague photographs and the inevitable “How on earth am I supposed to know that?” moments before the manual ever reached the printers.
Instead, customers end up acting as unpaid beta testers, deciphering what the manufacturer meant rather than what they actually wrote. It’s a mystery that continues to baffle me because, with a little extra effort at the documentation stage, many of these kits would go from very good to genuinely outstanding.
Watch out:

One little detail that didn’t quite convince me was the tree supplied as part F21. It just felt slightly out of scale with everything else around it, looking a touch too large for the space it was intended to occupy.
I did briefly consider leaving it out altogether, but in the end decided that a splash of greenery was better than none at all. So, with a little imagination (and perhaps a generous helping of artistic licence), I declared it to be a carefully cultivated bonsai tree. Problem solved!
Sometimes the simplest way to fix a modelling dilemma is to rewrite the story rather than the scenery.
Here’s another little trap the manual lays for unsuspecting builders. When you reach part K10—one of the birds that adds a lovely three-dimensional effect to the sky—don’t follow the placement shown in the instructions.
The manual has it positioned in the top right-hand corner, but that’s incorrect. Instead, it should be fitted in the top left, directly over the printed outline.
It only takes a few seconds to get right, but if you follow the manual you’ll end up wondering why nothing quite lines up. It’s yet another example of how a simple proofreading build by an experienced modeller could have caught these little niggles long before the manual went anywhere near a printer.
Yet more problems with the instruction manual:

At Step 63 you begin installing the PIR sensor. Once again, however, the manual lets the builder down. It starts by showing the cable being routed beneath part A2, but in the very next step, when fitting B7 and J4, the cable mysteriously disappears from the illustrations altogether, leaving you to work out the routing for yourself.
Fortunately, when fitting J4 it became apparent that the part incorporates a small notch and, when correctly positioned, sits flush against the base section K1. In reality, there is only one sensible route for the cable that avoids trapping it. The problem is that builders should not have to reach that conclusion through trial and error.
By this stage of the build, it had become abundantly clear that this manual needs to be rewritten from the ground up by someone who has actually built the kit. A competent builder would understand where additional photographs, clearer illustrations and logical sequencing are required, ensuring cable routing and assembly are explained properly instead of repeatedly leaving the builder to make educated guesses.
Step 67 delivers yet another example of the manual falling well short of the standard it should achieve. The instruction simply states, “Ensure the coloured face is inward.” That would be helpful if the black-and-white drawing gave even the slightest clue as to which side is the coloured face. Unfortunately, it doesn’t. To make matters worse, both sides of the part appear identical, with no printed pattern or markings to use as a guide, leaving the builder to make an educated guess.
The confusion doesn’t end there. The next instruction advises that the sliding track should be waxed before assembly, but nowhere does the manual identify exactly which track it is referring to. Looking at the components, there are four perfectly plausible candidates, yet no arrows, labels or close-up illustrations to remove any doubt.
At this point, I couldn’t help but laugh. Who said building book nooks was supposed to be a relaxing, stress-free hobby? This kit seems determined to test not only your patience but also your powers of deduction.
In the end I just ensured that anything which could be construed as a sliding track was treated.
Steps 83 and 84 bring you closer to the final stage of the build, where the PCB, PIR sensor, touch switch and remaining lighting components are connected. By this point, it will come as no surprise that the manual continues its tradition of providing little meaningful guidance on the lighting system or even something as fundamental as cable routing.
Rather than following the instructions, by this stage I had already reverse engineered the entire lighting circuit, tracing every connection, splicing into cables where necessary and checking each JST connector to ensure every connection was secure before sealing everything inside the model.
Against all expectations, the moment of truth arrived and… it worked. Every light illuminated exactly as intended, which was both a relief and immensely satisfying after the detective work required to get there. In my opinion, however, the finished lighting still falls just short of its full potential.
Two additional LEDs would have transformed the final presentation: one beneath the staircase on the right-hand side and another beneath the balcony on the left. Both areas are left in noticeable shadow, and a little extra illumination would have enhanced the depth and atmosphere of what is otherwise a beautifully designed scene.
I may well return to this kit at some point in the future, but at this stage I was just glad to be nearing the end.
The bridge of sighs!

Just when you think you’ve reached the end of the build, the manual has one final surprise in store. Steps 85 onwards introduce the construction of a small bridge, complete with what I can best describe as a ’tiller’ fitted underneath. This engages with a notch in the base, allowing the bridge to slide backwards and forwards as the two sides of the book nook are opened and closed.
On paper, it’s a wonderfully imaginative feature. The ability to open both sides of the model is something you don’t often see in kits of this type and, when I first realised what the designers were trying to achieve, I was genuinely impressed. Unfortunately, experience has taught me to approach moving parts with a healthy degree of scepticism because, more often than not, the engineering doesn’t quite live up to the ambition. Sadly, that proved to be the case here.
The principle is straightforward enough. The right-hand end of the bridge rests on a rotating capstan that was installed back in Step 21. As the right-hand side of the book nook closes, the capstan should rotate and gently push the bridge towards the rear of the model. It’s an elegant idea in theory.
In practice, however, it simply refused to work.
Every time I closed the side panel, instead of sliding backwards the bridge would lift upwards, jamming halfway through its travel like a miniature drawbridge. My first thought was excessive friction, so I tried applying wax to the sliding surfaces. That made no difference. Everything was cleaned thoroughly before trying a silicone lubricant, with exactly the same result. As a final attempt I reached for graphite powder, but the bridge stubbornly continued to jam.
At that point I admitted defeat for the evening. Sometimes the best tool on the workbench is a good night’s sleep, and I was hoping my wee Scots brain would wake up with the answer.
There had to be a way of persuading the bridge to glide gracefully backwards rather than catapulting any unsuspecting miniature pedestrians headfirst into the lake below. Whether the solution came from inspiration, stubbornness or sheer bloody-minded perseverance remained to be seen, but one thing was certain—I wasn’t about to let a bridge have the final word.
The following day I stripped the bridge back down, read the manual… then read it again… and somehow it still refused to reveal what I’d done wrong.

To add to the entertainment, I even managed to snap one of the components while dismantling it, creating yet another repair job before I could continue. For someone whose relationship with IKEA can best be described as “complicated”, this was beginning to feel all too familiar.
DIY, to me, usually stands for Destroy It Yourself. My last IKEA bookcase appeared to contain 2,763 parts, one mysterious screw left over, and instructions written entirely in interpretive dance. I provide the muttering, the endless cups of tea and the occasional existential crisis.
In the end, I stopped assuming the problem was with the mechanism and started questioning the manual instead. Again.
If you’re following Step 86, you’ll probably be wondering where on earth the bridge is actually supposed to sit. The drawings and typeface are reproduced at such a tiny size that the critical detail is almost impossible to make out.
Out of sheer determination, I enlarged the illustration to around 600%. By then the image was heavily pixelated, but it was finally just clear enough to reveal what the manual completely fails to explain: the right-hand bridge abutment must sit between the two pegs on the capstan instead of on top of both of them.
That tiny detail changes everything.
Once the bridge is positioned correctly, the capstan drives it exactly as the designers intended A single enlarged inset drawing in the manual would have saved builders a considerable amount of head-scratching and several hours of unnecessary fault-finding. Thankfully, patience finally won the day.
Discovering that the right-hand bridge abutment had to sit between the two pegs on the capstan was a major breakthrough, but it still didn’t completely solve the problem.
Despite stripping the mechanism down, thoroughly cleaning every component and applying a generous coating of wax to all the sliding surfaces, the bridge continued to jump off the capstan. Although the right-hand side was now being driven correctly, the left-hand abutment failed to slide smoothly, causing the bridge to twist slightly under load before the right abutment eventually climbed off the capstan altogether.
After studying the mechanism, the solution proved surprisingly simple. Rather than relying on a single capstan to push one side of the bridge, the design really needed a second capstan on the opposite side.
With both ends driven simultaneously, the bridge would move backwards and forwards evenly, eliminating the twisting action and allowing the mechanism to operate smoothly. It’s a pity the designers didn’t adopt this approach, because it would have transformed an ingenious idea into a genuinely reliable feature.
Final stages:

The final stage of the build sees you constructing a second moving section in the form of a traditional tea house. T
hankfully, after the trials and tribulations of the bridge mechanism, this assembly proved refreshingly straightforward. Everything fitted together beautifully and, once completed, the entire section simply slots into a second pair of guide tracks in the base, allowing it to slide smoothly as the book nook is opened and closed.
There is, however, one small point worth noting. These guide slots sit directly above the compartment housing the wiring for the lighting system. If the cables are left sitting too high, the sliding tenons can catch on them during operation, causing the movement to become stiff or even jam completely.
Before fitting the tea house permanently, take a moment to ensure the wiring is neatly secured with enough clearance beneath the tracks. It’s a simple precaution that takes only a few seconds but will save a great deal of frustration later on
Final niggles:

Before finally declaring the build complete, there was one last little niggle to deal with. The clear acrylic panels fitted to both sides of the model look superb once installed and really finish the book nook off beautifully.
Unfortunately, the upper panels have an annoying habit of popping out of their mortises every time the sides are flexed during handling. After reseating them for what felt like the umpteenth time, I decided enough was enough.
Two tiny dots of clear UV resin at each fixing point, followed by a quick blast from the UV torch, solved the problem permanently. The repair is virtually invisible, doesn’t detract from the appearance of the model, and the panels have remained firmly in place ever since.
Sometimes it’s the smallest modifications that make the biggest difference.
My thoughts:

Looking back over the entire build, the Four Arts proved to be something of a contradiction. On one hand, the manufacturing quality is excellent, with beautifully printed components, precise laser cutting, an imaginative design and a lighting system that, once deciphered, performs admirably.
On the other, it’s held back by one of the poorest instruction manuals I’ve encountered in a book nook kit, turning what should have been an enjoyable intermediate build into an exercise in detective work and perseverance.
Yet, despite the missing manual, confusing wiring diagrams, incorrect illustrations and the infamous bridge mechanism, I genuinely enjoyed the challenge. There was a real sense of satisfaction each time another puzzle was solved, and seeing the finished model illuminated for the first time made the frustrations worthwhile.
With a professionally rewritten instruction manual and a handful of minor design refinements, this would be a truly outstanding book nook. As it stands, it’s an excellent kit that’s let down slightly by its engineering quality, and majorly by the documentation that’s supposed to guide you through it.
Pros
- Excellent quality 2.5mm fibreboard with crisp printing and minimal laser scorching.
- Precise mortise and tenon joints made for an enjoyable, accurate build.
- Attractive traditional Chinese architecture with impressive attention to detail.
- Clever opening book nook design with an innovative moving bridge concept.
- Well-designed, pre-wired lighting system requiring no soldering.
- Integrated touch sensor and PIR motion sensor add to the finished presentation.
- Acrylic dust panels help keep the completed model clean.
- Excellent value for the level of detail and overall build quality.
- A striking finished display piece that looks superb when illuminated.
Cons
- Instruction manual is one of the weakest I’ve encountered, with tiny illustrations, missing information and confusing assembly sequences.
- Missing instruction manual in my kit (although the seller did respond positively).
- Electrical installation instructions are vague and require considerable detective work.
- Several errors and omissions in the manual, including incorrect illustrations and part placement.
- Bridge mechanism is let down by both poor documentation and a design that relies on a single capstan drive.
- No duplicate parts supplied for delicate or easily lost components.
- Builders are frequently left to determine cable routing and part orientation through trial and error.
- Some decorative components, such as the F21 tree, feel slightly out of scale.


Copyright Book Nook Workshop 2026 – All rights reserved. (John A. MacInnes)

Leave a Reply