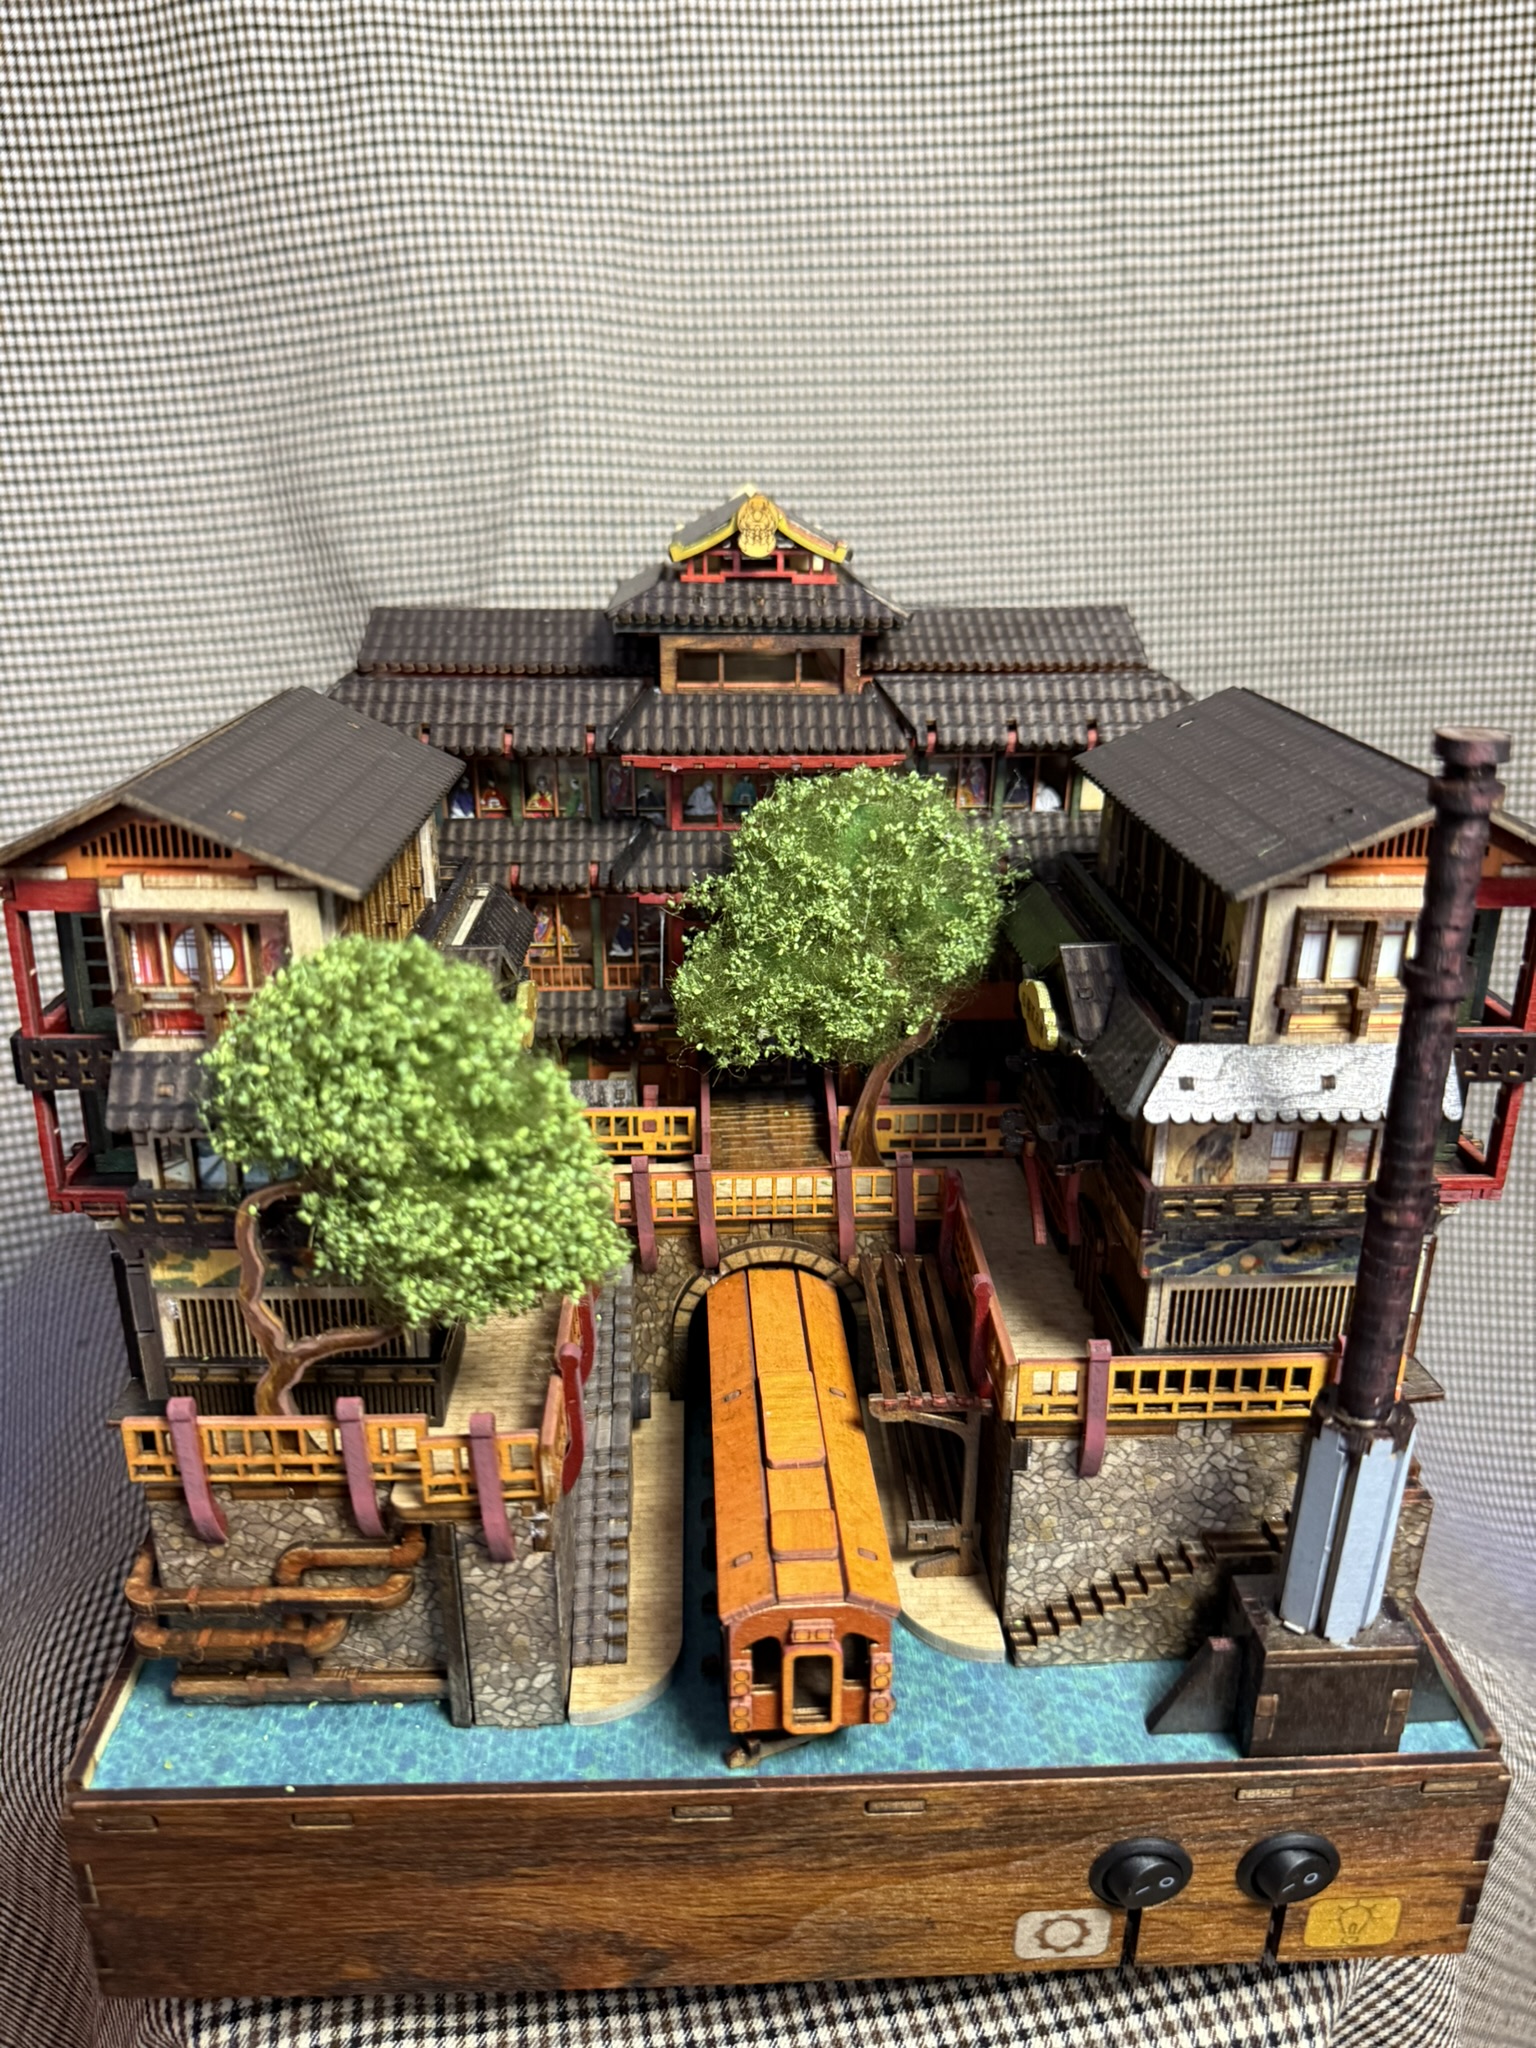
Built and reviewed by Martin Seidler as build # 43

Ratings
| Category | Rating |
|---|---|
| Instructions | ⭐⭐⭐⭐⭐⭐⭐⭐⭐☆ (9/10) |
| Lighting & Electronics | ⭐⭐⭐⭐⭐⭐⭐⭐☆☆ (8/10) |
| Precision of Fit | ⭐⭐⭐⭐⭐⭐☆☆☆☆ (6/10) |
| Customization Potential* | ⭐⭐⭐⭐☆☆☆☆☆☆ (4/10) |
| Difficulty | Intermediate to Advanced |
| Overall Design | ⭐⭐⭐⭐⭐⭐⭐⭐☆☆ (8/10) |
*The customization score reflects my own decision to preserve the designer’s original vision. The model certainly offers plenty of opportunities for builders who enjoy adding their own ideas.
More Than Just a Japanese Hot Spring
Some book nooks are designed to recreate a real place. Others tell a fictional story. Ginzan Onsen by Viendor does something rather unusual—it combines both.
At first glance, the model is immediately recognizable as a miniature interpretation of the famous Japanese hot spring town of Ginzan Onsen. The traditional wooden buildings lining the river, the bridges, the nostalgic atmosphere and the warm lighting all capture the charm of one of Japan’s best-known onsen towns.
As I was preparing for this review, I spent some time comparing the finished model with photographs of the real Ginzan Onsen. While the inspiration was obvious, one detail kept catching my attention.
Where did the train come from?
It certainly isn’t part of the real town.
The answer came directly from Hoang, Viendor’s founder and designer. During one of our conversations, he explained that the model was never intended to be an exact miniature of the real Ginzan Onsen. Instead, it combines the atmosphere of the famous Japanese location with inspiration from Studio Ghibli’s Spirited Away.
That single explanation completely changes the way you look at the model.


The largest building represents the restaurant inspired by the dining scenes in Spirited Away. Inside, a moving conveyor carries tiny servers delivering food to diners visible through the illuminated windows. The two smaller buildings depict traditional bathhouses, complete with moving pumps and pipework suggesting the circulation of the hot spring water. Even the little train suddenly becomes perfectly logical—it belongs to the imaginary world rather than the real one.
Once you understand the story behind the design, Ginzan Onsen stops being a simple architectural model and becomes a miniature scene telling its own story.
That, in my opinion, is one of the reasons why this kit has remained one of Viendor’s most iconic creations.
An Earlier Generation of Viendor
Ginzan Onsen is not one of Viendor’s latest releases.
It belongs to an earlier generation of kits, created at a time when the company primarily used birch plywood rather than MDF.
During our interview, Hoang explained the reason. When these early models were developed, reliable MDF was simply not readily available in Vietnam, making plywood the natural choice for production.
Today, this gives the kit both strengths and weaknesses.
The natural wood grain suits the traditional Japanese architecture beautifully and gives the finished model a distinctive character. The laser cutting is generally clean, and most medium-sized parts separate from the sheets without difficulty.
The downside is that plywood is noticeably more fragile than MDF.
Thin decorative parts can splinter if removed too quickly, and some of the smallest components require considerably more care than builders may be used to with modern kits.
Fortunately, Viendor clearly anticipated this. Many of the delicate parts are supplied with one or more spare copies. If you accidentally damage one while removing it from the sheet, don’t panic—there is a good chance that a replacement is already included.
This attention to detail is appreciated, because with well over a thousand individual pieces, the occasional broken part is almost inevitable.
Opening the Box
The first impression after opening the box is simple:
This is a big project.
The kit contains well over 1,100 individual parts spread across numerous laser-cut plywood sheets. Alongside them are several acrylic sheets protected by brown masking film, the complete lighting system, an electric motor, gears, shafts, rubber drive belts, battery boxes, glue and a large, full-colour instruction manual.
Interestingly, although there are more than eleven hundred individual pieces, the numbering only runs quite over 300.


The numbering system itself is also rather unusual.
Unlike almost every other manufacturer, Viendor does not identify the plywood sheets as Panel A, Panel B, Panel C and so on. Instead, every individual component simply receives its own sequential number.
It certainly works, but it makes locating parts slower than necessary. Each time you need a component, you first find its number in the instructions and then search across all of the plywood sheets until you locate it.
After a few evenings of building you gradually learn where everything is, but I still think the traditional panel lettering used by most manufacturers would make the process considerably more convenient.
Instructions and First Impressions
Fortunately, the instruction manual itself is excellent.
Viendor provides a large-format, full-colour manual with clear illustrations and a logical assembly sequence. Throughout most of the project I found the instructions easy to follow, even during the more complicated mechanical stages.
Only two points deserve a mention before you begin.
The first appears very early during the assembly of the conveyor rollers.
Step 7 shows glue being applied, but the illustration can easily be misunderstood. Only the centre of the wheel assembly should be glued. The outer rollers (Part No. 22) must remain free to rotate. If they are accidentally glued to the shaft, the conveyor cannot work correctly later in the build.
The second issue concerns Part No. 53 inside the gearbox.
These small locking pieces are intended to retain the shafts, but in reality they are the same diameter as the holes they fit into, meaning they cannot actually perform that function.
After discussing the issue with Hoang, he confirmed that this is a small design oversight.
Fortunately, it has virtually no practical consequences.
Once the surrounding structural parts are installed, the gearbox becomes rigid enough that everything remains securely in place despite the ineffective locking pieces.
Apart from these two observations, I found the instructions to be among the better ones available.
A Project That Rewards Patience
Before starting the build, it is worth setting the right expectations.
Ginzan Onsen is not particularly difficult because of complicated techniques.
It is demanding because of its scale.
With more than 1,100 individual parts, this is simply a long project. There are hundreds of small decorative elements, repeated assemblies and intricate architectural details that gradually come together over many evenings.
This is definitely not a weekend build, unless you really want to sit on it all the time
Personally, I don’t see that as a disadvantage at all.
Some models are enjoyable because they are quick to finish.
Ginzan Onsen is enjoyable because it invites you to slow down. Rather than rushing towards the completed model, you spend time appreciating the individual buildings, the mechanical features and the countless architectural details that gradually transform a pile of plywood sheets into a miniature Japanese town.
And that, for me, is exactly the right mindset before beginning one of Viendor’s classic designs.
Building Experience
Unlike the vast majority of book nook kits, Ginzan Onsen does not begin with walls, windows or buildings.
Instead, the first several hours are devoted almost entirely to mechanics.

You start by assembling the gearbox, shafts, guide wheels and drive system that will eventually power all the moving features of the model. At first glance the number of tiny components looks intimidating, but in reality the assembly is far more logical than it initially appears. As long as you take your time and regularly check that each shaft and gear rotates freely, the mechanism comes together without major surprises.
It is worth remembering, however, that this is one of Viendor’s earlier designs.
The entire transmission is built almost exclusively from laser-cut plywood components. There are no steel shafts, miniature bearings or moulded plastic gears like those used in some modern mechanical kits. Compared with manufacturers such as Tonecheer, whose recent models have become remarkably sophisticated from a mechanical point of view, Viendor’s solution is much more elementary.
That is not necessarily a criticism.
The mechanism was never intended to impress with engineering complexity. It simply has to provide movement, and in that respect it performs its job perfectly well.
A single electric motor drives two completely different systems. One side powers the moving conveyor hidden inside the restaurant, while the other drives a crankshaft that animates the decorative pumps mounted on the bathhouses.
It is a simple, practical design that works reliably once properly assembled.
The Conveyor

If there is one stage of the build that deserves a little extra patience, it is undoubtedly the conveyor.
The kit includes three conveyor belts, although only one is needed. My advice is to install the first belt as carefully as possible, making sure it is stretched evenly before the glue has completely cured. If it does not work correctly, you can cut it off and use another one. In my case it took all three trials before I was somewhat happy.
Once the belt is in place, you can trim the action by adjusting the rubber bands fitted to the rollers. Their primary purpose is to increase friction between the drive wheels and the belt, but they also allow fine adjustment of the belt alignment.
This adjustment took considerably longer than I expected.
Initially, my conveyor repeatedly drifted towards one side instead of running centrally. It required quite a bit of experimenting with the tension of the rubber bands before I finally achieved smooth operation.
I suspect this will be the stage where many builders spend the greatest amount of time.
Fortunately, there is no reason to become frustrated.
The conveyor is a charming feature, but it is not the main attraction of the finished model. Even if you never achieve absolutely perfect operation, Ginzan Onsen remains a beautiful display piece. My advice is simple: spend some time adjusting it, but don’t let it spoil the rest of the build if perfection proves elusive.
From Mechanics to Architecture
Once the conveyor and gearbox have been completed, the project begins to change character.
The mechanical assembly is installed onto the large blue base plate together with the battery box and motor switch. At first I considered replacing the visible blue surface with modelling resin or water effects to create a more realistic river, but as the build progressed it became obvious that most of the base would eventually disappear beneath the buildings and surrounding scenery. In the end, I decided there was little to gain from additional work in this area.
The second moving system—the crankshaft operating the bathhouse pumps—is assembled next.
Although it looks fairly complicated once completed, I actually found this mechanism easier to build than the conveyor. The connecting rods and crankshaft fit together well, and once installed on the base the whole assembly worked without requiring any significant adjustment.
Before moving on, I would definitely recommend testing both mechanical systems together.
It is far easier to correct any small problems now than after the buildings have been installed and access becomes more limited.
From this point onwards, the model gradually transforms into something much more familiar.
The tunnel portal, retaining walls, railway, platforms and foundations for all three buildings quickly define the overall layout of the scene. For the first time, you begin to appreciate the composition of the finished model and understand how all the individual elements fit together.
Lighting Installation

The lighting system is one of the most straightforward parts of the entire build.
One strip illuminates the restaurant, one is installed inside each bathhouse and another lights the small railway carriage.
Despite the number of cables running through the base, I never found cable management particularly difficult. The routing is logical, the instructions are clear and everything fits where it should.
Viendor continues to use traditional mechanical switches instead of the touch sensors that have become almost standard on many modern book nook kits.

Personally, I slightly prefer touch sensors because they are more discreet and give the finished model a cleaner appearance. On the other hand, I also understand Hoang’s reasoning. Mechanical switches provide clear tactile feedback, are extremely reliable and avoid some of the occasional quirks associated with touch sensors.
Ultimately, it comes down to personal preference.
One aspect that is more difficult to ignore is the motor noise.
Because the entire mechanism relies on plywood gears driven by a relatively simple electric motor, the model is noticeably louder than many contemporary kits. It is certainly not excessive, but if you are accustomed to the almost silent operation of some newer models, you will immediately notice the difference.
The wiring also reflects the age of the design.
The cables are noticeably thicker than those used in more recent kits. They perform perfectly well, but they are slightly more difficult to conceal neatly during the build.
For these reasons, I would not give the electronics a perfect score. They are reliable, easy to install and function exactly as intended, but they also show that Ginzan Onsen belongs to an earlier generation of Viendor designs.
The Best Part of the Entire Build
Once the mechanics and wiring are finished, the project changes completely.
From this point onwards, Ginzan Onsen becomes exactly the kind of build I enjoy the most.
Instead of gears and shafts, you spend your time constructing traditional Japanese wooden architecture.
And for me, that is where this kit truly shines.
Where the Build Really Comes to Life
With the mechanics completed and the wiring hidden inside the base, the character of the project changes completely.
From this point onwards, Ginzan Onsen becomes a pure architectural build, and in my opinion this is where the kit is at its best.
The first building to be constructed is the large restaurant, which immediately becomes the centrepiece of the entire scene. Construction starts with the walls and the printed acrylic window panels that later reveal the diners sitting inside. As the build progresses, balconies, supporting beams, roof brackets and countless decorative details gradually transform what initially appears to be a simple box into an impressively detailed traditional Japanese building.

This was undoubtedly my favourite part of the entire project.
None of the individual construction steps are particularly complicated, but there are a lot of them. The restaurant is built slowly, layer by layer, and with every new section the model gains more character.
Personally, I found this part extremely relaxing.
There is something very satisfying about watching the timber structure gradually grow into a richly detailed building. It reminded me of constructing traditional wooden architecture rather than assembling a commercial kit.
The amount of detail is impressive.


Many of the supporting brackets, balconies and roof structures are surprisingly small, and some of them are barely visible once the model is completed. Nevertheless, they all contribute to the finished appearance and give the restaurant a remarkable level of authenticity.
One thing became obvious very quickly.
Don’t hesitate to use glue. I have used the silicone super glue to secure many joints.
Although the laser cutting is generally good, the plywood construction is not as dimensionally precise as the MDF used in many modern kits. Most joints fit perfectly well, but occasionally a tenon feels slightly loose or a slot slightly tighter than expected.
None of these situations caused any real problems, but I soon found myself using considerably more glue than I normally do.
In my opinion, this is the correct approach.
Small amounts of glue give the entire structure much greater rigidity and make the delicate roof supports and decorative elements much less vulnerable during the later stages of the build.
The roof itself deserves a special mention.
It consists of numerous individual panels installed one after another, gradually transforming the exposed framework into the finished building. Again, I strongly recommend securing these panels properly with glue. Besides strengthening the building, it also helps maintain the correct alignment of the roof.
When the restaurant is finally completed and placed onto the base, the project suddenly feels almost finished.
For the first time you can switch on the lights, watch the illuminated dining room through the windows and see the moving conveyor carrying tiny servers through the building.
Whether you decide to keep the conveyor moving permanently or not, the restaurant immediately becomes the visual highlight of the entire model.
The Bathhouses
After completing the restaurant, the two bathhouses feel pleasantly familiar.
Both buildings follow exactly the same architectural principles. You begin with the walls and windows before gradually adding balconies, roof supports, decorative details and finally the roof itself.
The two structures are almost mirror images of each other.
Interestingly, Hoang told me that his original intention had been to design two completely different bathhouses. However, because of time constraints during development, the decision was eventually made to mirror one design instead.
Personally, I don’t consider that a significant compromise.
Once installed on opposite sides of the river, the mirrored arrangement creates a very balanced composition, and unless somebody specifically points it out, most builders will probably never notice.
Just as with the restaurant, I recommend using glue generously during construction.
The finished buildings become noticeably stronger and easier to handle during the final assembly, especially when installing them onto the base where several locating tabs need to engage simultaneously.
This is probably the only stage where I would advise working slowly.
Take your time, check that no wiring becomes trapped underneath the buildings and avoid forcing anything into place. Everything fits, but patience is rewarded.
With the bathhouses installed, Ginzan Onsen finally reveals its full character.
The restaurant naturally dominates the scene, while the two bathhouses frame it perfectly from either side. Together they create a convincing miniature interpretation of a traditional Japanese hot spring town.
Finishing Touches
At this stage only a handful of details remain.
The staircases, fences, benches, bridge, chimneys and other small decorative elements are all relatively simple to build, but they make a surprising difference to the finished appearance.
These are the details that most people never consciously notice, yet if they were missing, the whole model would somehow feel incomplete.
One particularly charming feature is the little train.
Although it is a relatively small part of the build, it plays an important role in the story behind the design and helps connect the real Ginzan Onsen with the fantasy world of Spirited Away.
Trees and Customization
The very last stage of my build coincided with a model railway exhibition where I was exhibiting my collection of book nooks.
As it happened, this turned out to be perfect timing.
By then, only the chimneys, a few final details and the two trees remained unfinished.
To be completely honest, I consider the trees to be the weakest visual element of the entire kit.
There is nothing technically wrong with them. They are easy to build and perfectly functional, but compared with the beautifully detailed buildings they look rather plain. The simple plywood trunks and the supplied foliage simply do not match the standard set by the rest of the model.
For me, they immediately called for improvement.
Fortunately, I was surrounded by experienced railway modellers who have been building realistic scenery for decades. One of them showed me a simple technique using polyfibre and fine leaf scatter to create far more natural-looking trees.
The method is surprisingly easy and requires only inexpensive materials that are readily available from almost any railway modelling supplier.
The difference was dramatic.


The upgraded trees completely changed the appearance of the finished model. Instead of looking like simple accessories, they became an integral part of the scenery, naturally framing the buildings and adding much greater depth to the entire composition.
If you compare my photographs with the original kit, I think the improvement speaks for itself.
If there is enough interest, I would be happy to prepare a separate BookNookWorkshop article explaining this technique step by step, because it is useful for many other book nook kits as well.
Interestingly, apart from the trees, I deliberately chose not to customize the model.
That certainly doesn’t mean there is no room for additional work.
On the contrary, builders could easily add more bushes, extra trees, realistic water effects, additional figures or countless other scenic details.
I simply decided not to.
Ginzan Onsen is one of Viendor’s classic designs and something of a legend within the book nook community. I wanted to present the model as faithfully as possible to the designer’s original vision.
Apart from my usual edge colouring—which I apply to virtually every wooden kit—and the upgraded trees, I intentionally left everything exactly as Viendor designed it.
For that reason, my relatively low customization rating should not be interpreted as a criticism of the kit.
It simply reflects my own decision to preserve one of the hobby’s classic designs rather than reinvent it.
Final Thoughts
Looking back at the completed model, I found myself appreciating Ginzan Onsen for a rather different reason than I expected when I first opened the box.
It isn’t the mechanics.
It isn’t the plywood construction.
And it certainly isn’t because it is the most technically advanced book nook available today.
What makes Ginzan Onsen special is the atmosphere it creates.
Once you understand the story behind the design, the entire model becomes much more than three attractive Japanese buildings standing beside a river. The combination of the real Ginzan Onsen, the inspiration from Spirited Away and the subtle movement of the conveyor, pumps and train creates a scene with its own identity and personality.
From a technical point of view, however, Ginzan Onsen clearly reflects its age.
The plywood construction requires considerably more care than modern MDF kits.
The dimensional accuracy is generally good, but not exceptional. During the build I occasionally encountered joints that were either slightly tighter or slightly looser than expected. None of these issues caused serious problems, but they reinforced my impression that generous use of glue is the best approach for this kit.
The mechanical assembly also belongs to an earlier generation of designs.
It works reliably once adjusted correctly, but compared with the sophisticated mechanisms found in some modern kits—particularly those from Tonecheer—it feels relatively simple. That is perfectly acceptable, because movement is only intended to enhance the scene rather than become the centrepiece of the model.
The only part that genuinely tested my patience was the conveyor.
Achieving smooth belt alignment required considerably more adjustment than I had anticipated, and I suspect many builders will spend most of their troubleshooting time at this stage.
Fortunately, once properly adjusted, it performs exactly as intended.
The electronics are another example of a solid but slightly dated design.
Installation is exceptionally straightforward thanks to the fully pre-wired system, but the relatively thick cables, traditional mechanical switches and the audible electric motor all remind you that this is not Viendor’s latest generation of kits.
None of these issues prevent the model from being enjoyable.
They simply place it within the context of its time.
What I Liked
✔ A unique concept combining the real Ginzan Onsen with inspiration from Spirited Away.
✔ One of Viendor’s most iconic and recognisable designs.
✔ Beautifully detailed traditional Japanese architecture.
✔ The restaurant is an outstanding and highly enjoyable build.
✔ Warm, atmospheric lighting.
✔ Fully pre-wired electronics with no soldering required.
✔ Straightforward instructions that make a surprisingly complex project easy to follow.
✔ Plenty of spare parts for the smallest and most delicate components.
✔ Excellent display presence once completed.
What Could Be Improved
✘ Plywood is considerably more fragile than modern MDF.
✘ The conveyor requires patience to adjust correctly.
✘ Some joints lack the precision expected from more recent designs.
✘ The original trees are rather basic and benefit greatly from simple customization.
✘ Mechanical switches feel somewhat dated compared with modern touch sensors.
✘ The motor and plywood gears are noticeably noisier than contemporary designs.
✘ The unconventional part-numbering system makes locating components slower than necessary.
💡 Builder’s Tip
If there is one improvement I would recommend for almost every builder of Ginzan Onsen, it would be upgrading the two trees.
The original trees are perfectly adequate, but they don’t quite match the level of detail found throughout the rest of the model. Using a simple railway modelling technique based on polyfibre and fine leaf scatter, you can dramatically improve their appearance with very little additional cost or effort.
I discovered this technique while completing the model at a model railway exhibition, where an experienced railway modeller showed me how surprisingly easy it is to create much more natural-looking trees.
The transformation was well worth the effort, and I believe it enhances the overall appearance of the finished model more than any other customization.
If you’re interested in trying it yourself, keep an eye on BookNookWorkshop.com. I’ll be publishing a separate step-by-step tutorial showing exactly how I created the trees used in this review, and the same method can be applied to many other book nooks and miniature scenes.
Ratings
| Category | Rating |
|---|---|
| Instructions | ⭐⭐⭐⭐⭐⭐⭐⭐⭐☆ (9/10) |
| Lighting & Electronics | ⭐⭐⭐⭐⭐⭐⭐⭐☆☆ (8/10) |
| Precision of Fit | ⭐⭐⭐⭐⭐⭐☆☆☆☆ (6/10) |
| Customization Potential* | ⭐⭐⭐⭐☆☆☆☆☆☆ (4/10) |
| Difficulty | Intermediate to Advanced |
| Overall Design | ⭐⭐⭐⭐⭐⭐⭐⭐⭐☆ (8.5/10) |
*The customization score reflects my own decision to preserve the designer’s original vision. The model certainly offers opportunities for builders who enjoy adding their own ideas, including more vegetation, realistic water effects and additional scenic details.
Final Verdict
Ginzan Onsen is not Viendor’s newest kit, nor is it the company’s most technically advanced one.
In many respects, its age is clearly visible. The plywood construction, relatively simple mechanics and older electrical design have all been surpassed by more recent developments within the hobby.
Yet despite all of that, I thoroughly enjoyed building it.
Why?
Because great models are not defined solely by engineering.
They are defined by the experience they create.
Ginzan Onsen tells a story.
It combines a real Japanese location with one of Studio Ghibli’s most memorable worlds and transforms them into a miniature scene full of atmosphere and character. Even today, years after its original release, it remains immediately recognisable among book nook enthusiasts.
That, in my opinion, explains why it has become one of Viendor’s flagship designs.
Would I recommend it?
Absolutely—but with realistic expectations.
If you are looking for cutting-edge mechanics, flawless MDF construction and silent operation, there are newer kits on the market that will suit you better.
If, however, you appreciate beautifully detailed architecture, enjoy a longer and more rewarding build, and would like to experience one of the kits that helped establish Viendor’s reputation, then Ginzan Onsen remains an excellent choice.
It may no longer represent the latest generation of book nook design.
But it remains one of the classics.
And after spending many evenings building it, I am very glad that Build No. 43 has earned its place in my collection.
Use discount code BNW15 at checkout.
Affiliate disclosure: If you buy through our Viendor links, Book Nook Workshop may receive a small commission at no extra cost to you. Our review and rating remain independent.
Photo Gallery


Copyright Book Nook Workshop 2026 – All rights reserved. (Martin Seidler)
Leave a Reply