
Introduction
After a run of builds that had his tweezers working overtime, John MacInnes, one of Book Nook Workshop’s pro build team fancied a wee change of pace and decided to go back to his roots with something nice and simple, while still smarting from his one spectacular fail. He wanted the sort of kit that’s ideal for beginners and doesn’t require the patience of a saint or a degree in engineering. John takes up the story…
When I first spotted this one, I have to admit I did a bit of a double take. It looked awfully like Sea Breeze. So before parting with any cash I went into full-on Sherlock Holmes mode. I checked the manufacturer, compared photos, did a fair bit of digging and generally made sure I wasn’t about to be stitched up.
Thankfully, all was above board. It wasn’t a copy at all, just another kit with a similar coastal feel. With my conscience clear and my wallet only slightly lighter, (it was a bargain £28.89) it was time to crack open the box and see if this little seaside scene could blow away the cobwebs.
The manufacturer
From what I’ve been able to uncover, ILE Create (often branded as IIE Create) is quite an interesting company because they seem to sit somewhere between a traditional manufacturer like Rolife and an OEM (Original Equipment Manufacturer) that produces kits for other brands.
Their products are aimed primarily at export markets, and they’re sold through wholesalers, online retailers and marketplaces rather than through a strong consumer-facing brand of their own. They have an Alibaba wholesale presence under the llE Create name, offering book nook kits directly to retailers.
The manufacturing operation appears to be in Guangzhou, Guangdong Province, China, one of the country’s largest manufacturing hubs for hobby and craft products.
Beach Corner
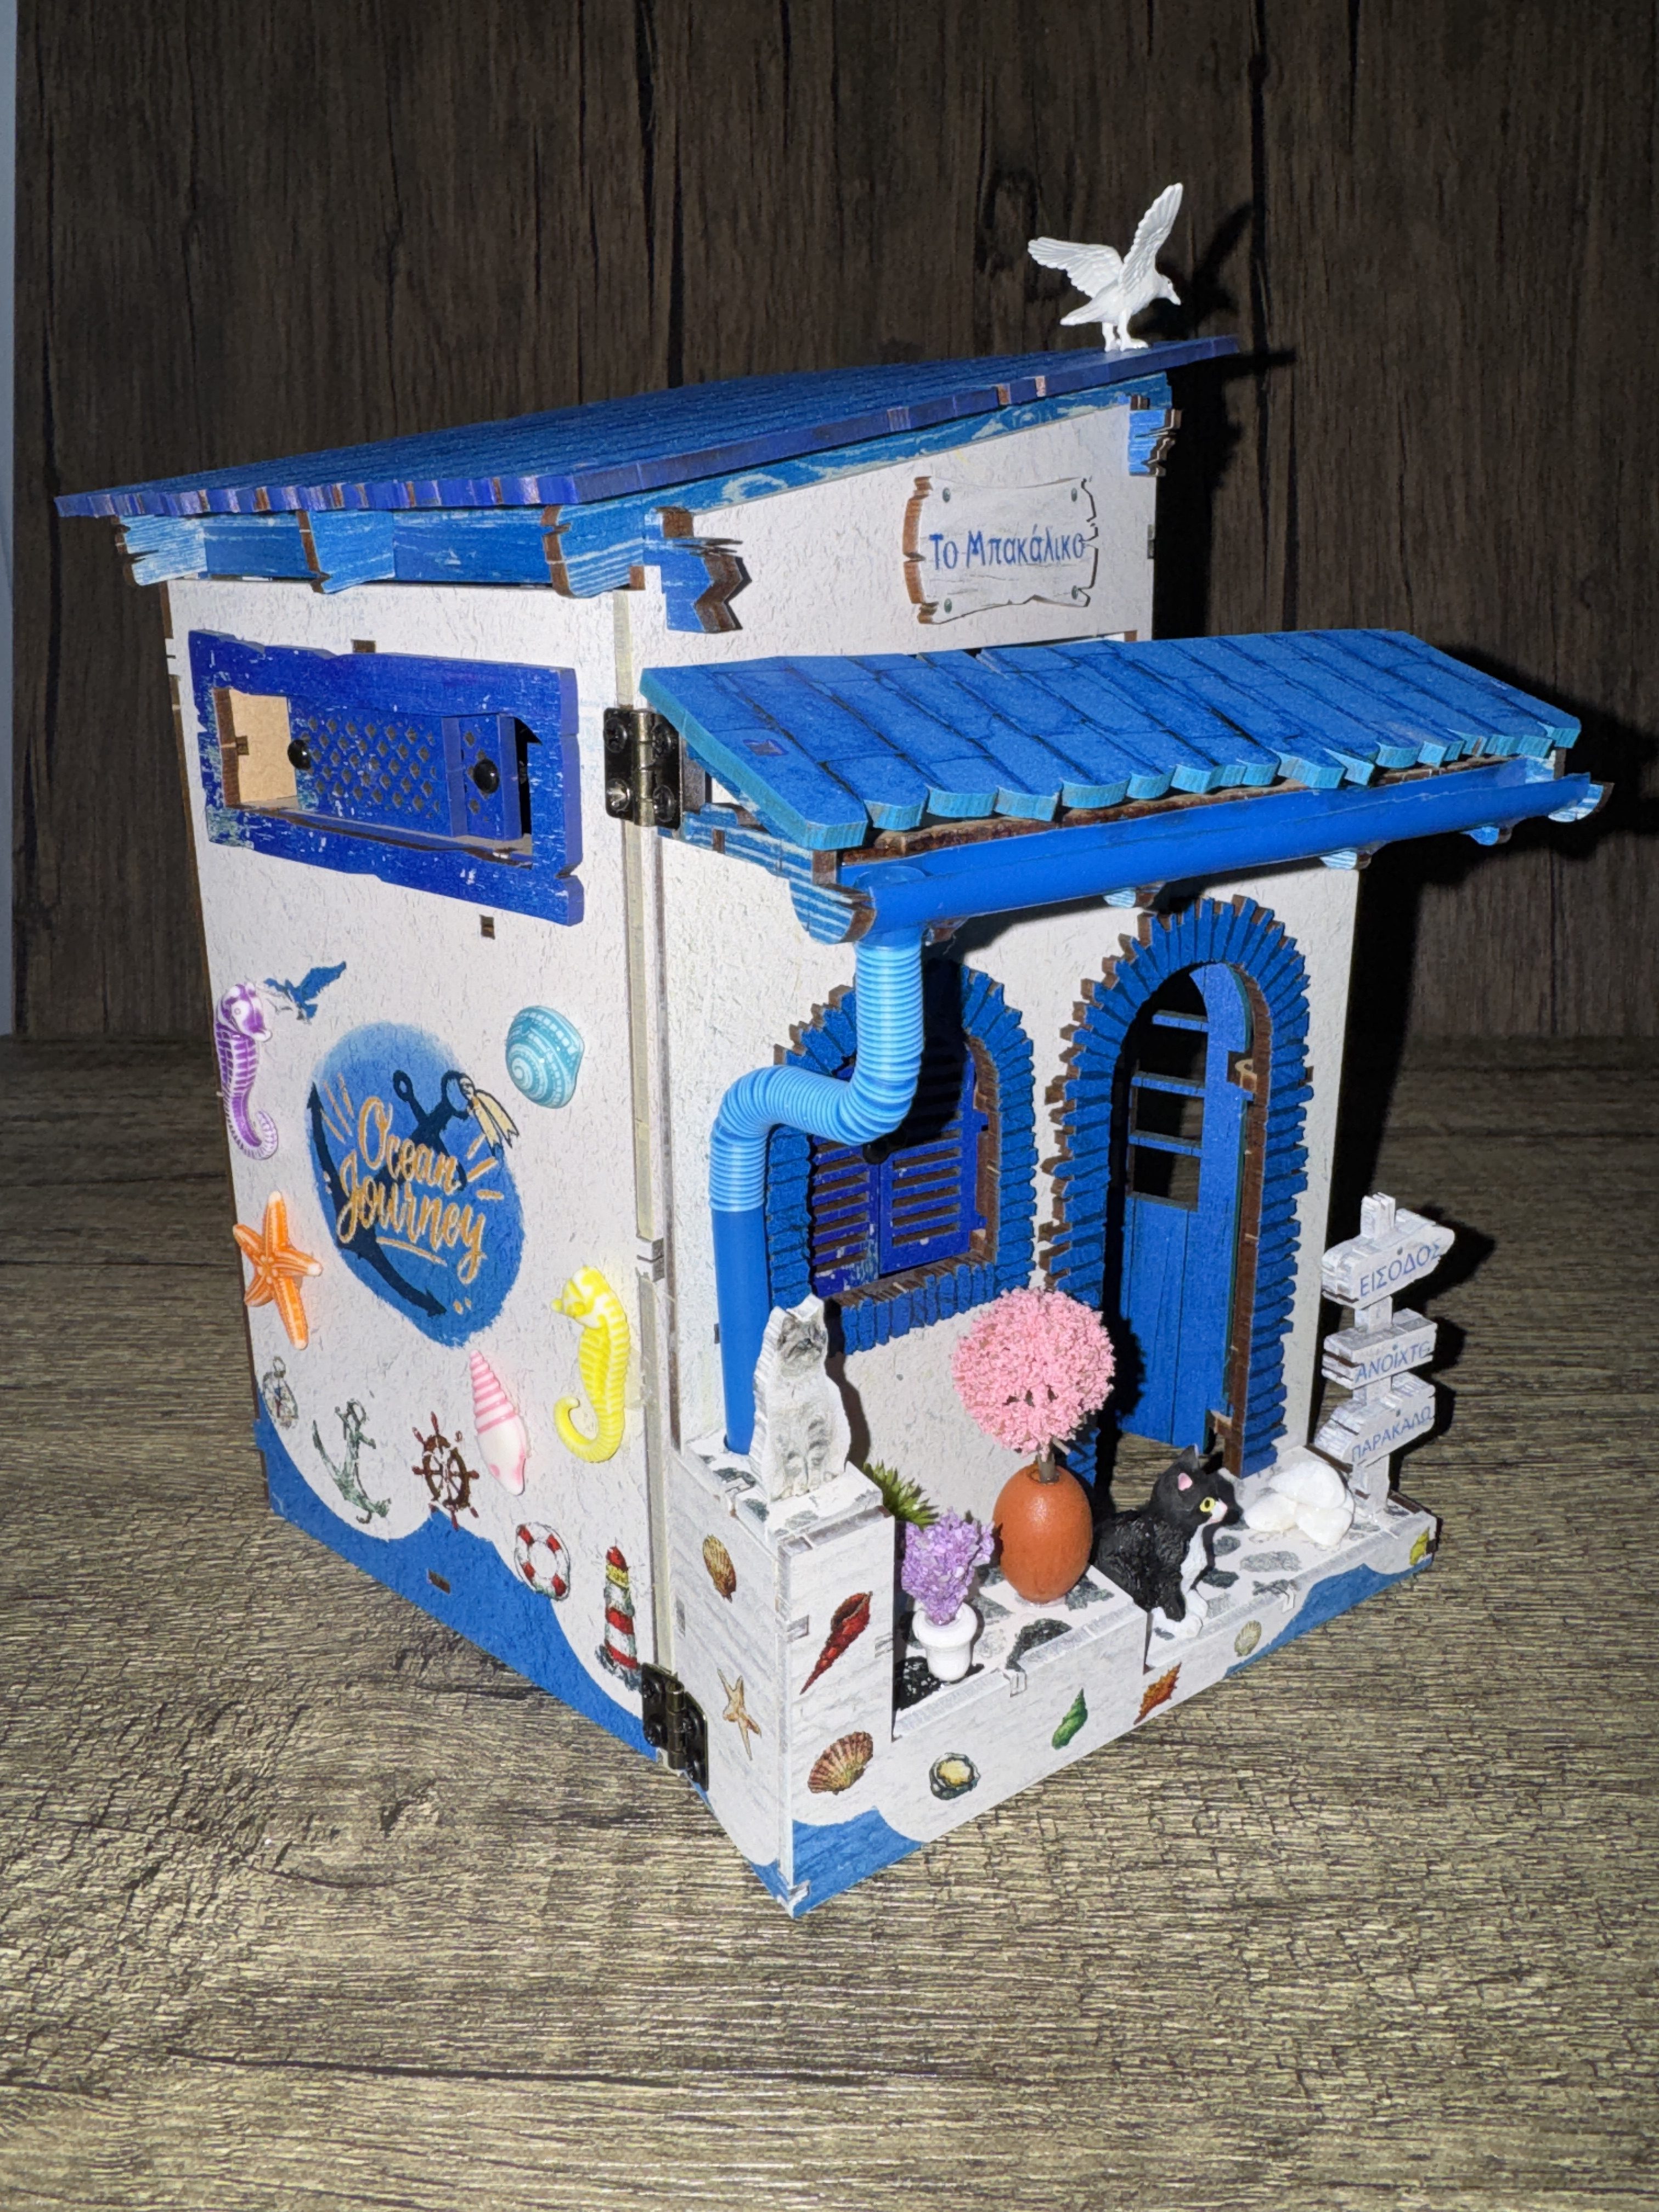
The scene itself is a charming little seaside shack finished in that classic blue and white colour scheme that immediately screams “bucket and spade holiday”. You can almost hear the seagulls circling overhead, although thankfully there’s no tiny model one trying to nick your chips. Measuring just 123mm x 128mm x 186mm when finished, it’s not going to dominate your bookshelf, but it’s the perfect size to brighten up a wee corner without requiring a house extension. This is a standard click and fit, mortise and tenon build.
The 38-page A5 full-colour instruction manual is an absolute little cracker. It’s written in English, the illustrations are nice and clear, and, best of all, it starts with a complete parts inventory. That might not sound particularly exciting, but when you’re greeted with a couple of bags full of tiny bits and bobs that all look remarkably similar, it’s worth its weight in gold. It only takes a minute or two to tick everything off and gives you peace of mind that nothing has escaped during transit or is still hiding in the bottom of the box waiting to ambush you halfway through the build.

Inside the box you’ll find six full sheets of 2.5mm of what appears to be a fibreboard, an A5 sheet of stickers, the lighting kit, two rather intriguing blue plastic straws, and a generous assortment of accessories including fabric, plant material, shells, a lifebelt, flower pots, beads and even a pair of tiny hinges. Now, whenever I spot hinges in a kit, the inner child immediately starts wondering, “Ooh… what’s going to open?” It’s like the kit is teasing you before you’ve even removed the first part from the sheet. Whatever it is, I’m already looking forward to finding out.

First impressions of the sheets are encouraging. The laser cutting looks nice and clean, with no obvious signs of scorching or rough edges. Of course, the real test comes when you start popping the pieces out. That’s when you discover whether they glide out like a dream or cling on for dear life, determined to take half the surrounding panel with them. So far, though, everything looks promising.
However, there’s a reason I was a wee bit cautious when I said the laser cutting looked fine. As soon as I started looking closely at the printed surfaces, the honeymoon was over. The colours are a bit muddy in places, and some of the printed signs on the side panels and smaller accessories are, frankly, about as sharp as a bowling ball. The text is blurred but because this is a seaside shack kit, there is every possibility that the printing is designed to look worn and faded from all that sun and salt spray.
Now, I’m not usually one for nit-picking, and anyone who has read my reviews knows I’ll happily praise a kit when it deserves it. But equally, if something isn’t up to scratch, I’ll say so. In 62 builds, this is the first kit I’ve come across where the print quality simply doesn’t make the grade. Hopefully it’s just an early wobble and the build itself can pull things back, because at the moment it’s not making the best first impression. I’ve emailed the manufacturer for some further information.
The electronics
The electronics are about as beginner-friendly as they come. There’s no soldering, no wire stripping and no moments where you’re left wondering if you’ve just invented a new way to electrocute yourself. Everything is pre-wired and simply plugs together.
Power is supplied via a separate battery box with its own on/off switch, which is always a welcome addition. It means you can leave the batteries in place without them quietly giving up the ghost every time the model is sitting on the shelf. Just remember you’ll need to supply your own two AAA batteries.
The lighting system itself is pretty straightforward. The battery box connects to a small PCB with touch sensor, into which three LED beads are plugged. Two are paired together while the third is destined to become a covered lamp within the scene. It’s hardly a Blackpool Illuminations setup, but then this is a compact little seaside shack rather than the Las Vegas Strip. Given the size of the finished model, I don’t foresee the simple lighting arrangement being an issue at all—in fact, it should be more than adequate.
One piece of advice I give with every single build is this – before you even think about reaching for the glue, stick a couple of batteries in and test the lighting. It takes all of 30 seconds and can save you a world of pain later on. Only last week I did exactly that with another kit and discovered the lighting set was faulty straight out of the box. Had I waited until everything was assembled, I’d have been performing surgery on a finished model or, worse still, living with a beautiful book nook that remained stubbornly in the dark. Trust me, test first, build second. Future you will be very grateful.

The build
Now, anyone who’s followed my reviews for any length of time will know about my deep, undying affection for… building tiny books. And by “deep, undying affection” I mean I’d rather glue my fingers together.
So imagine my relief when I discovered the sticker sheet is mainly book covers and there are only 14 books to make. Fourteen! That’s practically a day off compared with some kits I’ve tackled. No mountain of miniature paperbacks, no endless folding and sticking until your eyes go square. By my reckoning, that’s a win-win and probably deserves a small celebratory cup of tea before the real building begins.
One of the first things that caught my eye with Beach Corner was the amount of scope it gives you to make it your own. As most of you will already know, I have a rather relaxed relationship with instruction manuals. I don’t ignore them completely—that would be madness—but I do tend to treat them as a rough guide rather than the builder’s equivalent of the Ten Commandments.
For me, half the fun is looking at a kit and thinking, “Aye… but what if I did this instead?” Whether it’s adding extra greenery, changing colours, moving accessories around or sneaking in a few details of my own, I love putting my own stamp on a build. At the end of the day, if I wanted an exact copy of the picture on the box, I’d just look at the picture on the box.
Who knows where this one will end up? It might become a sleepy little fishing shack, a bustling holiday retreat… or, knowing my imagination, we could all get the shock of our lives and discover it’s actually situated in a nudist colony. Don’t worry though, I’ll spare you the sight of any tiny wooden sunbathers. There are some things that even I draw the line at.
That’s what makes these builds so enjoyable. The real satisfaction comes from creating something that’s unmistakably yours rather than just another replica of the manufacturer’s photograph.

A quick heads-up before you merrily sail past page 9. Keep a close eye on parts C12 and C13. The manual doesn’t mention it, but one of them has a longer tenon than the other, and that longer tenon needs to fit into the bottom section, F43. There’s a very good reason for this, as that section later slots neatly into the base plate.
Now, if you’re wondering how I discovered this little gem of information… let’s just say it wasn’t because the manual told me. Yours truly merrily fitted them the wrong way round before the penny dropped. Thankfully, I’d resisted my usual urge to drown everything in glue, so it was a quick fix rather than a full-scale rescue operation. Let my momentary lapse in concentration save you from making the same mistake!
Before I forget—and this might come as a shock to those of you who’ve followed my reviews for a while—we need to talk about the books.
Yes… the books.
As you’ll know, I usually greet any build requiring dozens of tiny books with all the enthusiasm of a man being told he needs root canal treatment. Thankfully, this kit showed a rare flash of mercy, with only 14 books to build.
Better still, the sticker sheet was excellent. The book covers are printed so crisply that, once wrapped around the MDF cores, you’d be forgiven for thinking they were miniature versions of the real thing. Which, I suppose, is rather the point.
Even more impressive was the quality of the adhesive. Every cover wrapped neatly around its book without any lifting corners or rebellious edges trying to spring back open five minutes later. For once, the B7000 stayed firmly on the bench because not a single book needed a dab of glue to persuade it to behave.
Now that’s something I wish every manufacturer would take note of. If you’re going to make us build tiny books, at least make them this painless.
One area where this kit really earns a pat on the back is the selection of accessories supplied in the box. It’s amazing how a handful of tiny details can transform what would otherwise be a rather ordinary little shack into somewhere that genuinely looks lived in.
You’ve got miniature shells scattered around the scene, flower pots bursting with colour, plenty of greenery, a length of hessian sacking and various other little odds and ends that all help tell the story. None of them scream for attention on their own, but together they add bags of character and make the beach cabin feel as though someone has just wandered off for an ice cream and will be back any minute.
It’s one of those occasions where less really is more. The manufacturer hasn’t gone overboard by cramming every spare inch with clutter, but instead has supplied just enough accessories to create a realistic, well-loved seaside retreat. It’s these finishing touches that lift a build from being “that’s a nice model” to “that actually looks like somewhere I’d quite fancy spending a sunny afternoon.”

The mystery of the blue straws
The next little adventure arrives on page 13, where you’re introduced to one of the two blue plastic tubes that, with a bit of careful surgery, is transformed into the rain gutter. The manual tells you to cut it to 112.5mm, then place it into the cradle formed by parts F52 and F53 so you can mark both sides before cutting out the channel.
Now, before you go any further, do yourself a favour and make sure you have a permanent marker handy. And whatever you do, don’t follow the example set by a certain Scottish reviewer who shall remain nameless. Said individual carefully marked the tube, promptly removed it from the cradle, started cutting… and then wondered why the guide lines had mysteriously vanished. Turns out ordinary pen doesn’t leave much of a mark once you’ve been merrily handling a smooth plastic tube. Who knew?
Thankfully, this wasn’t quite the catastrophe it could have been, and after a bit of educated guesswork I ended up with something that looked remarkably like a rain gutter… provided you admired it from at least six feet away.
Just when you think you’re back on track, the manual throws in another little surprise. It tells you to cut a hole in one end of the gutter ready to accept the downpipe. Helpful? Not particularly. There are no measurements, no indication of how far in the hole should be—just an arrow pointing vaguely towards one end of the gutter. Full of confidence after my previous triumph, I carefully cut a neat little opening and congratulated myself on a job well done.

Then came page 14.
You place the gutter onto its mounting brackets and suddenly realise the beautifully cut hole now sits directly over one of the brackets. Unless your rainwater has suddenly learned to flow through solid wood, it simply isn’t going to work. Fortunately, the kit includes enough spare tubing for a second attempt, so out came the remaining piece and it was back to square one. My advice? Before you even think about cutting that downpipe hole, dry-fit the gutter onto the brackets first and mark exactly where the opening needs to go. It’ll save you from repeating my little plumbing disaster.
And if you thought page 13 had finished testing your patience, think again. Once you’ve fitted the two end caps to the gutter, the manual tells you to screw one of the tiny hinges onto one of those end caps. Why? I’ve absolutely no idea.
Seriously, don’t do it that way.
Instead, take part A12, lay it flat on your workbench and attach the hinge while everything is nice and stable. Once you’ve done that, fit the completed assembly onto the gutter bracket. It’s far easier, you can actually see what you’re doing, and you’re not trying to wrestle with a microscopic hinge while balancing a piece of plastic guttering that seems determined to escape at every opportunity.
Sometimes I wonder if the person who wrote the instructions ever actually built the kit. This is one of those occasions. Their method makes life unnecessarily awkward, whereas doing it in the order above turns it into a simple two-minute job. Consider that another little “service announcement” from someone who’s already made the mistakes so you don’t have to!
Just when you think you’ve finally got the measure of this kit, along comes page 15 to prove otherwise. Here you’ll build part of the cabin exterior, and it’s all going swimmingly until the manual once again decides it’s the perfect moment to ask you to fit another tiny hinge to an already assembled section.
Nope… we’re not falling for that one twice.
My advice is exactly the same as before. Fit the hinge to part A9 while it’s lying nice and flat on your workbench. It’s far easier to hold, you can line everything up properly, and you’re not trying to juggle a half-built wall while persuading a microscopic screw to bite into the wood.

I’m beginning to detect a bit of a theme here. Whoever designed the kit clearly knows what they’re doing. Whoever decided on the order of assembly in parts of the manual… perhaps not quite so much. Sometimes a slight change in the build sequence can save a lot of frustration, and this is another perfect example.
Here’s another little tip that will save you from getting ahead of yourself.
On page 18, the manual tells you to fit the two decorative surrounds around the door and windows. Sounds simple enough, except you’ll notice there are a whole collection of mortise holes around these openings and absolutely no explanation as to why they’re there.
Now, curiosity got the better of me, so I did something I often recommend when building these kits—I skipped ahead a page to see what was coming next. I’m glad I did.
Page 19 reveals the mystery. Those mortise holes aren’t random at all; they’re there to accept the hinges for the working door and window shutters. If you glue the decorative surrounds on first, you’re making life unnecessarily awkward for yourself.
My suggestion is to ignore page 18 for a few minutes. Turn to page 19, fit the door, window shutters and all the hinges while you’ve got easy access to those mortise holes, then flip back to page 18 and glue on the decorative surrounds afterwards. It doesn’t affect the build in any way, but it does make the whole process much easier.
Sometimes it pays to read a page or two ahead. In this kit, it’s becoming less of a recommendation and more of a survival strategy!
Well, if you’ve ever fancied spending half an hour searching for a part that doesn’t actually exist, page 19 has got you covered.
The manual confidently tells you to fit the boat oar, helpfully identifying it as part F45. Now, something immediately rang alarm bells because I distinctly remembered using F45 only a few pages earlier for the door and window hinge pieces. Last time I checked, manufacturers hadn’t started issuing two completely different parts with the same number.
Sure enough, a quick inspection of sheet F revealed the culprit. There, sitting all on its own, minding its own business, was the boat oar, practically shouting at me, “Pick me! Pick me! I’m F21!”
So if you find yourself tearing the workshop apart looking for the mythical F45 oar, don’t panic—it’s simply a typo in the manual. Reach for part F21 instead and carry on building.
It’s a small error and an easy one to fix, but it’s definitely something I’d like to see the manufacturer correct in the next print run. It’ll save builders a fair bit of head scratching… and possibly a few choice words directed at an entirely innocent piece of MDF.

Do you ever get one of those builds where, by the end of the day, you’re convinced the kit looked at you when you opened the box and thought, “Oh, it’s you. Right… let’s have some fun.”
Welcome back to page 19. Yes, again.
This time it’s the front canopy with the drainpipe. Sounds innocent enough. Fit the canopy, job done. Except… not quite.
Earlier on, you’d carefully fitted hinge M2 to canopy end cap A12 using the pre-drilled holes provided by the manufacturer. Fast forward to fitting the completed canopy onto the front of the building and, surprise, surprise, the hinge is now sitting directly in the path of the tenon that’s supposed to slot neatly into the front wall.
“No problem,” I thought. “I’ll just loosen the two tiny screws and slide the hinge forward a fraction.”
Oh, if only life were that simple.
The hinge has absolutely no adjustment in it whatsoever. None. Zero. Zilch. Whoever drilled the holes clearly wasn’t on speaking terms with whoever designed the mortise and tenon joint.
Thankfully, this wasn’t my first rodeo. Out came the screwdriver and, one screw at a time, I removed the hinge. A tiny dab of UV resin secured one side, a quick blast with the UV torch, then repeat the process for the second side. The end result? A perfectly secure hinge and, more importantly, a very happy little tenon that could finally slot into its mortise exactly as the designer originally intended.
At this point I’m beginning to think this kit isn’t testing my modelling skills nearly as much as it’s testing my patience… and my sense of humour.

At the start of this review, I commented that the laser cutting appeared to be of a good standard. Having now reached the latter stages of the build, I think it’s only fair that I revise that opinion slightly. Don’t get me wrong, it’s by no means a disaster, but do take a little extra care when removing parts from the sheets.
I’ve had to sand a surprising number of components to remove small burrs left behind by the laser cutting. In quite a few cases, the tenons were simply too large to fit comfortably into the mortises, so a light sanding was needed before the parts would slot together properly. I also came across a couple of pieces where the laser hadn’t quite completed the cut. Part E14, the end panel for the display cabinet, was one such example and needed a little persuasion before it could be freed from the sheet, and then cut to fit with a craft knife.
None of these issues are beyond the abilities of even a beginner, but they are worth mentioning. Keep a sanding stick or a small file close to hand and, if a tab refuses to fit a slot, don’t force it. A few gentle passes with the sanding stick will usually solve the problem and save you from hearing that sickening little ‘crack’ as a part decides it’s had enough of life.

Lighting
It’s not until page 30 that we finally reach the lighting installation and, after some of the little adventures this kit has thrown at us, I was almost afraid to turn the page. I was half expecting to be told to thread a wire through the eye of a needle while balancing on one leg.
Thankfully, sanity prevailed.
The lighting installation really couldn’t be any easier. Two LED beads fit into the ceiling and a single pendant lamp hangs down to illuminate the interior. That’s it. No spaghetti junction of wires, no head scratching and certainly no colourful language.
In fact, I don’t think I’ve come across a simpler lighting installation in any of the 62 kits I’ve built to date. Everything plugs neatly into the PCB, the wires are easy to route and, before you know it, you’re flicking the switch and admiring your handiwork.

After wrestling with wandering hinges, disappearing marker lines and a gutter that clearly hadn’t read the instructions either, this straightforward lighting install was a very welcome change of pace. Sometimes it’s nice when a manufacturer simply lets you enjoy a job without trying to turn it into an episode of The Crystal Maze.
This has been a bit of a funny one for me. I started off thinking it would be a nice, relaxing return to a simple beginner-friendly build, and for the most part that’s exactly what it is. The finished model is full of charm, the accessories are excellent, the lighting is wonderfully straightforward and there’s plenty of scope to personalise it and make it your own.
Unfortunately, it’s also a kit that is let down by its instruction manual and a handful of quality control niggles. Between incorrect part numbers, awkward build sequences, vague instructions, laser-cutting issues and the occasional head-scratching moment, it’s fair to say this build asked more questions than I expected. None of them were insurmountable, but they did mean I spent more time outsmarting the manual than actually following it.
Would I still recommend it?
Absolutely—but with one small caveat. If this is your very first book nook, take your time, read a page or two ahead before committing glue to wood, and don’t be afraid to dry-fit everything. The build itself isn’t difficult; it’s the manual that occasionally likes to keep you on your toes.
Despite all the little grumbles throughout this review, I genuinely enjoyed bringing this little seaside retreat to life. Once completed, it’s a delightful model with bags of character, and most of the frustrations are quickly forgotten the moment you flick on the lights and admire the finished scene.
And if this review saves just one builder from cutting the wrong gutter, fitting a hinge at the wrong time or spending twenty minutes searching for a mythical part F45, then my work here is done.

Pros
- Beautiful finished model with a charming seaside theme.
- Excellent value for beginners looking for a straightforward first build.
- Plenty of opportunity for customisation and adding your own personal touches.
- Fantastic selection of accessories including shells, flower pots, greenery and hessian, all of which add real character.
- Book covers are exceptionally well printed and wrapped perfectly without needing any additional glue.
- Clear, full-colour English instruction manual with a comprehensive parts inventory at the front.
- Very simple lighting installation – probably the easiest I’ve encountered in 62 builds.
- Working door, shutters and canopy add a nice interactive element.
- Compact finished size makes it ideal for smaller bookshelves.
- Once completed, it has a lovely coastal feel and looks far more expensive than it actually is.
Cons
- Print quality on some of the larger panels and signs is noticeably below the standard expected, with blurred text and muddy colours.
- Several errors and omissions in the instruction manual, including incorrect part numbering (F21/F45) and vague guidance.
- The recommended build sequence isn’t always the easiest, particularly when fitting the hinges.
- No measurements are provided for some operations, leaving the builder to guess.
- Several components required sanding to remove laser-cut burrs before they would fit correctly.
- Some tenons were oversized for their mortises and needed trimming.
- A couple of parts weren’t fully cut by the laser and had to be carefully freed from the sheets.
- Builders would benefit from reading a page or two ahead before committing parts with glue.
- A few quality control issues mean this isn’t quite the carefree beginner build it first appears to be.

My verdict
Despite my numerous “conversations” with the instruction manual, Beach Corner still wins me over. The finished model has bags of charm, the accessories are excellent, and it’s a kit that rewards patience. As it stands, it’s a thoroughly enjoyable build.
I don’t think llE Create is quite in the same league as Rolife or Tonecheer yet, but they have the potential to get there. Beach Corner shows that the company has creative designers who understand what makes an appealing book nook. If they invest more effort in proofreading their manuals, improving laser-cutting consistency and tightening quality control, they’ll quickly become a manufacturer to watch.


Copyright Book Nook Workshop 2026 – All rights reserved. (John A. MacInnes)
Leave a Reply