Build and reviewed by Martin Seidler, build # 41
Buy this kit on Amazon UK: Check current price and availability →
As an Amazon Associate, Book Nook Workshop may earn from qualifying purchases at no extra cost to you.
Summary
| Category | Rating |
|---|---|
| Design | 9/10 |
| Build Experience | 8.5/10 |
| Instructions | 4.5/5 |
| Final Result | 9.5/10 |
| Overall | 9/10 |
Introduction
MiniCity has built a solid reputation for architectural-style book nooks, and Saisons Café continues in that direction. Rather than relying on a large number of tiny accessories, this kit creates its atmosphere through the building itself—large windows, a comfortable café interior, two elegant chandeliers and plenty of small details that together produce a warm and inviting scene.
Although this is technically a book nook, the emphasis is clearly on the café. There are several bookshelves, but only around a dozen individual books need to be assembled. If you’ve built some of the more library-oriented kits with hundreds of books, this comes as a welcome change.
From the beginning, the model gives the impression of a project intended to be enjoyable rather than demanding. That impression stayed with me throughout almost the entire build.
What’s in the Box

The package contains everything needed to complete the model.
Inside are several MDF sheets with accurately laser-cut and well-printed parts, acrylic sheets for the windows and chandeliers, lighting components with all necessary wiring, decorative accessories, flower materials, coffee cups, a coffee grinder, translucent chandelier parts, beads and numerous other miniature details. The package also includes the familiar full-colour MiniCity instruction manual.
The overall manufacturing quality is consistent with previous MiniCity kits. I did not encounter damaged parts, poor printing or laser-cutting issues during the build.
Instructions
The instructions follow the standard MiniCity format and divide the construction into three logical stages:
- Part 1 – Ground Floor
- Part 2 – Right Wall and Interior
- Part 3 – Left Wall and Final Assembly
The sequence is easy to follow and, for the most part, each step prepares the next one naturally.
The lighting instructions are generally good. There are one or two places where a little more guidance about the final position of the LEDs would have been helpful, but nothing that should create difficulties even for less experienced builders.
Overall, I found the instructions easy to work with and would rate them 9/10.
Part 1 – Building the Ground Floor
Construction begins with the café itself.
This section is very straightforward. Furniture, tables, shelving and decorations are assembled one after another without any unexpected complications. It is an enjoyable start to the project and allows you to become familiar with the overall design before moving on to the larger wall assemblies.
Step 18 – Learn from My Mistake
The first point worth mentioning appears in Step 18.
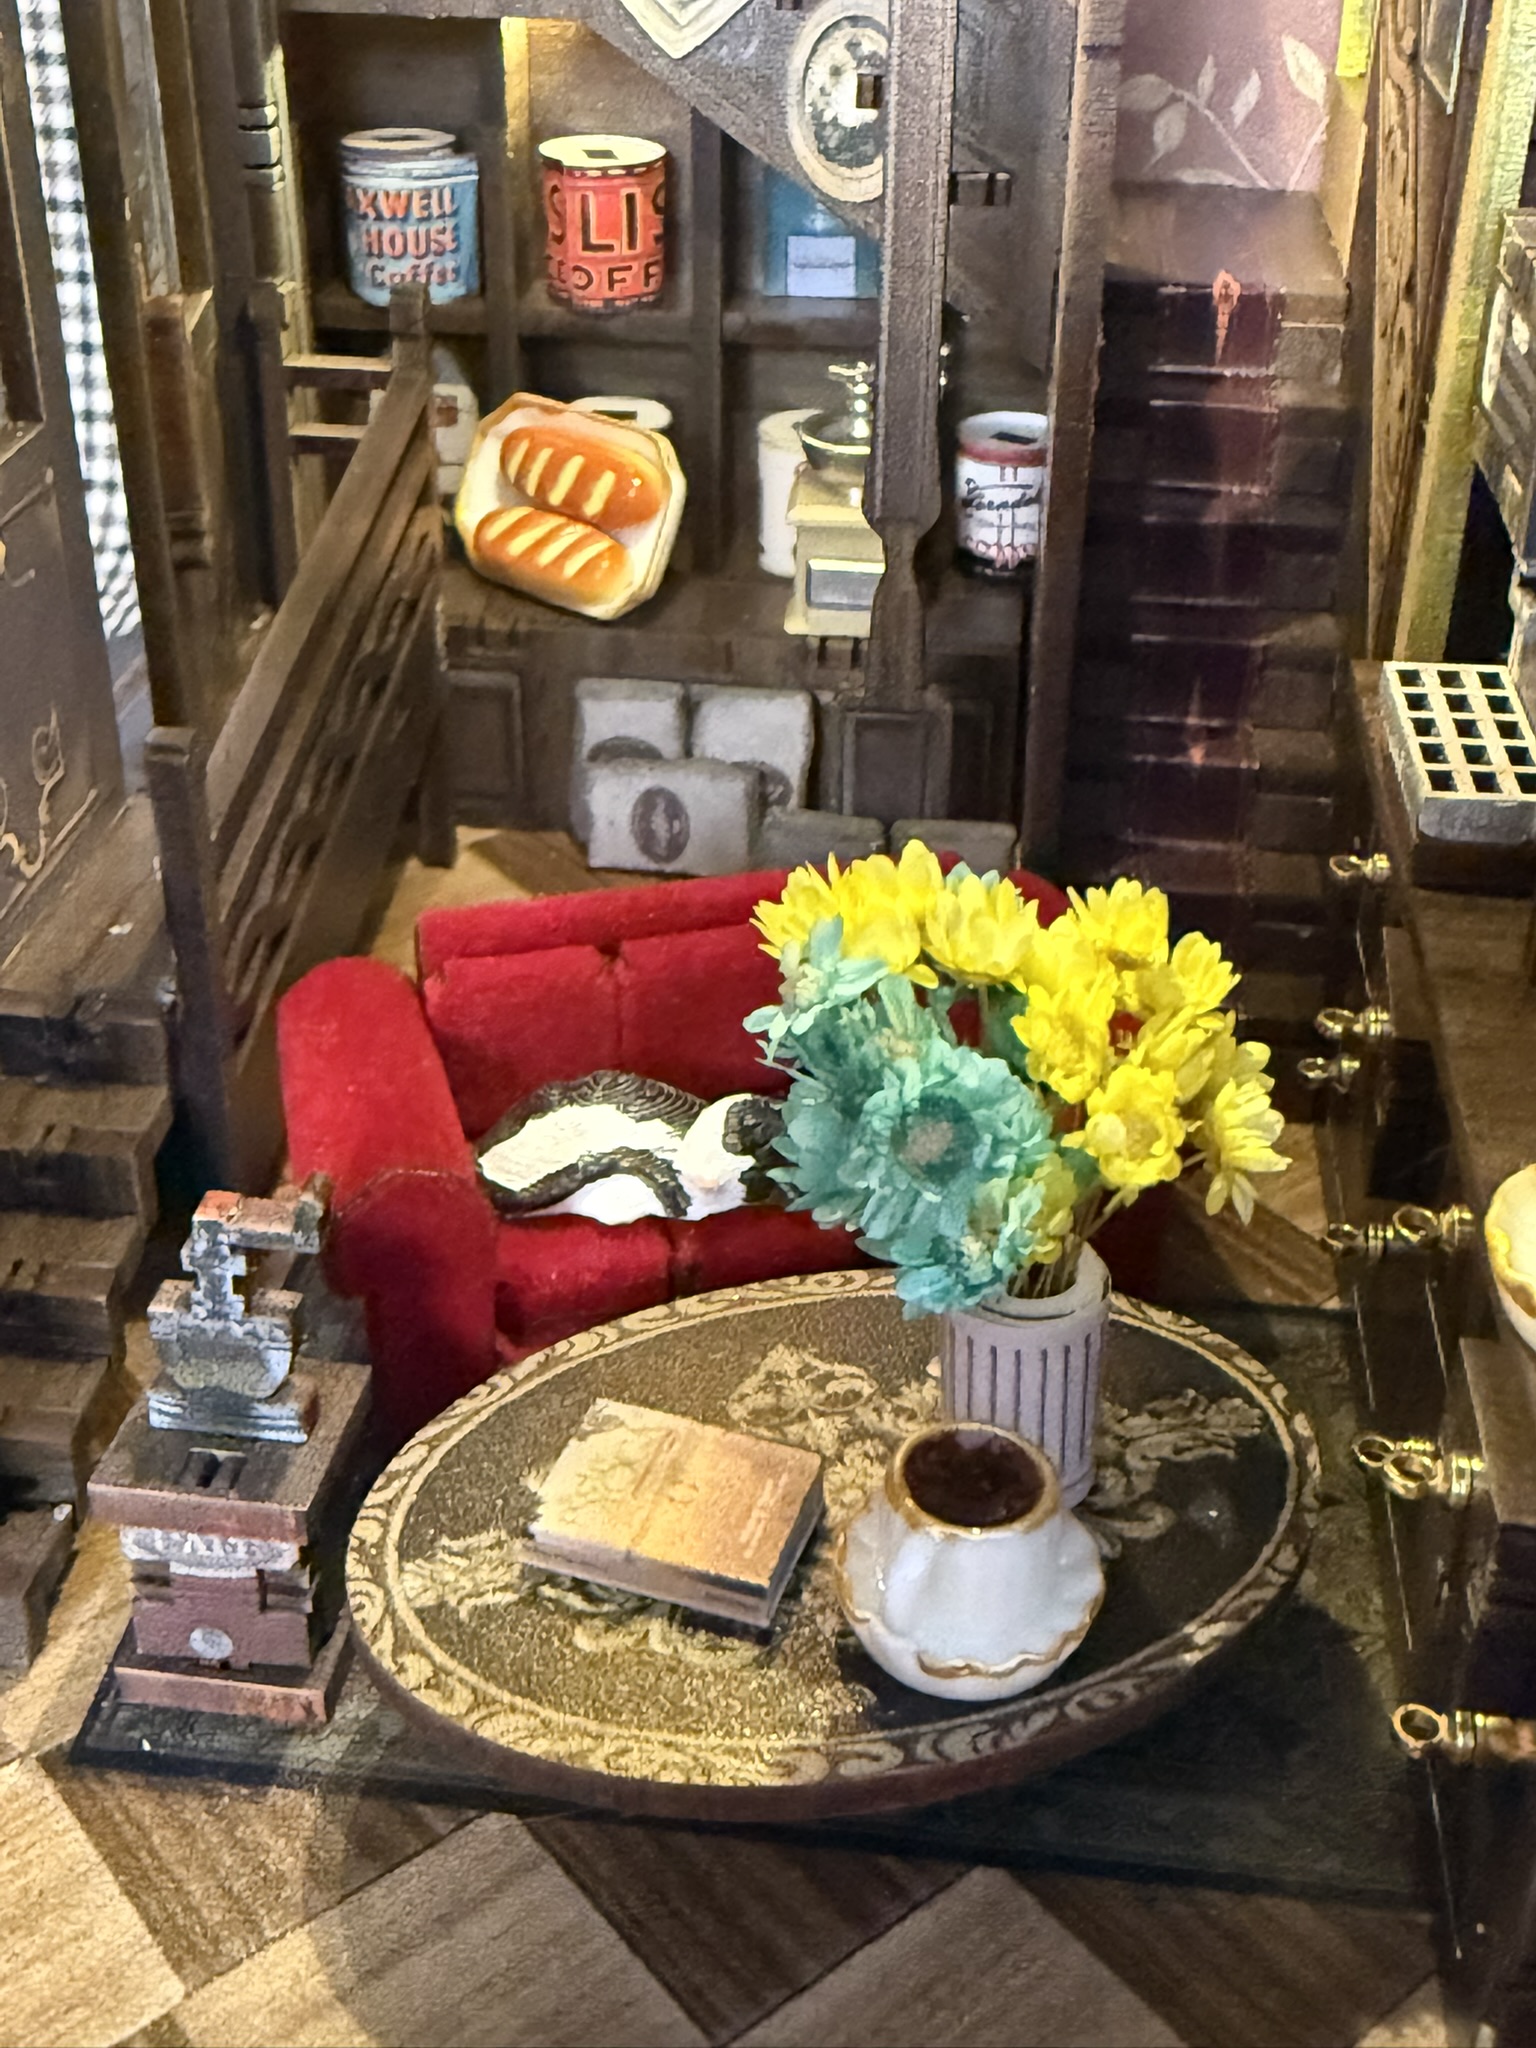
MiniCity supplies a bag of loose flowers for the model. Without reading ahead, I naturally assumed that all of them belonged in the bouquet placed in the vase on the ground floor.
They don’t.
Approximately half of the flowers are intended for the flower box that is installed much later on the upper floor.
Unfortunately, I only discovered this after proudly creating what was probably the fullest bouquet this little café had ever seen.
Fortunately, I keep a reasonable stock of miniature flowers from previous projects, so I simply built a different arrangement for the upper flower box. In the end I actually liked the result, but if you are building directly from the box, save roughly half of the flowers for later.
Sometimes the instructions are correct and the builder is the weak link.
The Sofa

The sofa deserves a separate mention because it became one of my favourite assemblies in the entire build.
Construction starts with a simple wooden frame. In my case, the joints assembled in Step 21 were just loose enough that I decided to secure them with a small amount of glue before continuing.
I would recommend doing the same.
The following step transforms the assembly completely. The supplied velvet-like upholstery fits the wooden structure remarkably well, and after adding the six cushions the finished sofa looks excellent. It is one of those subassemblies where the result is noticeably better than the individual parts suggest during construction.
It is also one of the first places where the café begins to develop its character.
Part 2 – Building the Right Wall
The second stage follows the same relaxed pace.
Bookshelves, decorative panels, furniture and accessories gradually fill the right-hand side of the café. Nothing here is particularly difficult, but there are two places where I would slow down and pay a little more attention.
Steps 55–56 – Secure the Assembly First

This was probably the only construction sequence where I felt the assembly order could be improved.
After installing part H2, the right wall is still able to move relative to the rear panel. The following step then asks you to begin installing the books while these two assemblies are still free to shift slightly.
It certainly can be done exactly as shown in the instructions.
Personally, I found it much easier to align both panels first and secure them with thin super glue using capillary action. Since there is no reason to separate these parts later, this makes the remaining assembly considerably easier and avoids constantly correcting the alignment while installing the books.
It is a small modification to the assembly sequence, but in my opinion it improves the overall building experience.
Step 61 – Worth a Second Look
Step 61 is probably the least obvious drawing in the manual.
The exact position of several decorative parts isn’t immediately clear, and I also managed to overlook part H17, which should be inserted from the rear.
Fortunately, I noticed my mistake before completing the model and was still able to install it afterwards.
Nothing serious here—just a reminder to compare the drawing with the actual assembly before moving on.
The Upper Flower Box

Remember those flowers from Step 18?
This is where the remaining half should have been waiting for me.
Since mine had already been promoted to the ground-floor bouquet, I built a completely new flower arrangement using flowers from my own miniature collection.
So yes, my mistake eventually became a customization.
Sometimes that’s how new ideas start.
Lighting

The lighting installation is generally straightforward and follows the same approach as other recent MiniCity kits.
Most of the wiring presents no difficulties. The only point where I spent a little more time was routing wire L1. The instructions show the general idea, but the final position of the LED is left largely to the builder. A few minutes spent adjusting its position before fixing it permanently pays off with a better lighting effect later.
I would not describe this as a problem—simply one of those occasions where a little experimentation produces a better result.
Chandelier Assembly
For me, this was the most enjoyable part of the entire build.
The acrylic components are accurately manufactured, the protective film peels away cleanly, and the individual parts fit together exactly as intended. Watching the chandelier gradually take shape was genuinely satisfying.
I chose to assemble the decorative crystal elements using yellow UV resin rather than conventional glue. For transparent parts, I find UV resin easier to control and much cleaner to work with. It also allows enough time to position everything accurately before curing.
One small observation concerns the hanging wires.
The supplied wires are longer than I felt was necessary. Using their full length causes the decorative beads to hang quite low beneath the chandelier. I shortened mine to produce a more compact appearance, although this is entirely a matter of personal preference.
I also used UV resin to secure the hanging wires to the ceiling rather than adhesive tape. Either method works perfectly well; this is simply my preferred way of working whenever fine wires are involved.
Looking at the Finished Lighting


During almost the entire build I was convinced that the large decorative windows on the rear wall would eventually be illuminated from behind.
Only after completing the assembly did I realise that this wasn’t part of the original design.
The model still looks very attractive, but those nicely printed translucent windows lose much of their detail once the interior lighting is switched on.
At that moment I already knew I was going to modify it.
Part 3 – Final Assembly
The third construction stage completes the left-hand wall before bringing everything together into the finished book nook.
Like the previous stages, construction is straightforward and follows a logical sequence.
Step 80
The railing assembly fits correctly, but I found the joints rather loose before gluing.
This isn’t unusual for an assembly of this type. I simply allowed the glue to cure fully before handling the part further, which made installation much easier.
Step 93 – Building the Stairs
The staircase deserves a little patience.
The individual steps are assembled almost freehand, and I would definitely recommend allowing the glue to cure before attempting installation into the model.
Trying to hurry this stage would probably create more work than it saves.
Once assembled, however, the staircase fits very well.
Handle the Front Frame Carefully
One final observation before completing the build.
The decorative front frame is relatively delicate.
While installing mine I applied a little too much pressure and managed to break one section. Fortunately the repair was simple and invisible after gluing, but it’s worth slowing down during this final step.
Sometimes the last five minutes of a build deserve just as much attention as the first five hours.
My Customizations
One thing I like about MiniCity kits is that they don’t require modifications to look good.
Everything I changed was simply because I enjoyed adding a personal touch.
Rear Window Backlighting


The most significant modification was adding illumination behind the rear windows.
To achieve an even lighting effect there wasn’t enough space to install several conventional LEDs between the window frames, so I chose a different solution.
I used a double-sided filament LED approximately 30 mm long, soldered it directly into the existing lighting circuit and fixed it in place with UV resin.
After testing the result, I added a piece of aluminium foil behind the filament to act as a reflector.
This simple addition noticeably improved the light distribution across the windows and produced the effect I had expected from the beginning—a soft glow behind the stained-glass style panels.
If I were building the kit again, I would definitely repeat this modification.
Two Cats Instead of One
MiniCity supplies a flat printed cat for the upper floor.
I replaced it with a small 3D-printed figure in a similar colour.
After finishing the interior I looked at the sofa and felt it was missing one final detail.
So I added a second cat—a tuxedo cat modelled after one of my daughter’s own cats.
This café will almost certainly become a gift for my daughter, who works as a barista, so including her cat seemed like an appropriate finishing touch.
Sometimes customization isn’t about improving the kit.
Sometimes it’s simply about making it your own.
Flower Box
As already mentioned, the upstairs flower box received flowers from my own miniature collection because I had enthusiastically used all the supplied flowers downstairs.
Entirely my own mistake—but one that produced a result I actually like.
Painted Edges
As with all of my builds, every exposed MDF edge was painted before assembly.
It takes additional time, but the improvement in the finished appearance is well worth the effort.
Difficulty
I would classify Saisons Café as suitable for advanced beginners through intermediate builders.
There are no particularly demanding assemblies, and the overall construction sequence is logical from beginning to end.
The only areas where I would suggest taking a little extra care are:
- saving some flowers for the upper floor,
- securing the right wall before installing the books,
- assembling the chandeliers,
- allowing the staircase to cure properly,
- handling the front frame during final assembly.
Apart from these points, this is a relaxed and enjoyable project that should not present any major surprises.
Ratings
Design: 8.5 / 10
A well-balanced architectural design with an attractive interior and a pleasant overall appearance.
Instructions: 9 / 10
Clear, colourful and easy to follow. A little more guidance for LED positioning would make them even better.
Lighting Kit: 9 / 10
Everything works reliably. Slightly longer wires would make handling a little easier, but they are sufficient when installed as intended.
Customization Potential: 4 / 10
This is not really a kit designed for extensive rebuilding, and in my opinion it doesn’t need to be. It already works well straight out of the box, although there is still room for a few personal touches if that’s something you enjoy.
Build Experience: 9 / 10
Consistent, relaxing and enjoyable from beginning to end.
If I Built It Again…
If I were starting this project again tomorrow, I would:
- save roughly half of the supplied flowers for the upstairs flower box,
- glue the right wall to the rear panel before installing the books,
- add a small amount of glue to the sofa frame before fitting the upholstery,
- allow the staircase to cure fully before installation,
- shorten the chandelier wires before attaching the crystal beads,
- handle the front frame carefully during the final assembly,
- add backlighting behind the rear windows,
- and, as always, paint all exposed MDF edges before assembly.
Final Thoughts
Saisons Café is another solid addition to MiniCity’s architectural series.
It doesn’t try to impress with complicated mechanisms or hundreds of tiny accessories. Instead, it focuses on a logical build sequence, good manufacturing quality and a finished model that looks exactly as a café should—comfortable, welcoming and balanced.
There are only a few places where I would slightly change the assembly sequence, and none of them should discourage anyone from building the kit.
Would I recommend it?
Absolutely.
If you’re looking for a relaxing project that can be completed successfully without major modifications, Saisons Café is an easy recommendation.
And if, like me, you enjoy adding a few personal details along the way, it also provides enough opportunities to make the finished model uniquely your own.


Copyright Book Nook Workshop 2026 – All rights reserved. (Martin Seidler)
Leave a Reply