Built & reviewed by John A. MacInnes Build #59
Summary Table
| Metric | Score |
| Build Quality | 9/10 |
| Value for Money | 8/10 |
| Ease of Assembly | 8/10 |
| Detail Level | 9/10 |
| Customisation Potential | 4/10 |
| Overall Recommendation | 8.5/10 |
Introduction
There are two types of builders in this hobby. Those who carefully research a kit before buying it, weighing up complexity, build time and whether it contains enough tiny parts to induce a nervous twitch, and those who see a pretty picture, click “Buy Now” and ask questions later. I freely admit to falling into the latter category when Timory’s Dreamland Theater appeared on my radar. With its grand façade, elegant lighting and promises of theatrical splendour, it looked every inch the star of the show. The question, of course, was whether this miniature masterpiece would earn a standing ovation or leave me wishing I’d asked for a refund before the curtain even rose. Time to take our seats and find out. Before anyone reaches for the red pen, I should point out that Dreamland Theater is the spelling used by Timory themselves. Whilst my British instincts may twitch every time I type it, I have retained the manufacturer’s American spelling throughout this review for consistency.
Unboxing

Supplied in a full-colour retail box, Dreamland Theater immediately stands apart from some competitors who appear to have exhausted their packaging budget on the kit itself, leaving just enough spare cash for a plain cardboard box and a sticker hastily slapped on the front. To be fair, I’m not particularly concerned about how a kit arrives—after all, it’s the contents that matter—but a professionally presented retail box does create a positive first impression. It sets the tone for what follows and quietly suggests that a similar level of care and attention has gone into the kit itself. At least, that’s the hope. As every seasoned builder knows, a fancy box can sometimes be little more than an elaborate disguise for the chaos lurking within. Image 1
Opening the box reveals seven full-sized sheets and two half sheets of 2.5mm MDF, all neatly secured in shrink wrap to minimise movement during shipping and, more importantly, to prevent the sort of damage that results in builders muttering unrepeatable words before they’ve even started. Everything arrived in excellent condition, with no broken parts or loose pieces rattling around the box.

Alongside the MDF components, Timory has included a generous selection of accessories. These comprise decorative jewels, a section of coloured plastic destined to become part of an eye-catching chandelier, a sheet of stickers, the rotating mechanism, speaker, motor assembly that brings the theatre’s moving elements to life, and the various LED components. It’s a surprisingly substantial collection of bits and pieces, and a quick glance through the contents makes it abundantly clear that Dreamland Theater is aiming for something rather more ambitious than simply being another static book nook destined to gather dust between a couple of forgotten paperbacks. Image 2
The lighting system consists of a battery box requiring 3 x AAA batteries, together with a pre-wired loom featuring three LED heads. Also included are the PCB, speaker and motor, all of which work together to provide the theatre’s lighting, sound and movement effects.
Before you get carried away and start popping parts from the boards, I’d strongly recommend carrying out a quick functionality test. Connect the LED loom, speaker and motor to the PCB and confirm everything is working as intended. It takes only a couple of minutes and could save a great deal of frustration later. There are few things more soul-destroying in this hobby than spending hours assembling a kit, carefully routing wires and concealing components, only to discover at the very end that one of the electronic elements has decided not to participate in the performance. A quick test now could spare you from an unscheduled appearance in a one-person production of The Builder’s Nervous Breakdown

Timory estimates the build time at between four and six hours. Whilst that may well be achievable for those builders who tear parts from the boards with reckless abandon and regard sanding as an optional extra, I suspect most hobbyists will take considerably longer. If, like me, you’re a firm believer in sanding tabs, colouring exposed edges and generally fussing over details that most people will never notice, you can comfortably double that estimate. And having now completed this kit, it took nine hours in total. Image 3
Of course, build times are always subjective. One builder’s leisurely afternoon project is another’s week-long exercise in perfectionism. Personally, I’ve long since stopped paying much attention to manufacturers’ suggested times. They seem to be calculated in a parallel universe where nobody drops parts on the floor, spends ten minutes looking for a component that’s already in their hand, or pauses every so often to admire their handiwork before carrying on.
Timory awards Dreamland Theater a four-star difficulty rating, and whilst I can see why they’ve arrived at that conclusion, possibly because it has a rotating double-sided stage design. I’d perhaps place it slightly differently. In my view, this is very much a kit for the advanced beginner through to intermediate builder. There’s enough going on to keep things interesting, particularly with the lighting, motorised components and various decorative elements, but nothing that should prove especially daunting for anyone who has already completed a few book nooks or miniature kits.
Experienced builders, on the other hand, may find themselves cruising through much of the construction without breaking sweat. That’s not a criticism of the kit by any means; not every build needs to be an exercise in engineering designed to test the limits of one’s patience and eyesight. Rather, Dreamland Theater strikes a pleasant balance between challenge and enjoyment, offering enough variety to remain engaging without ever feeling like it’s plotting your downfall.
In short, if you’re taking your first tentative steps beyond beginner-level kits, this is an excellent next move. If you’re a seasoned veteran who routinely rewires lighting systems, modifies instructions and spends your evenings debating the merits of different grades of sandpaper, don’t expect a white-knuckle experience. Instead, expect an enjoyable and relaxing build that focuses more on presentation and charm than technical complexity.

The instruction manual follows Timory’s familiar format: an A4 landscape booklet spanning 30 pages and printed in black and white. Whilst some manufacturers have embraced full-colour manuals in recent years, I’ve never considered colour to be essential provided the instructions are clear, and thankfully that’s very much the case here. Image 4

The build sequence is logical, easy to follow and laid out in a manner that should present few problems for builders of any experience level. Each step is accompanied by clear illustrations and concise descriptions, allowing construction to progress smoothly without the frequent bouts of head-scratching that some manuals seem determined to provoke. Image 5
I was also pleased to see that Timory has included warnings and advisory notes where additional care is required. These small reminders are easy to overlook but can save a great deal of frustration, particularly when dealing with delicate assemblies, wiring or moving components. In short, the manual does exactly what an instruction manual should do: guide you through the build without turning itself into an additional challenge that needs to be overcome before you can continue.

One feature I particularly appreciated was the component table located at the front of the manual. It may seem like a small inclusion, but it’s one that proves invaluable throughout the build. Rather than squinting at MDF sheets and wondering whether you’re looking for part P17, P71 or something entirely different, the table provides a clear reference showing the location and identification of all major components. Image 6
It’s one of those thoughtful additions that doesn’t attract much attention when it’s present, but is sorely missed when it isn’t. Experienced builders will know the frustration of hunting through multiple boards trying to locate a single elusive piece, convinced it has either vanished into another dimension or been eaten by the carpet monster. The component table removes much of that detective work and helps keep the build flowing smoothly, which is never a bad thing when there are dozens of parts waiting patiently for their turn in the spotlight.
The build:
Before moving on to the construction itself, it’s worth highlighting the excellent manufacturing quality of the components. The laser cutting throughout is first class, with parts releasing cleanly from the sheets and requiring very little persuasion to separate. In fact, during the entire build I never once had to resort to the traditional “gentle application of increasing force” that some kits seem to demand. Everything fitted precisely as intended, which made for a surprisingly civilised building experience.

The printing quality is equally impressive. Colours are vibrant, crisp and well reproduced across all boards, helping to create a premium appearance straight out of the box. Just as importantly, the print registration is excellent, with no obvious overprinting or misalignment issues. All artwork remains comfortably within the cutting tolerances, even on double-sided pieces where inaccuracies are often most noticeable. It’s one of those details that many builders may not consciously notice, but it contributes enormously to the professional appearance of the finished model and reflects the high standards being set out. Image 7
A quick word of warning before you reach Page 8 and enthusiastically attack the first decorative elements. This stage involves the construction of a pair of flame torches, and the instructions advise builders to peel the protective backing from item M4, the acrylic flame piece. Unfortunately, I can confirm that there is no protective backing to remove.
What there is, however, is a printed surface that looks suspiciously like the sort of thing that should have a protective film attached. Trust me, it doesn’t. Several minutes of careful scraping, picking and increasingly colourful language later, I can assure you that all you’ll achieve is the gradual removal of the printed finish. The acrylic is supplied exactly as intended and requires no peeling whatsoever.
Consider this your public service announcement. Put down the craft knife, step away from the flame pieces and save yourself the disappointment. You’ve been warned!
Page 14, Section 16 brings us to one of those delightful little tasks that miniature builders seem to encounter with alarming regularity: folding a newspaper. Now, seasoned builders will know that this can range from mildly fiddly to an exercise in origami-induced despair, depending on how the manufacturer has prepared the part.
Fortunately, Timory has shown a rare moment of compassion here. Rather than supplying a full sheet and leaving builders to channel their inner newspaper vendor, the strip is already pre-cut and ready to fold. This transforms what could have been an unnecessarily awkward exercise into a quick and straightforward task that takes only a matter of seconds.
It’s a small detail, but one that I genuinely appreciate. Not every manufacturer adopts this approach, and having spent far longer than I’d care to admit wrestling with miniature newspapers, maps and pamphlets in other kits, I was more than happy to accept Timory’s helping hand on this occasion. Sometimes it’s the little victories that keep a build moving along smoothly. 📰😏🎭
Turning to Page 18 and the construction of the display cabinet, there is a small but important detail that the instructions neglect to mention. When fitting parts B8 and B10, which form the top section of the cabinet, take a moment to check the orientation of B8 before committing yourself.
The reason for this becomes apparent later when the completed cabinet is positioned against part C1. If B8 has been installed incorrectly, the cabinet will not sit flush as intended, leaving an unsightly gap and prompting the sort of language that never features in Timory’s instruction manual.
If you’ve only dry-fitted the parts, the solution is straightforward enough—carefully dismantle the cabinet and reposition B8 correctly. If, however, you’ve enthusiastically applied glue and moved on with a sense of accomplishment, matters become somewhat more complicated. At that point your choices are likely to involve careful surgery, gentle persuasion, or reaching for a file and convincing yourself that you intended to do a little customisation all along.
Consider this one of those “ask me how I know” moments that every reviewer occasionally encounters so that hopefully you don’t have to.
One area where Dreamland Theater genuinely excels is its lighting installation. Regular readers will know that wiring can sometimes feel like an afterthought in certain kits, with cables routed through improbable gaps, concealed by hope rather than design, and accompanied by instructions that appear to have been translated via several different languages before reaching the page.
Thankfully, none of that applies here. Timory has done an excellent job of designing the lighting routes, with the wires neatly concealed behind pillars and structural elements where they remain completely hidden from view. The routing is logical, easy to follow and supported by clear, well-illustrated instructions that leave very little room for confusion.
Better still, installation proved entirely trouble-free. The wires threaded through the designated channels without complaint, the components fitted precisely where they were supposed to, and at no point did I find myself engaged in the traditional hobby pastime of trying to persuade a cable through a hole that appears to have been designed several sizes too small. It’s a refreshingly straightforward process and one that demonstrates the thought Timory has put into this kit.


As for customisation, there isn’t a huge amount of scope with this kit. Most of the scene is quite self-contained and doesn’t really lend itself to major modifications. However, refusing to accept such limitations, I couldn’t resist giving the treasure chest a bit of an upgrade. Out went the rather modest contents and in came a proper pirate’s haul, complete with jewels, gold coins, gold bars and a length of chain for good measure. It only took a few minutes to add, but it transformed the chest from looking mildly prosperous to something Captain Jack Sparrow might actually be interested in stealing. Sometimes a little bit of bling goes a long way. Image 8 and 9
Remarkably, the only genuine issue I encountered during the entire build surfaced right at the very end, just when I was beginning to think that Dreamland Theater was going to make it across the finish line without a single complaint from me.

The problem arose during the installation of the base section containing the motor. For reasons that were not immediately obvious, the drive cog wasn’t consistently engaging with the mechanism responsible for rotating the stage. What followed was a familiar scene to many experienced builders: removing the base plate, inspecting everything, refitting it, testing it, removing it again, and repeating the process several more times whilst becoming increasingly convinced that the solution was hiding in plain sight. Image 10
After what must have been half a dozen attempts, the culprit finally revealed itself. The confined space beneath the theatre has to accommodate wiring from the speaker, lighting system, motor and battery box, all entering from different directions. Whilst there is enough room for everything, the cables do need to be routed carefully and kept as close to the outer walls as possible. In my case, some of the wiring was preventing the motor assembly from sitting quite as it should, which in turn affected the engagement of the drive mechanism.

Once the wiring had been persuaded into a more cooperative arrangement, accompanied by a few stern words and the occasional threat of replacement, the system finally sprang into life and the stage began rotating as intended. The only task remaining now is to fine-tune the timing so that the stage completes its rotation and stops neatly at the front of the display, rather than presenting the audience with an unexpected view of the backstage area. Such is the glamorous world of theatre production. Image 11
In theory, it should stop neatly facing the front of the kit after completing its rotation. In practice, the synchronisation between the stage and the front opening is random at best. I followed the manual carefully and reset the two timing cogs several times as instructed. Each attempt would behave itself for a couple of rotations before deciding it had a mind of its own and stopping at whatever angle it fancied. After several rounds of dismantling, adjusting and testing, I reached the conclusion that life is simply too short. It’s not a deal-breaker, as the stage still rotates perfectly well, but if you’re hoping for precise theatre-style positioning every time, you may find yourself having a polite disagreement with the mechanism. My other minor gripe is the lack of a “lights only” mode. The controls give you the choice of everything running, or the music switched off while the stage continues to rotate with the lights on. A third option allowing the lights to stay on without the stage moving would have been a welcome addition, especially for those wanting to use it purely as a display piece. (see video for rotation issue).

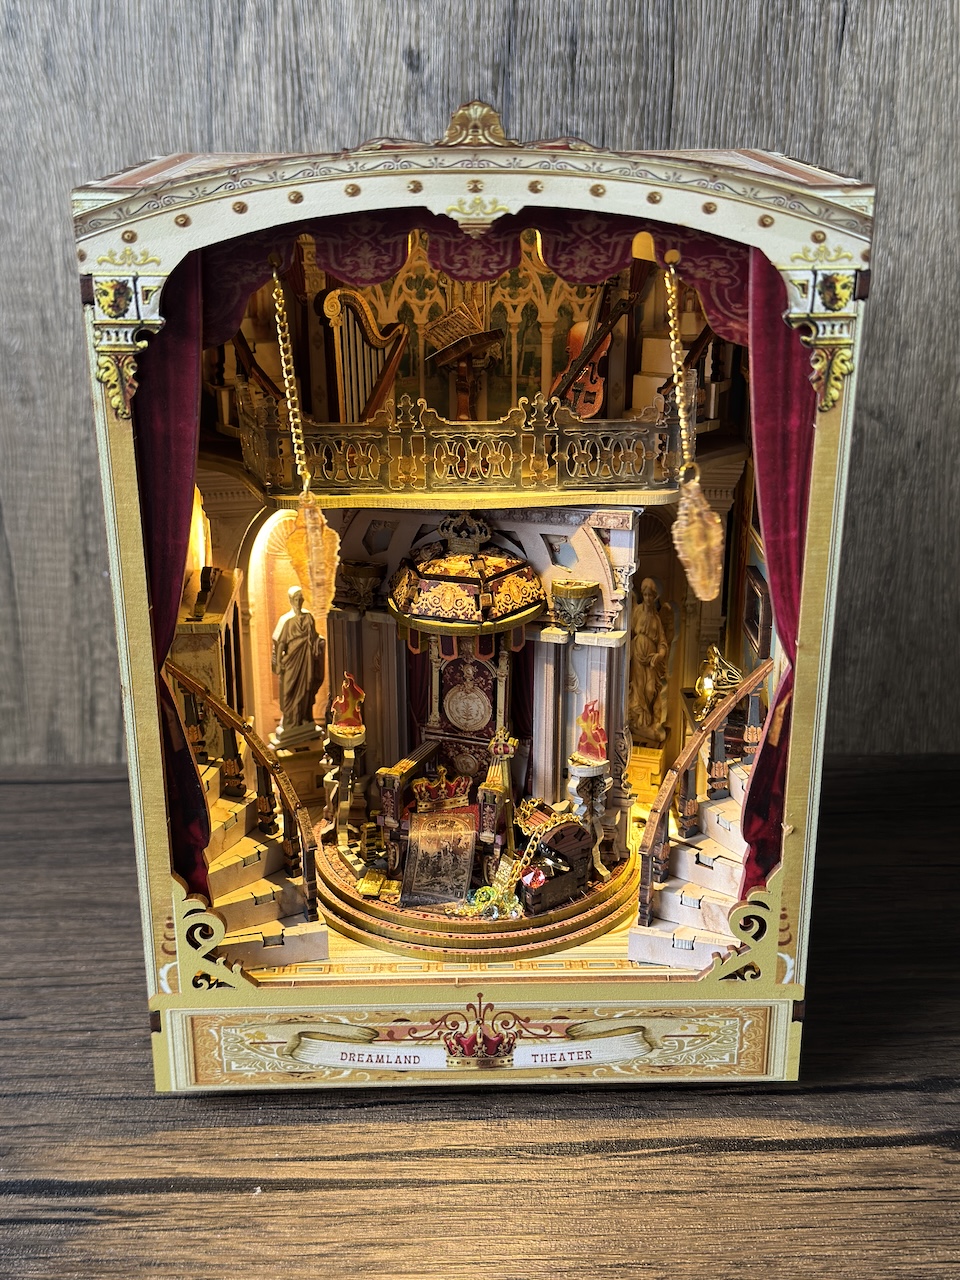
Overall, Dreamland Theater is a thoroughly enjoyable kit that succeeds in delivering exactly what it promises: an attractive, engaging and visually impressive miniature theatre that looks every bit as good illuminated and in motion as it does on the box artwork. The build is well designed, the instructions are clear, the lighting installation is amongst the best I’ve encountered, and aside from the minor issue with the motor assembly, construction progresses smoothly from start to finish. Image 12
Whilst advanced builders may not find themselves particularly challenged by the complexity, that’s not really the point of this kit. Dreamland Theater focuses on presentation, atmosphere and enjoyment, and in those areas it performs admirably. The combination of lighting, sound, moving stage and decorative detailing creates a model that feels alive in a way many static kits simply cannot match.

Timory has produced another strong addition to its range and one that I would have no hesitation recommending to builders looking to take the next step beyond beginner kits. It’s accessible without being simplistic, detailed without becoming overwhelming, and, perhaps most importantly, manages to remain fun throughout. In a hobby where some builds occasionally seem determined to test the limits of one’s patience, Dreamland Theater prefers to entertain. And for a theatre, that seems entirely appropriate. Image 13
Book Nook Workshop Rating: 9/10
A charming, beautifully presented build with excellent lighting integration, impressive animated features and just enough challenge to keep things interesting. The final curtain falls on another enjoyable Timory production, and this audience member left the theatre thoroughly satisfied.
Pros 👍
- Beautiful finished appearance with a striking theatre-themed design.
- Excellent lighting integration with wiring routes that are well concealed and easy to follow.
- Motorised rotating stage adds movement and visual interest.
- Sound effects enhance the overall presentation.
- High-quality printed MDF components with attractive detailing throughout.
- Well-packaged contents with no damage encountered during transit.
- Comprehensive 30-page instruction manual with logical build progression.
- Useful component identification table at the front of the manual.
- Clear warnings and guidance provided where additional care is required.
- Pre-cut paper elements make decorative tasks, such as the newspaper, quick and painless.
- Suitable for advanced beginners looking to progress beyond entry-level kits.
- Good balance between challenge and enjoyment.
- Excellent value considering the inclusion of lighting, sound and movement.
Cons 👎
- Manufacturer’s 4–6 hour build estimate is somewhat optimistic for most builders.
- Instructions incorrectly advise removing a backing film from the acrylic flame pieces when none exists.
- Orientation of part B8 during cabinet construction is not clearly highlighted and can lead to fitment issues later.
- Limited space beneath the base means wiring must be carefully managed around the motor assembly.
- Final motor installation may require some adjustment to ensure reliable engagement with the stage mechanism.
- Advanced builders may find the overall complexity a little too straightforward.
- Stage rotation may require some fine-tuning to achieve perfect alignment at the front of the display.
Verdict 🎭
A highly enjoyable and visually impressive build that combines lighting, sound and movement to great effect. The few issues encountered are relatively minor and easily overcome, leaving Dreamland Theater as another strong offering from Timory and an excellent choice for builders looking to add a little theatrical flair to their collection.
Photo Gallery


Leave a Reply