Build #58 Built & reviewed by John A. MacInnes
Review Summary
| Category | Score |
|---|---|
| Build Quality | 7.5/10 |
| Value for Money | 7/10 |
| Difficulty | Intermediate to Advanced |
| Customisation Potential | Limited |
| Dust Protection | None |
| Overall Verdict | Good quality build with attractive design, but limited customisation and no dust covers prevent it from reaching the top tier. |
For my 58th build, I decided it was time for a change of scenery. Out went the winding alleyways, cosy libraries and whimsical little worlds that usually clutter up my workbench, and in came Timory’s Century Ferris Wheel — a kit that, judging by the box alone, has absolutely no interest in being understated. (See image 1).
This is not one of those polite little builds that turns up, behaves itself and quietly becomes decorative. Oh no. Timory have packed this one with lighting, music, moving parts and just enough mechanical ambition to suggest that, at some point, I may well find myself staring at the instructions in silence while reconsidering a life of simpler hobbies. On paper, it promises to be part model kit, part engineering exercise and part miniature fairground spectacle, which is either excellent news or the beginning of a very specific kind of character-building afternoon.
I should say at this stage that I’m not exactly a Timory veteran. I’ve built enough of their kits to know they’re capable of producing something rather good, but not enough to approach this one with the calm confidence of a man who knows precisely what fresh nonsense may be lurking in the parts boards. So I opened the box with an open mind, cautious optimism, and the faint hope that I wouldn’t be reduced to muttering at a piece of MDF before elevenses.
Thankfully, first impressions are extremely encouraging. The packaging is smart, the contents are neatly arranged, and the print quality and materials immediately suggest that Timory have made a proper effort here. More importantly, the Century Ferris Wheel already feels like a kit with a bit of theatre about it. This is not simply something to build and place on a shelf in the hope that people might notice it. It is very clearly designed to spin, sparkle, sing, and generally make sure it becomes the centre of attention whether the rest of the shelf likes it or not.
Where Century Ferris Wheel Stands Out:
What immediately sets the Century Ferris Wheel apart is that it refuses to be just another static display piece sitting quietly on a shelf hoping someone notices it. Timory have gone all in here with LED lighting, music and a rotating train tucked into the base, while the Ferris wheel itself turns with the sort of steady determination that suggests it knows perfectly well it is the main event. The result is a kit that feels far more theatrical than the average book nook or miniature scene, and all the better for it.
One of the real pleasures of the build is watching the mechanical side of it come together. There is a satisfying amount of gearwork and moving nonsense hidden beneath the decorative fairground charm, and unlike some kits where such features are included mainly for show, these parts actually earn their keep in the finished model.
Combined with the lighting and music, they give the whole thing a sense of life and movement that makes many otherwise lovely static kits feel faintly underambitious by comparison.

At 178mm wide, 183mm deep and 238mm high, it takes up a respectable amount of shelf space without behaving like it expects planning permission. With 367 parts, it is not a build for anyone seeking instant gratification, but neither does it stray into the sort of complexity that requires a degree in mechanical engineering and a support team. If you have a few builds behind you and a workable supply of patience, there is every chance you will get on with it very well indeed. (See image 2)
First Steps:
First impressions were reassuringly good. The kit arrived in excellent condition in a full colour sturdy presentation box that gives the whole thing a slightly premium air. It is, on the face of it, perfectly suited to gifting. Though seasoned model builders will know that buying a kit “as a gift” is often just the opening move in a private negotiation that ends with it mysteriously appearing on one’s own workbench instead.
Inside the box is a satisfyingly substantial collection of components. The main build is spread across eight sheets of 2.5mm MDF, the largest measuring 227mm by 187mm, with the parts cleanly cut and sensibly laid out. Also included are glue and a screwdriver, which means Timory have at least spared builders the traditional pre-build ritual of wandering round the house trying to remember where they last put something useful.

Two small bags contain the accessories, screws, wax, and the electrical components responsible for the lighting, music and motorised elements. Everything is neatly packed and well protected, which is always encouraging when a kit contains parts that are capable of either delighting you or ruining your evening depending on how the day goes. (See Image 3).

The instruction manual follows the now familiar Timory format: black and white, A4, and more practical than glamorous. Happily, it is clear, well laid out and easy enough to follow, with a sensible build sequence that rarely leaves you wondering what fresh chaos lies ahead. There is also a full component inventory at the front, which makes it easy to confirm that everything is present before glue, optimism and irreversible decisions enter the picture. (See image 4)
Particularly welcome are the instructions for installing and testing the electronics and PCB before they disappear into the body of the build. This is one of those small but deeply sensible steps that can save a great deal of misery later. I would strongly recommend taking a few minutes to test the complete lighting and sound system before installing anything. Discovering an electrical fault after several hours of careful assembly is about as welcome as finding the final jigsaw piece attached to your sock.
The lighting and sound system is supplied as a complete package, although builders will need to use a USB power source as the kit is not supplied with a battery box. The system comprises a PCB, along with three LED light heads that illuminate the finished scene, while the music comes from a chip on the board. I will admit I had been hoping for something a little more colourful and gloriously over-the-top in the lighting department, given the fairground theme, but that is perhaps me expecting Blackpool Illuminations from a sheet of MDF.
Once the wires, PCB and lighting components are buried beneath layers of MDF and decorative detail, fault-finding becomes much less “quick check” and much more “delicate archaeological recovery mission”. A simple test at the outset saves time, saves effort, and may also help preserve what remains of your patience and vocabulary. The wiring, incidentally, is not colour-coded — a minor irritation, though the three LED heads are identified in the manual as being the same length, which at least removes one possible avenue for confusion.

If subtlety is what you’re after, the Century Ferris Wheel is probably not the kit for you. The printed parts are gloriously bright, unapologetically colourful, and entirely committed to the fairground brief. Reds, blues, yellows and golds are everywhere, and the whole thing looks as though it intends to be seen from orbit. (See image 5)
What impressed me most, though, was not merely the colour palette but the quality of the printing. It is exceptionally well done. Colours are rich and consistent, fine details remain sharp, and there is none of the fuzzy edging, colour bleed or slightly wonky alignment that can sometimes creep into mass-produced kits. Even the double-sided printed parts — often the moment when quality control has a little lie down — are perfectly aligned and impressively crisp. It all contributes to the sense that this is a kit made with real care rather than rushed out in the hope that flashing lights will distract you. (See Image 4).
Timory estimate a build time of four to six hours, which, at this stage, feels optimistic but not yet entirely delusional. Much depends on your pace, your experience, and whether you are the sort of builder who simply assembles the thing or one who also sands, colours edges, pauses to inspect the engineering and disappears periodically in search of tea. For now, I was prepared to give them the benefit of the doubt, albeit with the kind of cautious expression usually reserved for estate agents and weather forecasts.
Timory’s own two-star difficulty rating also seemed fair on first inspection. There are 367 parts, plus lighting, music and moving features, but the instructions are logical enough and the build appears to be challenging in a reasonably civilised way rather than in the “good luck, you’re on your own” style some manufacturers favour. It is not a beginner’s kit in the absolute sense, but nor does it look likely to require a degree in engineering and a support crew.
As is my usual habit, I spent a few minutes studying the manual before making a start. At least, that is the official version. In reality, I was trying to work out precisely what Timory had planned for me and whether there were any hidden horrors lurking among the 367 components. Thankfully, there were no hundreds of tiny books to fold, no acres of shelving to populate, and no repetitive assembly stages likely to induce temporary madness. Instead, the emphasis seemed to be on mechanical interest and decorative detail, which felt like a fair trade.
The quality of the laser cutting is excellent. Most parts come away from their sheets cleanly and without fuss, rather than requiring the sort of force normally associated with minor demolition work. A few of the smaller or more delicate pieces do benefit from a little extra care, though, and I would strongly recommend using a suitable pushing tool rather than relying on your thumbs and a belief in brute force. The components are well made; the trick is keeping them that way until they are where they need to be.
The build:

One aspect of the build that did demand a little extra time was preparing the edges of the components. Most parts benefited from a light sanding to remove the slight remnants of the laser-cutting process. For many builders, that may not matter in the slightest, but as regular readers will know, I now colour all exposed MDF edges before assembly to give the finished model a cleaner and more convincing look. (See image 6)
That process proved slightly more awkward than usual on the Century Ferris Wheel. The gloriously overexcited fairground colour scheme means that many components have two or even three different colours around their edges, which requires a bit more concentration when selecting and applying the appropriate marker pens. Before any colouring could begin, the sanded surfaces also needed to be properly smooth, as even the smallest rough patch has an infuriating habit of making itself known the moment ink is applied.
Of course, most builders will quite rightly decide not to bother colouring the edges at all, and fair enough. Viewed from a normal distance, the difference is probably negligible and unlikely to be noticed by anyone admiring the finished model. The problem is that I would know those plain MDF edges were still there and once spotted they would continue to catch my eye and quietly irritate me every time I looked at the kit. None of this is difficult, but it does add extra time if, like me, you prefer to remove every visible trace of raw MDF before the build gets underway.
Just when you think it is safe to relax and settle into a comfortable building rhythm, the kit reaches out and gives you a sharp nip on the toe. Stickers.
Having assembled all ten of the Ferris wheel carriages, I found myself wondering why the tops looked so plain and rather deprived of fairground glamour. Surely Timory had not gone to all the trouble of producing such a colourful kit only to leave these prominent little cabins looking unfinished? The answer, as it turned out, was waiting a few pages later in the manual.

The carriage roofs are completed using cleverly shaped stickers that fold into place to create the peaked tops. I will freely admit that my heart sank slightly when I realised stickers were involved, as experience suggests they can range from wonderfully effective to a prolonged exercise in patience and diplomacy. Fortunately, on this occasion the adhesive behaved itself. The stickers aligned well, held their shape once fitted, and remained exactly where they were supposed to be. The result is a significant improvement to the appearance of the carriages and, much to my relief, the entire episode passed without incident. (See image 7)
By this stage, the level of detail being packed into the Century Ferris Wheel was becoming increasingly obvious. Remarkably, I was still only on page two of the instruction manual yet had already spent somewhere between two and three hours assembling the ten Ferris wheel carriages. Each one consists of no fewer than twelve individual components, all of which needed removing from the sheets, sanding, edge colouring, assembly and, of course, the application of the roof stickers.

It would have been very easy for Timory to simplify this stage with fewer parts and less intricate construction, but the finished result unquestionably benefits from the extra effort. Each carriage ends up feeling like a miniature model in its own right, and by the time all ten are complete there is already a considerable sense of achievement. It is this sort of detail that stops the kit feeling like a glorified slot-together time-filler and gives it the air of something designed for people who enjoy this sort of nonsense on purpose. Whether your response is admiration or a sudden urge to check how many pages remain in the manual will depend entirely on your appetite for detail, but the care in the design is hard to deny. (See Image 8).

A word of warning: pay close attention to step 15 on page 6. There are a couple of plastic spacers that need to be glued in place on the Ferris wheel. Whenever a rotating model asks me to involve glue anywhere near a moving part, alarm bells begin ringing immediately — apply it in the wrong place and you could very easily transform a working attraction into an expensive static ornament. Take your time here and make absolutely sure the adhesive goes only where it is meant to. (See image 9)
Oddly, page 6 finishes with step 15 and, naturally enough, I expected page 7 to begin with step 16. Not a chance. Instead, it leaps straight to step 19, which sent me flipping back through the manual to check whether I had somehow managed to miss an entire page. Thankfully, nothing appears to be absent from the build itself, but it is a peculiar oversight and one that could leave builders briefly wondering whether the instructions have decided to improvise.
Another word of warning. Step 14 on page 6 asks you to install the bars from which the carriages hang. Once removed from the parts board, you will notice that one side of each bar has two tiny, engraved lines while the reverse side is completely smooth. The significance of these markings is not explained until page 8, step 22, where you are instructed to fit clips onto the bars. These clips keep the carriages centrally positioned between the two-wheel sections and stop them sliding along the bars.
Fit those bars upside down and attaching the clips later becomes virtually impossible without dismantling several stages you have already completed, which is not the sort of excitement anyone needs. To spare yourself a completely avoidable bout of frustration, make sure the bars go in with the engraved lines facing upwards. Thankfully, mine did. Had they not, I suspect the official workaround would have involved staring at them for a while and hoping for divine intervention.

Hidden within the Ferris wheel base is a rotating train set that circles endlessly behind a series of viewing windows. What really caught my attention, however, was the construction of those windows. Each one consists of an extraordinary twenty individual parts. I honestly cannot recall building a window with quite so many components before. It is an almost absurd level of detail for something many builders may only glance at, but it perfectly demonstrates the commitment to craftsmanship running through the kit. The result was already shaping up to be something rather special. (See image 10)
Another word of caution arrives at step 31, where you are asked to fit two side curtains to the train viewing windows. The instructions helpfully tell you to apply glue along the engraved guidelines. Splendid advice — if only you could actually see them.
The curtains fit to the reverse side of the assembly, while the guidelines are engraved on the printed front face. The result is that you are left trying to position everything while working completely blind. It quickly becomes a case of fit, turn over, check, adjust, turn over again, and repeat until you either get it right or lose the will to continue.

A far simpler solution would have been for Timory to engrave matching guidelines on the reverse of part G1. That would have removed the guesswork entirely and saved builders from what felt suspiciously like hanging curtains in the dark. Simply adding glue to the front face of the curtains and then placing them leaves them in the wrong position, with gaps at the sides, so a little trial and error is unfortunately unavoidable. (See image 11)

A handy little tip for step 40 (page 15), and a reminder: this is where the Ferris wheel’s legs are attached to the baseplate. The fit is fairly snug, and trying to push everything home with your fingers alone turns into a bit of a juggling act. I found that slipping the barrel of a pen through the lower two holes and then applying gentle downward pressure worked beautifully, encouraging the legs into their slots without putting unnecessary stress on the surrounding parts. Sometimes the simplest tools are the most useful, and on this occasion a humble biro more than earned its keep. (See image 12)
This is where I save you some genuine grief. Guess who managed to affix the Ferris wheel the wrong way round.
Remember those two plastic wheels you have already encountered? One rotates the Ferris wheel and the other drives the train. There is, therefore, very little point in having one on the left-hand side and the other on the right unless you happen to enjoy dismantling perfectly good work while muttering darkly at your own incompetence.
In my defence, I clearly was not paying attention in class. That said, the manual could do a much better job of reminding builders at this point why the orientation matters. A simple note or warning would have saved me from an entirely avoidable bout of head-scratching and remedial surgery.
Learn from my mistake and double-check the wheel orientation before committing to glue. Your future self will be quietly grateful.

As you have probably gathered by now, this review is turning into something of a survival guide. That is largely because the instruction manual could really do with an upgrade, as several stages are far more complicated than they need to be. A few well-placed notes, warnings, or explanatory lines on the relevant pages would make a genuinely significant difference to the overall building experience. (See image 13)
Take page 18, step 44, where you are asked to fit the drive band around the gear wheels. Do yourself a favour and fit the band around the lower wheel first, then carefully stretch it up onto the upper one. Trying to do it the other way round is an excellent way to end up chasing a runaway drive band around your workbench.

It is a simple little trick, but one that makes this stage considerably easier and spares a lot of unnecessary fiddling. Sometimes the difference between an enjoyable build and an annoying one is simply knowing the order in which to tackle a job, and this is very much one of those occasions. (See image 14)
Time for another cautionary tale. As the build progresses, we arrive at page 27, section 71. This is the stage where the base is attached to the Ferris wheel assembly, and it is very much one of those moments where patience ought to be treated as a basic requirement rather than an optional extra.
Please be gentle and resist any urge to hurry. The backdrop reel that drives the rotating train scene is surprisingly easy to bend or damage, and you will need to take extra care when bringing the two sections together. Nothing here should require force, so if something does not seem to fit naturally, stop and check the alignment before proceeding further and making your evening significantly worse.
While you are there, pay close attention to the exploded diagram. It is very easy to become fixated on getting everything lined up physically and completely miss the orientation of the base itself. Trust me, a few extra seconds studying the illustration is far preferable to discovering later that you have attached everything facing the wrong direction.
This is not a particularly difficult stage, but it is absolutely one where a little care and attention can spare a great deal of frustration later on.
When it comes to customisation, there is not a great deal that can be done without significantly modifying the kit. Personally, I would have loved to see lighting around the wheel rim and spokes, but with any rotating mechanism that is a far bigger challenge than it first appears. Supplying power to moving parts without ending up with a tangled little tragedy of wires is no small feat.

That did not stop me adding a small personal touch, however. Looking at the completed wheel, the tenon joints and metal pins stood out a bit more than I liked, so I raided my craft stash and attached some coloured jewels to disguise them. It is a simple modification, but one that adds a little extra sparkle while also hiding some of the more obvious construction points. (See image 15)
Sometimes the best customisations are not the elaborate ones. A few well-placed embellishments can make all the difference and, in this case, the jewels help lift the finished appearance without interfering with the wheel’s operation.
So, would I recommend the Century Ferris Wheel? Yes, absolutely — but not without a few caveats. Once finished, it looks splendid in that slightly smug way a kit does when it knows perfectly well how much effort it extracted from you to get there. It is also, however, a build that occasionally feels more difficult than it really needed to be, thanks to instruction diagrams that could be clearer and several stages that benefit greatly from experience, patience, or the sort of survival tips I have now apparently been obliged to provide.

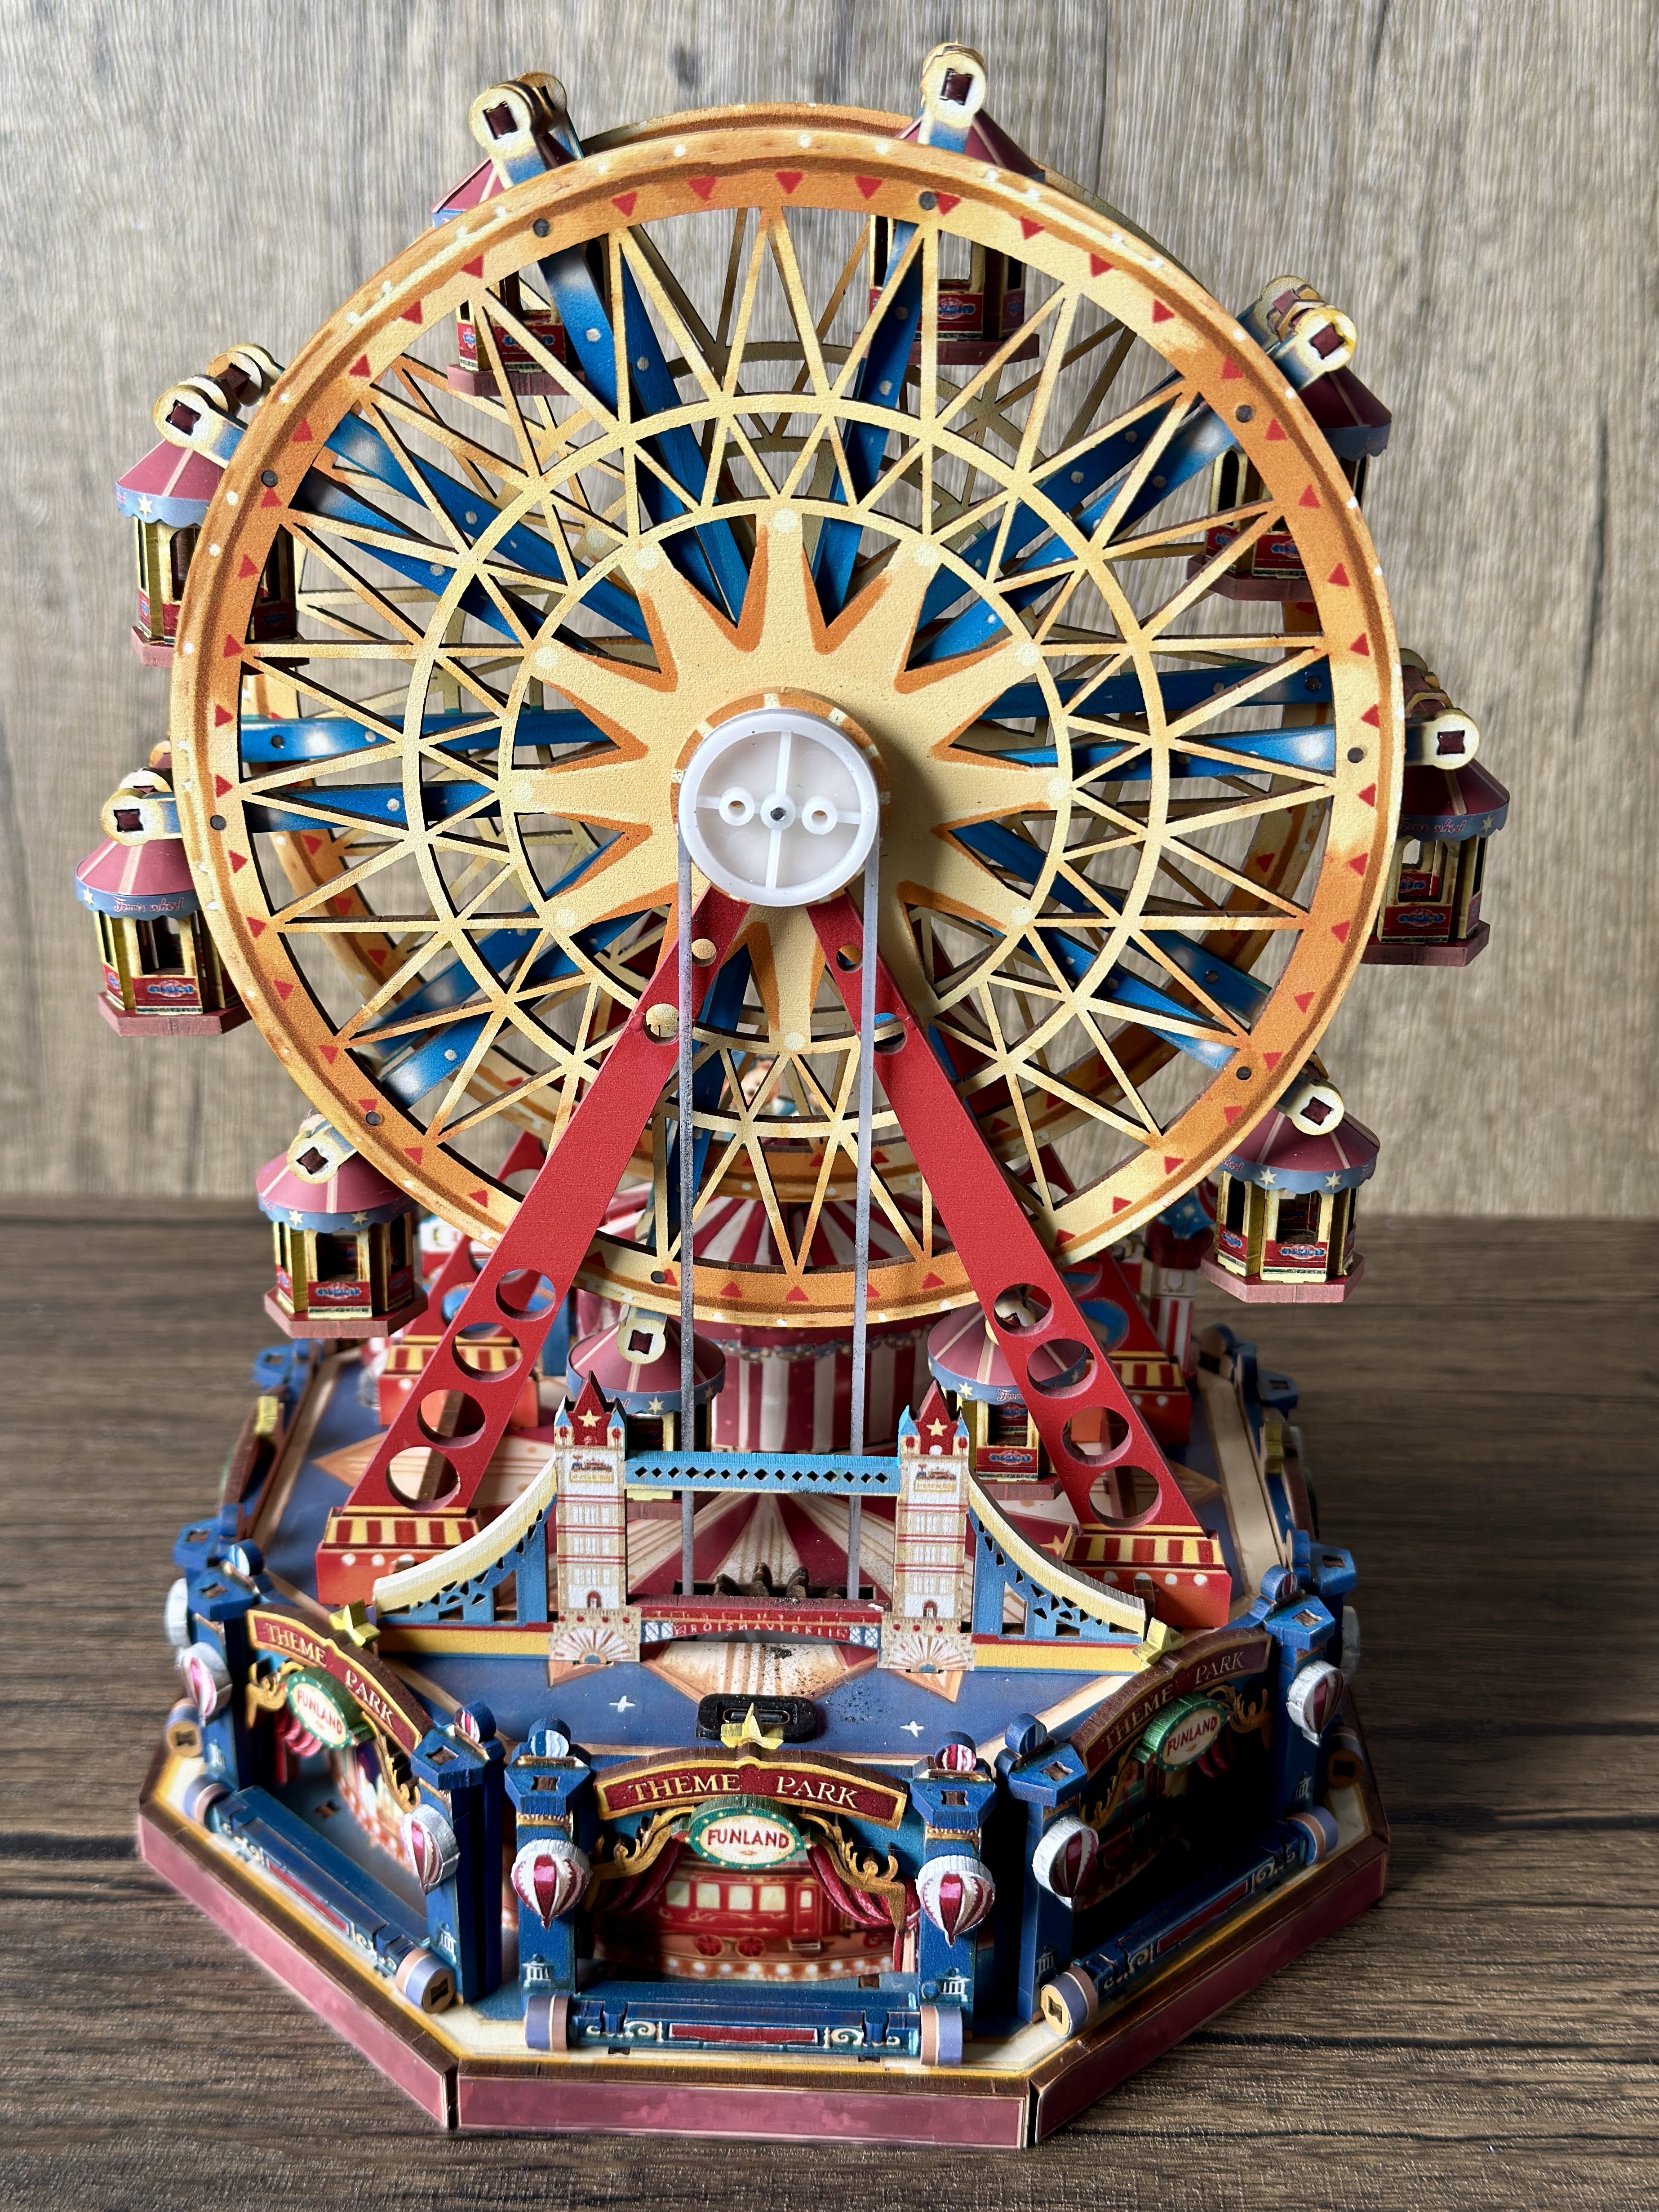
Despite the moments of head-scratching, the couple of self-inflicted mistakes, and the occasional colourful expansion of my vocabulary, I did thoroughly enjoy the build. The finished model has real presence, the rotating wheel and moving train stop it from becoming just another object on a shelf, and there is a certain grim satisfaction in finally seeing the whole thing work after it has spent hours trying to test your commitment to the hobby. (See image 16)
This is not a kit I would recommend to an absolute beginner, but for anyone with a few builds behind them and a healthy supply of patience, the rewards are very much worth the effort. Just remember to pay attention to the wheel orientation, treat the moving mechanisms with care, and perhaps keep a pen barrel handy. Trust me on that last one. Oh, and Timory’s build estimate of four to six hours is wildly inaccurate. Even had I not been colouring the edges, this was comfortably a ten-hour build. After all, what did you expect from a kit that thinks twenty-part windows are a perfectly reasonable use of a person’s afternoon?
A challenging, theatrical, and thoroughly rewarding build that earns its shelf space the hard way.
Pros
✅ Looks superb once finished and has enough shelf presence to behave like it pays rent
✅ The rotating wheel and moving train give it real life rather than leaving it to sit there looking decorative
✅ Excellent laser cutting and printing quality throughout
✅ Clever engineering in the moving mechanisms, with plenty to admire as it comes together
✅ Genuinely satisfying to complete, assuming it hasn’t broken your spirit first
✅ Enough room for small personal touches without needing to redesign the entire thing
✅ Good value for a model this detailed, theatrical, and mechanically fussy
Cons
❌ The manual could be much clearer and seems oddly determined to keep a few surprises to itself
❌ Some stages are fiddlier than they need to be, largely because the instructions leave too much unsaid
❌ It is alarmingly easy to glue something the wrong way round if you trust the diagrams a little too much
❌ Delicate moving parts around the train mechanism do not respond well to haste or optimism
❌ Not remotely beginner-friendly, despite the cheerful box art trying to suggest otherwise
❌ Limited scope for extra lighting unless you fancy engineering your own rotating power solution
❌ Several stages cry out for warnings or explanatory notes that simply are not there
Photo Gallery


Leave a Reply