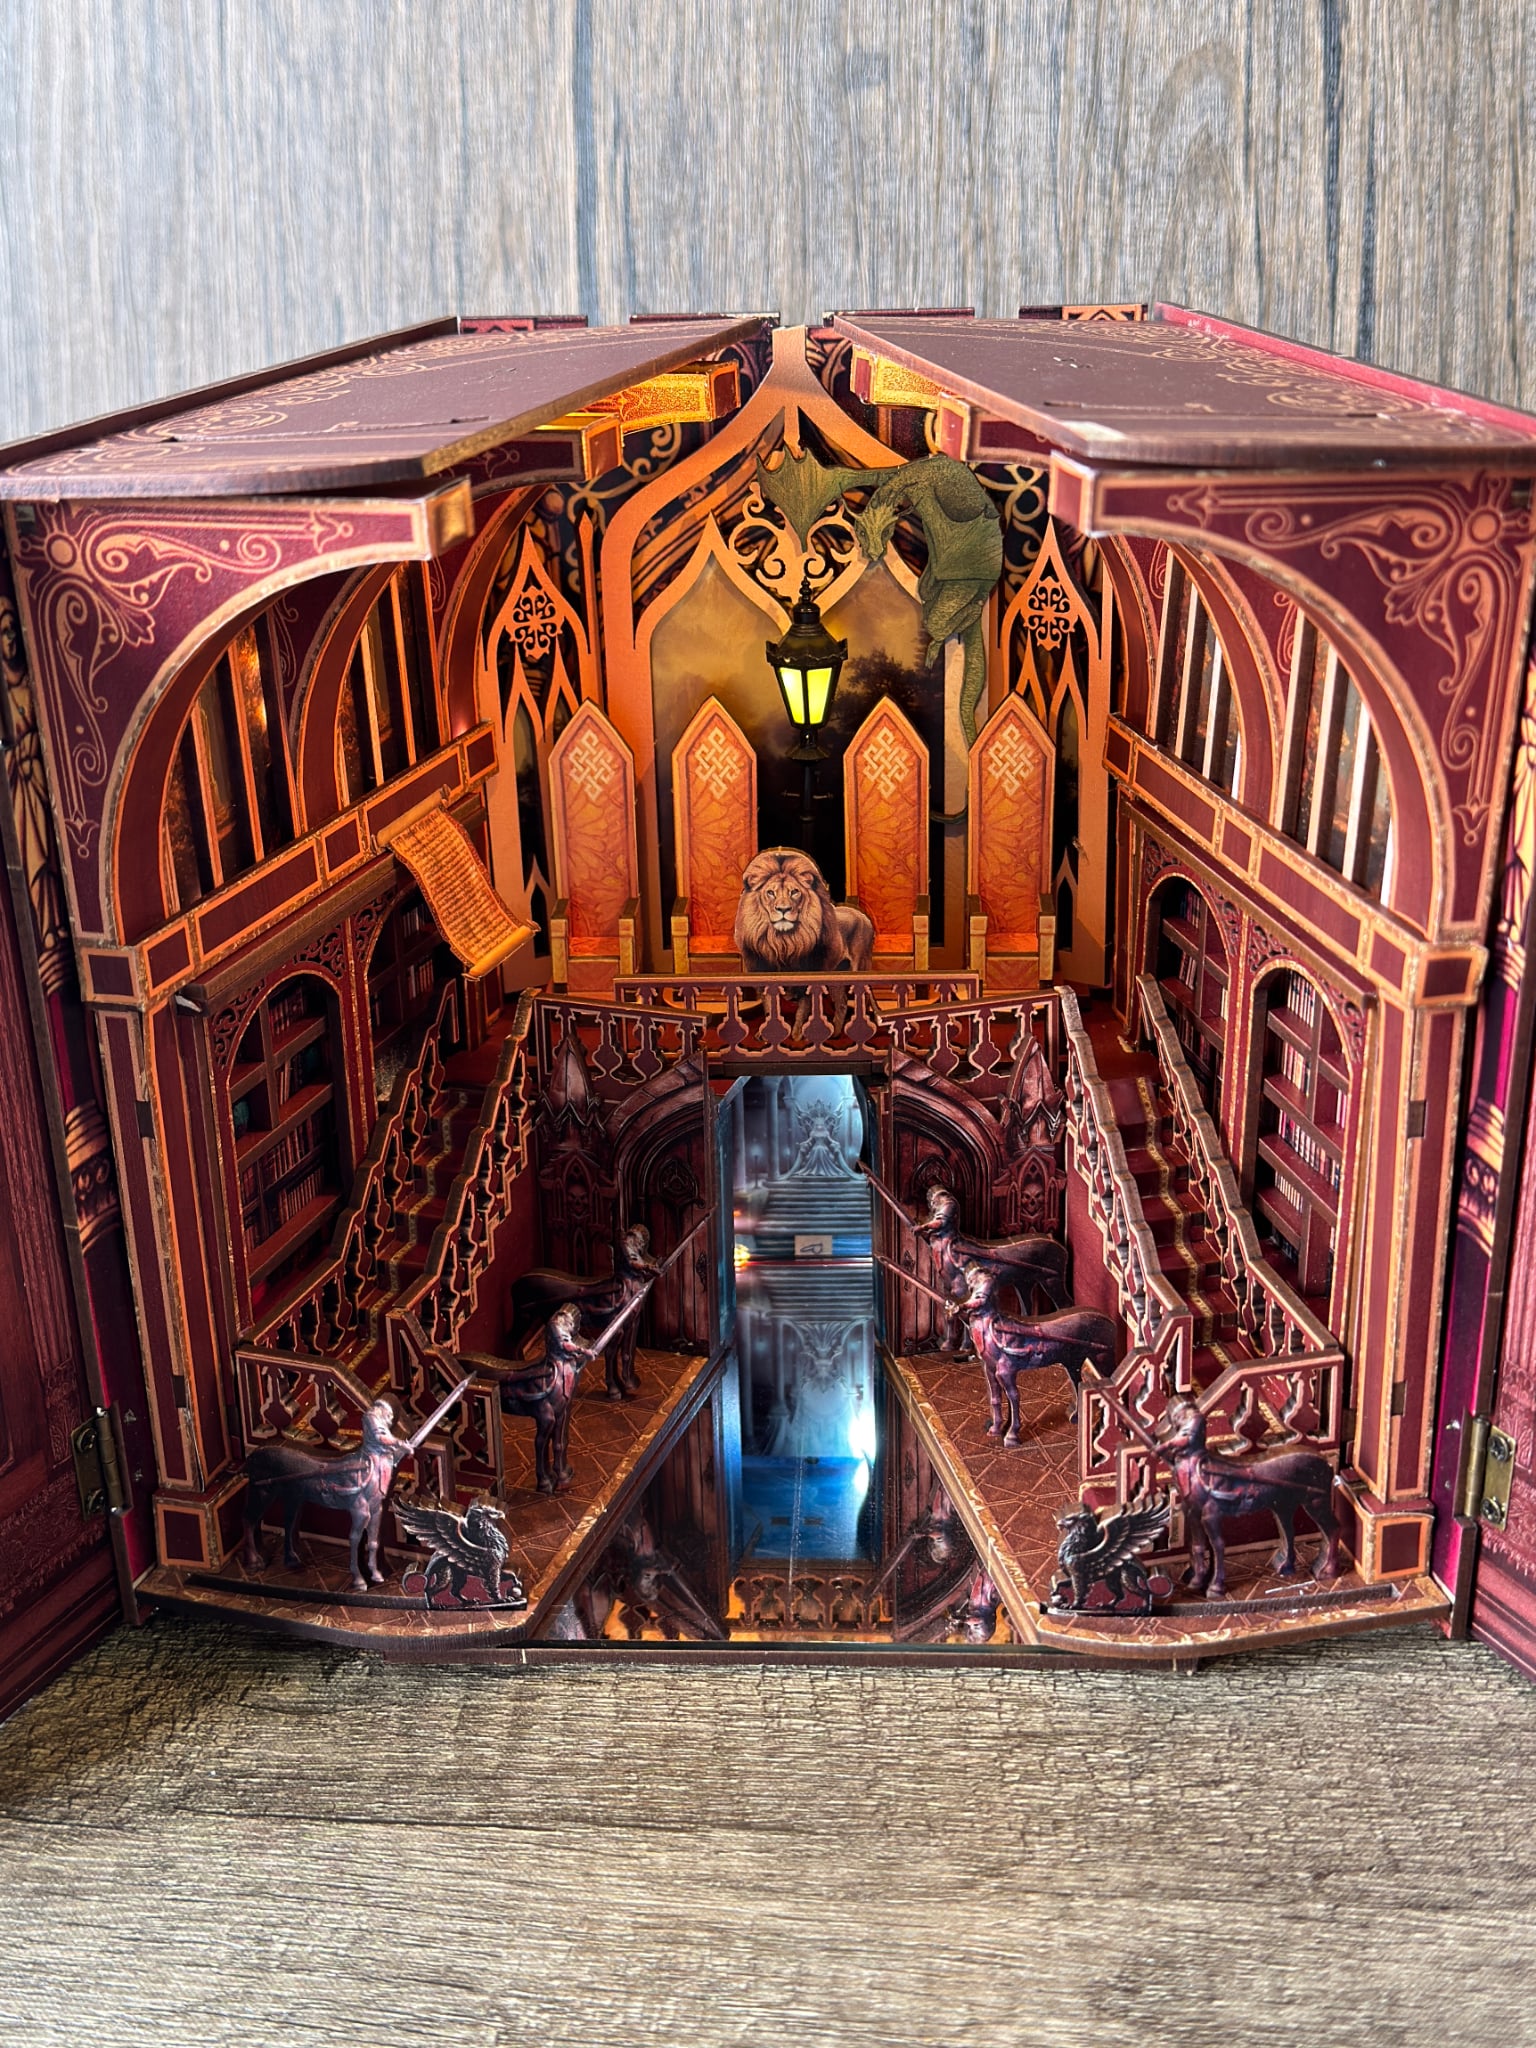
Build #60 – Built & reviewed by John A. MacInnes
| Feature | Rating / Details |
|---|---|
| Brand | Aslowsnail |
| Model Number | ZP05 |
| Piece Count | 300 |
| Age Rating | 14+ |
| Difficulty Rating | Advanced Beginner to Intermediate |
| Dust Covers | No |
| Customisation Potential | None |
| Build Time | 11 Hours |
| Build Quality | ⭐⭐☆☆☆ (2/5) |
| Value for Money | ⭐☆☆☆☆ (1/5) |
Introduction
With a title like Magic Wardrobe, a grand staircase leading into a fantastical interior, and especially a lion placed prominently at the top, it’s hard not to think of The Lion, the Witch and the Wardrobe by C. S. Lewis. In that story, the wardrobe serves as a portal to a magical world, and the lion Aslan is the central figure.
Manufacturers often avoid direct references to copyrighted characters and settings, so they create something “inspired by” rather than an official adaptation. The result is usually a collection of visual cues—a wardrobe, magical architecture, snow-themed elements, lampposts, lions, castles, or enchanted forests—that evoke the story without reproducing it exactly.
As for the lion atop the staircase, it would seem a rather random decorative choice unless it was intended as a nod to Aslan. A grand staircase could fit many fantasy settings, but adding a lion strongly points toward Narnia-inspired imagery.
Unboxing


The Magic Wardrobe kit arrives in a sturdy box that provides good protection during transit, finished with a full-colour glossy sleeve that gives the package a polished, professional appearance. First impressions are very positive, with the presentation suggesting a well-produced kit before the box is even opened.
Opening the box reveals nine MDF sheets in total – seven full-size and two half-size – all cut from 2.5mm board and securely shrink-wrapped to prevent movement during transit. Also included are a sheet of stickers, an infinity mirror, a full-colour sheet of window and opening inserts designed to be illuminated from behind, and the electronic components, all of which were carefully packaged and arrived in excellent condition. See image 1
As soon as the protective wrapping was removed from the MDF sheets, a few of the smaller pieces immediately made a bid for freedom. It’s worth keeping a pen handy to mark the reverse of any loose parts with their identification number or alternatively using sticky notes for double-sided printed pieces where marking the board isn’t practical. A few moments spent doing this at the outset can save a lot of head-scratching later in the build. See Image 2
The lighting system is supplied as a mostly pre-wired assembly, which should come as welcome news to anyone whose electrical expertise extends no further than inserting batteries the correct way round. The package includes a battery box requiring two AAA cells, a wiring loom carrying three LED light heads, a control PCB with touch-sensitive switch pad, and an unfinished wiring section where the streetlamp will eventually be connected.
Also included are two lengths of ultra-fine wire fitted with tiny, encapsulated LEDs. These miniature lights are perfect for adding discreet illumination to the finished scene and are small enough to disappear almost entirely once installed. Their delicate appearance does inspire a certain amount of caution, however, as they look as though a stern glance in their direction might be enough to snap them in half.
Despite their fragile appearance, all of the lighting components arrived well packaged and undamaged, ready to bring the Magic Wardrobe to life once construction is complete.
A Rare Example of Good Lighting Design
One small detail that immediately earned Aslowsnail a gold star is the colour coding of the lighting leads. The three lamp cables are identified by red, yellow and blue markers, making it instantly obvious which wire belongs where. It sounds ridiculously simple because, frankly, it is.
Which rather begs the question: why don’t more manufacturers do it?
This is one of those ideas I would love to see become standard across the hobby, yet manufacturers who adopt it remain very much in the minority. More often than not we’re expected to distinguish between three nearly identical wires by measuring them with a ruler, squinting at a diagram, and offering up the occasional sacrifice to the modelling gods in the hope we’ve chosen correctly.
When the time comes to thread wiring through holes barely large enough for the wire itself, and half the build has already been glued together, clear colour coding turns what could be an exercise in frustration into a straightforward job. It’s a tiny touch, costs next to nothing, and makes a world of difference. Other manufacturers, please take note.
Before You Start Building
Before you get carried away and start liberating parts from the MDF boards, it’s well worth doing a quick sanity check first. Plug the LED loom into the PCB and make sure everything lights up and behaves as it should.
It only takes a couple of minutes, and while it may feel like an unnecessary pause in the excitement, it’s infinitely preferable to discovering later that something isn’t working after half the kit has already been assembled and firmly committed with glue.
Aslowsnail does not provide a build time for this kit. Of course, these are always subjective. One builder’s leisurely afternoon project is another’s week-long exercise in perfectionism.
Personally, I’ve long since learned to treat manufacturers’ suggested build times as more of a theoretical concept than a practical guideline. They seem to be calculated in a world where every part politely waits to be picked up, nothing ever vanishes into the carpet dimension, and the builder never pauses mid-task to question whether they’ve actually been looking at the instructions upside down for the last ten minutes.
In reality, most builds come with their own built-in delays—some planned, many not—and I’ve yet to encounter one that didn’t involve at least a brief search party for a part that was absolutely, definitely just here a second ago.
Instructions and Manual Quality

The instruction manual follows a familiar format: an A4 booklet spanning 34 pages and printed in full colour. Whilst some manufacturers have embraced full-colour manuals in recent years, I’ve never considered colour to be essential provided the instructions are clear, and thankfully that’s very much the case here. Image 3
The build sequence is logical, easy to follow, and laid out in a way that should cause minimal trouble for builders of any skill level. Each step is clearly illustrated and supported with concise instructions, allowing progress to be made at a steady pace without the sort of unnecessary head-scratching that some manuals seem to treat as part of the experience.
It’s one of those rare cases where the instructions actually feel like they were written for humans rather than as a cryptic puzzle to be solved under a desk lamp at midnight.
One feature that immediately earned my approval was the component reference table at the front of the manual. It might not sound particularly exciting, but anyone who has ever spent five minutes staring at an MDF sheet trying to decide whether they’re looking for part P17, P71, or a completely different part altogether will appreciate its value.
Rather than turning component identification into an impromptu eye test, the table clearly shows the location and numbering of the major parts, making it quick and easy to find what you’re looking for. It’s one of those simple additions that costs very little to include, yet saves a surprising amount of time, frustration and occasional questioning of one’s sanity.
I was also pleased to see that the manual includes warning and advisory notes at points where a little extra care is required. These are strategically placed just before the sort of step that would otherwise have you saying, “I wish they’d mentioned that earlier,” while attempting to separate two pieces that have just been glued together with great enthusiasm and absolutely no forethought.
Whether it’s a delicate assembly, wiring run, or moving component, the reminders help steer you away from potential pitfalls before you discover them the hard way. As a result, the manual manages a surprisingly rare achievement: it actually helps with the build rather than becoming an additional obstacle that has to be deciphered, interpreted and occasionally argued with before work can continue. It’s one of those thoughtful additions that doesn’t attract much attention when it’s present but is sorely missed when it isn’t
Build Quality and First Impressions
Before getting too far into the build, it’s worth taking a moment to appreciate the quality of the manufacturing. The laser cutting is consistently clean and accurate, with parts separating from the sheets exactly as they should. There were no stubborn attachment points, no splintered edges, and no occasions where I found myself wondering whether the designers intended a particular piece to come free at all. Components simply detached cleanly and fitted where they were supposed to, which is exactly how it should be but, unfortunately, isn’t always the case.
The print quality is every bit as impressive. Colours are rich and well defined, helping to give the kit a polished appearance from the outset. More importantly, the artwork and cutting lines are perfectly aligned, something that becomes particularly noticeable on detailed pieces and double-sided components. There are no distracting white borders, no areas where the print drifts towards the edge of a part, and no signs of the registration issues that can occasionally spoil an otherwise attractive kit. It’s the sort of attention to detail that many builders won’t consciously notice, but it quietly contributes to the overall impression of quality throughout the build.
The First Problems Appear
Stair Carpet Sticker Issue

The first snag I encountered came on page 8 with the application of the stair carpet stickers. In my view, it would have made far more sense to fit these before installing the staircase. By the time the instructions call for them, the stairs are already in place, which makes what should be a straightforward job rather more awkward than it needs to be, especially if you are a belt n’ braces type of builder and glue components in place that perhaps neither call for it or is required. Go on, ask me how I know this! Image 4
Of course, had I followed my own advice and read a few steps ahead, I would have spotted this coming and held off fitting the staircase until the carpet stickers were attached. Instead, I charged ahead with my usual level of confidence, only to discover that the instructions had other ideas. Consider this a public service announcement for future builders: peek a few pages ahead and save yourself the unnecessary gymnastics.
Incorrect Manual Illustration
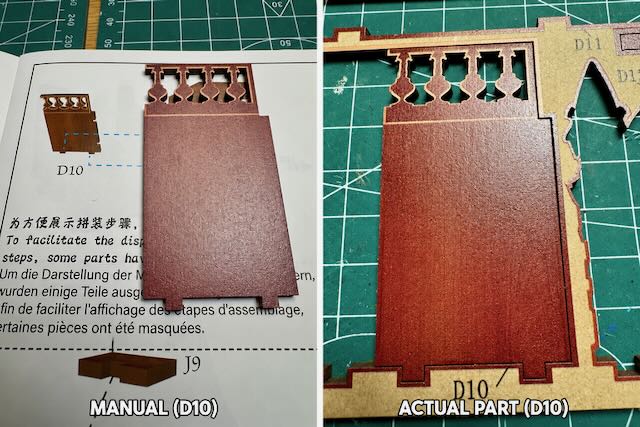
My first genuine “hang on a minute…” moment arrived on page 14 with part D10. The illustration in the manual clearly shows two notches on the right-hand side of the piece. The actual part, however, possesses precisely zero notches. Image 5
Naturally, this sent me down the familiar rabbit hole of checking the MDF sheets, checking the part number, checking the manual again, and then repeating the entire process just to be certain I hadn’t accidentally removed the wrong component. After all, admitting the instructions might be wrong is usually the last possibility any modeller considers.
As it turns out, the part is correct and the manual isn’t. Fortunately, it doesn’t affect the build and the piece fits exactly where it should, so there’s no need to become overly concerned. That said, Aslowsnail really should correct the illustration in future print runs. In the meantime, a simple note slipped into the box would save builders from spending ten minutes questioning their eyesight, their sanity, and their ability to identify a piece of MDF.
Poor Part Layout
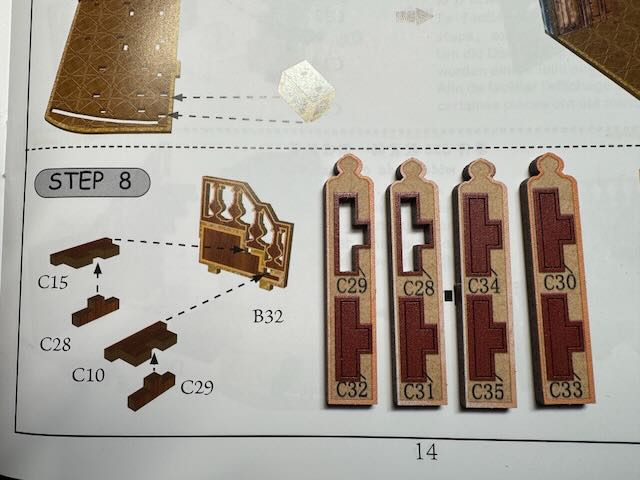
Another minor gripe concerns the way some of the components have been laid out on the MDF sheets. If the instructions ask for parts C15, C10, C28 and C29, most builders would reasonably assume that these parts would be located together, or at least somewhere in the same general vicinity.
Apparently, common sense was unavailable on the day this board was designed.
Instead, the parts are scattered across several different sections of the sheet. C29 and C32 occupy one area, C28 and C31 another, C30 and C33 are elsewhere, while C34 and C35 have been sent off on their own little adventure. The real punchline, however, is that these parts are all identical.
Given that they’re interchangeable, it would surely have made more sense to arrange them in the order they’re required by the instructions. Grouping C28 and C29 together, for example, and placing C10 and C15 nearby would have saved builders from repeatedly scanning the board like a contestant on a particularly frustrating episode of Where’s Wally?. Image 6
It’s hardly a build-breaking issue, but it does feel like a missed opportunity to make the assembly process a little more intuitive and a lot less like an Easter egg hunt.
Signs of Insufficient Testing
By this stage of the build, I was beginning to notice a steady stream of small issues appearing with rather more regularity than I would have expected. None of them are individually serious, but taken together they do raise questions. Aslowsnail has built a solid reputation within the hobby, backed by parent company Sile Crafts, which makes some of these oversights all the more surprising. As this is a relatively new release, I can’t help wondering how extensively the kit was tested before reaching the market. A handful of experienced builders armed with glue, patience, and a healthy dose of scepticism would have identified at least some of these niggles before they found their way into production.
Sticker Problems


The sticker situation is a good example. Several stages require decorative stickers to be applied, yet the manual frequently recommends securing them with glue. Now, I may be missing something here, but if a sticker requires glue in order to stick, has it not rather missed the point of being a sticker in the first place? Image 7
Unfortunately, the examples supplied with my kit seemed determined to prove the manual correct. Despite being self-adhesive in theory, several began lifting from the surface after a relatively short time and ultimately had to be glued down. The end result looks fine, but it does leave one wondering why the adhesive backing was included at all. Calling them “pre-positioned decorative overlays requiring supplementary adhesive” might be more accurate, although admittedly it doesn’t roll off the tongue quite as well. Image 8
Fragile Centaur Design

A word of caution for future builders: take extra care once the right-hand centaurs and their swords have been fitted. If, like me, you later need to reopen the two main sections—for example, to deal with a sticker that has decided it no longer wishes to be attached—it’s remarkably easy for the swords to collide with each other or on the rear wall pieces marked D12 and 20.
Unfortunately, the outcome of such a meeting is unlikely to be diplomatic.
In my case, one of the swords snapped twice, although a small application of UV resin soon had matters back under control. Even so, I suspect this may become a recurring issue for other builders. The swords are long, delicate, and positioned in an area where accidental contact is difficult to avoid when handling the model. It feels less like a one-off accident and more like a potential design weakness that Aslowsnail may need to revisit in future revisions if they want to prevent a growing population of disarmed centaurs. Image 9
Weak Roof Structure
Yet another word of warning for anyone building this kit. When it comes time to attach the right-hand roof section to the bookcase, proceed with extreme caution and handle the assembly as though it were made from spun sugar.
The roof section is secured by just two tabs, and as can be seen from the construction of the parts identified as “J” in the manual, there is very little structural strength in the assembly at this stage. Until everything is finally locked together, the whole arrangement feels rather more optimistic than robust.
In fairness, most of the parts do fit correctly, but I found myself treating the assembly with the sort of care normally reserved for transporting nitroglycerine over a cobbled road. Once I was satisfied that everything was aligned properly, I reinforced the joints with UV resin to add some much-needed rigidity. The difference was immediate, transforming the structure from “please don’t touch that” into something that inspired a little more confidence. Given the design, I suspect other builders may wish to consider a similar approach.
More Evidence of Rushed Development
I’m sorry to say that by this point the nagging suspicion had begun to form that this kit may have reached the market a little earlier than it should have. Individually, the issues I’ve highlighted so far are relatively minor. Collectively, however, they paint a picture of a product that could have benefited from a little more real-world testing before being released to the public.
Lighting Design Problems
The next area to raise my eyebrows was the lighting. The kit includes some beautifully printed acetate window inserts and, naturally, I was looking forward to seeing them illuminated with a soft, warm glow. Instead, the instructions called for the micro wire LEDs to be positioned directly behind the windows. Now, anyone with experience of model lighting will know that these tiny LEDs produce a concentrated point source of light rather than a gentle, diffused illumination. A warm white or even yellow LED bead head mounted above the windows would have created a far more convincing effect.
Rather than blindly following the instructions, I carried out a quick test fit without glue. The results were exactly as expected. Instead of warm, inviting light spilling from the windows, six distinct bright spots appeared behind the acetate, looking less like a grand magical building and more like a gathering of enthusiastic torch bearers conducting a late-night committee meeting outside.
Window Design Concerns
And while we’re discussing the windows, I have to question another design decision. Who thought printing the bead head micro wire window lines in white against a diffused insert was a good idea? Much of the detail simply disappears into the background. A darker print colour would have provided contrast and definition, allowing the builder something to work with.
The frustrating part is that neither of these issues would have been difficult to identify. A single illuminated prototype built by an experienced modeller would almost certainly have highlighted both problems immediately. Instead, we’re left with a situation where the builder is forced to experiment, modify and, in some cases, completely rethink aspects of the lighting installation in order to achieve a convincing result.
Attempting a Fix

In the end, I made the best of a less-than-ideal situation by repositioning the wires and LED heads around the window openings rather than directly behind them. It certainly looked better than the arrangement suggested in the instructions, but if I’m being honest, the improvement was fairly marginal. The fundamental problem remained: the lighting simply wasn’t being used in a way that complemented the window design. Image 10
No amount of careful wire routing was going to transform concentrated point-source LEDs into the soft, ambient glow the scene was crying out for. The result is acceptable, but it never quite achieves the warm, magical atmosphere that the beautifully printed window inserts deserve. That’s a shame, because all the ingredients are there—the execution just falls frustratingly short of the potential. Image 11

The Hinge Screw Disaster
At this point, I’m beginning to feel as though this review is turning into a catalogue of avoidable problems rather than a discussion of the build itself. Every time I convince myself I’ve found the last of the issues, another one appears around the next corner.
Step 14 looked refreshingly straightforward. The task was simply to fit four hinges to the two front door sections. A few screws, a couple of hinges, job done. Surely there was little opportunity for anything to go wrong here.
Reader, there was.

The screws supplied for the hinges are simply too long. Tighten them down so that the hinge sits correctly against the surface and the screw tips emerge through the opposite side of the door. This isn’t a subtle issue that only becomes apparent under close inspection; it’s immediately obvious the moment the screws are fully seated.
What makes this particularly frustrating is that it’s the sort of problem that should never have survived even the most basic test build. The solution is obvious—shorter screws—and yet here we are. By this stage I was beginning to wonder whether the prototype and production kits had ever occupied the same room together. Image 12
The manufacturer, it would be fair to say has found a solution to this problem. They have supplied two column sections with cutouts into which the screws that protrude are hidden, and then a secondary decor piece to cover the one with the cutout slots.
A Growing List of Avoidable Problems
At this stage, I have to be honest and say my patience with the kit was beginning to wear thin. Every model will have the occasional issue, and experienced builders generally accept that minor corrections and workarounds are part of the hobby. What is far harder to accept is the sheer number of avoidable problems that have appeared throughout this build.
I have no idea who carries out the pre-release testing on new kits, but based on my experience here, they either weren’t given a production version to build or their feedback was ignored. There are now simply too many issues that should have been identified long before this kit reached customers. Incorrect illustrations, questionable part layouts, poorly conceived lighting arrangements, ineffective stickers, overlong screws and fragile design elements are not obscure faults discovered only after months of use. They are the sort of problems that should emerge during even a moderately thorough test build.
The frustrating aspect is that underneath these issues lies a kit with genuine potential. The concept is attractive, the manufacturing quality is generally excellent, and many of the design ideas are sound. Unfortunately, the execution lets it down far too often.
Can Magic Wardrobe Be Recommended?

In my opinion, this is a kit that would benefit enormously from a design review and refresh. Several of the issues could be resolved with relatively minor changes, while others require a more fundamental rethink. Until that happens, I find it difficult to recommend the Magic Wardrobe. That’s not a conclusion I reach lightly. Having built more than sixty book nooks and miniature kits, I’ve encountered my fair share of challenges, but rarely have I come across a model that combines such obvious promise from a respected manufacturer with such a long list of avoidable frustrations. Image 13
Handling Problems During Assembly
Here’s another issue that will almost certainly catch out other builders because it’s been a recurring theme throughout my build. The design leaves very few safe places where you can actually get hold of the model and apply pressure when pushing tabs into slots.
Now, if you’ve built a few of these kits, you’ll already know exactly why that’s a problem.
Time and again I found myself needing to push one part home, only to discover that the only place available to hold the model was a delicate decorative section that really wasn’t designed to have a thumb pressing against it. The result? Bits coming loose, bits breaking off, and bits deciding they no longer wished to be attached to the model.
I have genuinely never used so much UV resin during a build. Some of it was used to repair damage, some to strengthen weak areas before they became damaged, and some simply because parts needed a little sanding before they would fit properly and then required gluing to keep them there.
By this point my UV torch was getting more use than some of my modelling tools.
The frustrating thing is that this isn’t the result of careless building. It’s a consequence of a design that doesn’t really take into account how builders physically handle a model during assembly. Every kit needs occasional persuasion to get parts into place. The difference is that most kits provide somewhere safe to hold while you’re doing it.
Final Roof Problems

And then we arrived at the final stages of the build and, foolishly, I thought the worst was behind me.
It wasn’t.
The final roof fitting turned out to be another exercise in frustration. The decorative roof panel that covers the opening side sections simply would not sit correctly. After a considerable amount of checking, re-checking, and the usual ritual of convincing myself I’d assembled something incorrectly, the problem became obvious. Image 14
The roof arches do not sit flush. As a result, they force the roof structure upwards, which means the final decorative roof panel has no flat surface onto which it can properly fit. Instead of dropping neatly into place as intended, it sits proud of the surrounding structure and immediately looks wrong. Image 14
At this point I wasn’t even surprised. What should have been one of the most satisfying stages of the build—adding the finishing touches and standing back to admire the result—instead became yet another round of fault-finding and remedial work.
It’s particularly disappointing because this isn’t some obscure issue buried deep within the model. It’s the roof. It’s one of the last things every builder will fit and one of the first things anyone looking at the completed model will notice. Quite how this made it through testing is beyond me, because I can’t believe my kit is the only one affected.
Final Verdict


By now, the pattern was becoming all too familiar: a good idea, attractive design, decent manufacturing quality, and then numerous completely avoidable issues that turn straightforward assembly steps into problem-solving exercises.
After building more than sixty book nooks and miniature kits over the years, I can honestly say this is the first one that has generated such a lengthy list of problems. Any kit can have the occasional issue, and most experienced builders expect to make minor adjustments along the way. What I don’t expect is to spend so much time correcting design flaws, working around questionable instructions, reinforcing fragile assemblies, repairing damage caused by the design itself, and generally trying to second-guess what the manufacturer intended.
That’s particularly disappointing because there is a good kit buried in here somewhere. The manufacturing quality is generally excellent, the artwork is attractive, and some of the design concepts show genuine promise. Unfortunately, all of that is overshadowed by a succession of avoidable problems that should have been identified and corrected long before release. Image 15 and image 16.
As things stand, I simply cannot recommend the Magic Wardrobe. In my opinion, it needs a thorough design review and a properly tested revision before it is ready for the wider market. In a first for me, this won’t be joining my display collection once the review is complete. The photographs have been taken, the video has been recorded, and when I’ve finished writing this review, the kit will be heading for the bin. That may sound harsh, but after everything we’ve been through together, I think we’ve both had enough of each other.
I won’t even bother you with a list of pros and cons, as I would normally do, it would take too much time!
Photo Gallery


Copyright Book Nook Workshop 2026 – All rights reserved. (John A. MacInnes)
Leave a Reply