Built & reviewed by Martin Seidler #37
Introduction
Song of Sirens from MiniCity became my build number 37, and I must say it turned out to be one of the most enjoyable projects I have built recently. Not necessarily because it is the best kit I have ever built, but because it offered tremendous opportunities for customization and allowed me to learn several completely new skills along the way.
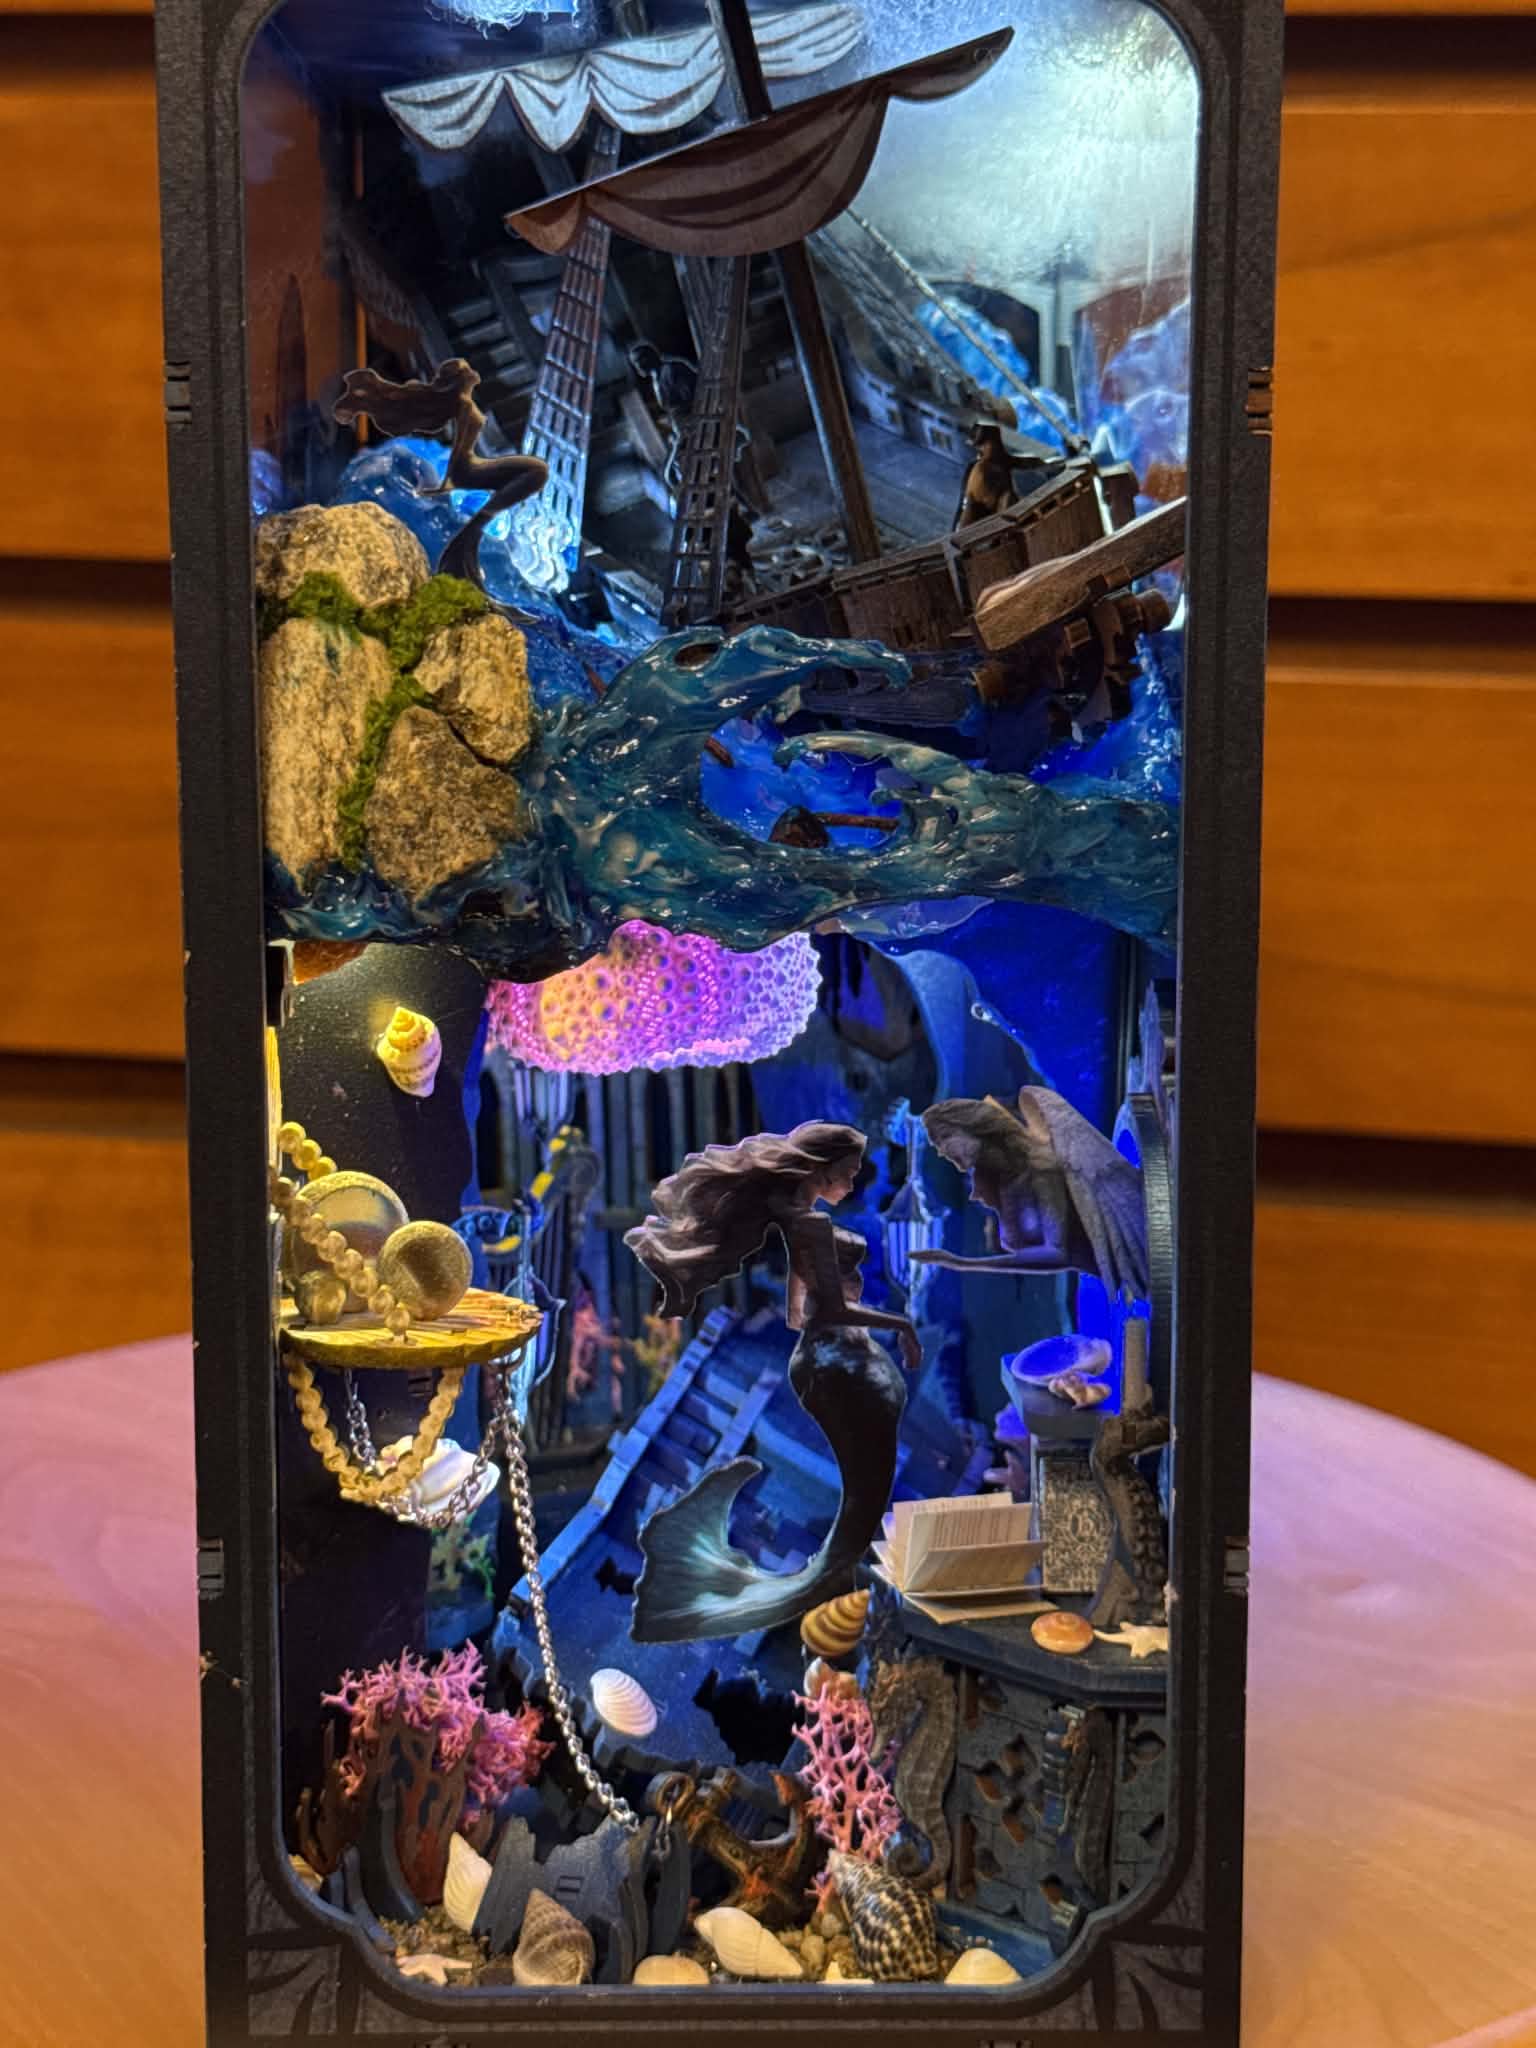
The concept itself is unique. The scene depicts a sailing ship caught in a violent storm while, beneath the waves, a group of sirens waits among the remains of previous shipwrecks. The book nook is effectively divided into two worlds. Above the sea level, we have the ship and its crew fighting the raging ocean. Below the surface lies the underwater kingdom with wrecked ships, ruins, shells, and the sirens themselves.
I liked this concept immediately. Unlike many book nooks that simply show a street scene or an interior, Song of Sirens tells a story. There is drama, tension, and a clear connection between the two halves of the model.
At the same time, I had already seen comments and reviews from other builders mentioning that the lighting was somewhat unusual and that the wave design divided opinions. After completing the build, I can understand where those comments came from. However, I also quickly realized that this kit had enormous customization potential, which made me look forward to the project even more.
What’s in the Box
The kit follows the modern MiniCity formula. You receive printed MDF sheets, several plastic sheets with components for the ship, mermaids, and decorative details, a dust cover, lighting components, and various accessories.
One feature I particularly liked is that the book nook is open on both sides. This allows you to view the ship and the scene from multiple angles, which significantly improves the display value.
The lighting system consists of six LED lights and two LED strips. The kit also includes a bag of small seashells and a large sea urchin shell that serves as a chandelier in the underwater section.
Instructions
The instructions are divided into several parts, following MiniCity’s usual approach.
Overall, they are good, but not perfect.
There were several places where the illustrations could have been clearer, particularly regarding the installation and positioning of the lighting components. The wiring itself is straightforward, but the exact orientation of some LEDs was not always obvious.
This is not a major issue and certainly not enough to significantly downgrade the kit, but a few improvements in the diagrams would make the build smoother for less experienced builders.
The Build
Part 1 – The Underwater World
The build starts with the underwater section, where you assemble the remains of a wrecked ship, the ruins, the sirens’ environment, and the seabed.
There is nothing particularly difficult here. The assembly is straightforward and progresses smoothly. At this stage, the contrast between the underwater and surface worlds already starts to emerge.
Part 2 – The Structural Framework
The second section creates the supporting structure that will hold the ship above the sea.
This framework consists of ribs and supports that create both the strength of the model and the intended wave effect. Again, assembly is fairly straightforward, although this is one of the places where the instructions could better explain the positioning of the lighting components.
Structurally, everything works perfectly and creates a surprisingly strong framework for the upper section.
Part 3 – The Ship


The ship itself was one of my favorite parts of the build.
Assembly is logical, enjoyable, and satisfying. Watching the vessel gradually come together was great fun, and it quickly becomes the centerpiece of the entire scene.
The only small issue was the installation of the rope ladders on the masts, where the instructions could have been slightly clearer. Otherwise, I had no problems at all.
Part 4 – Final Assembly
The final section brings everything together.
The side walls are completed, furniture and decorative details are installed, and the scene starts to come alive.
One amusing detail made me smile. Despite being an underwater shipwreck scene, it is still a book nook. Apparently, book nook law requires that books must appear somewhere. MiniCity solved this by including a small cabinet with books and papers hidden in the underwater world. Even sirens, it seems, need reading material.
The upper section contains semi-transparent skies illuminated by a light strip and a slowly blinking LED. Cotton-like material is added to represent clouds and to help conceal the light source.
At this point, the standard build is technically complete.
For me, however, this was only the beginning.
Customization
One of the reasons I was attracted to Song of Sirens was its enormous customization potential. The core concept is excellent, but I immediately saw opportunities to push it much further.
Lightning Effects

The first thing that bothered me was the original blinking LED intended to simulate lightning.
To be honest, I found the effect rather strange and not particularly convincing. Since the entire scene revolves around a ship battling a violent storm, I wanted real lightning.
This project finally gave me an excuse to learn something I had wanted to try for a long time.
I purchased a Digispark ATTiny85 controller, learned how to program it through Arduino, and created my own lightning simulation using two additional LEDs. One LED was positioned on the far left side of the sky, while the second was installed in the central section. Together they create random flashes that illuminate different parts of the storm and make the scene feel alive.
I removed the original blinking LED and replaced it with a standard 3 mm LED to provide stable illumination in the upper section. Since I was generating lightning myself, I no longer needed the breathing-style LED effect supplied with the kit.
The result is absolutely magnificent.
The storm now feels dynamic and realistic. The flashes reflect from the waves, illuminate the ship, and completely transform the atmosphere.
Commercial lightning controllers are available for around $16–20. My DIY solution cost approximately $4, including the controller and LEDs. More importantly, I learned a completely new skill that I can now use in future projects.
Sound Effects
If there is a storm and there are sirens, then there should also be sound.
I initially considered connecting the sound module directly to the Digispark controller so that lightning and sound would be synchronized automatically. Technically, this would not have been difficult.
In the end, however, I decided against it because I still wanted the option to switch the sound off independently. Sometimes you simply want to enjoy the model in silence.
I installed a standalone sound module powered from the same battery system. The module includes its own speaker, controller, LiPo battery, and activation switch. The entire setup cost approximately $5 from AliExpress.
The activation button is located on the rear side of the upper deck and disguised with one of the decorative shells supplied with the kit. From the front it remains almost invisible, but pressing the shell activates the soundtrack.
The soundtrack itself was created in Audacity. I combined the creaking of an old sailing ship, rigging noises, bell sounds, crashing waves, thunder, and the haunting songs of sirens into a single ambient soundscape.
The module is installed at the rear of the model and works perfectly.
The combination of sound and lightning transforms the model from a static display into a small living scene.
Rebuilding the Ocean


This was by far the biggest modification of the entire project.
I should start by saying that I understand why MiniCity designed the ocean the way they did. Within the traditional book nook format, there are not many practical ways to represent large waves while keeping the structure lightweight, affordable, and relatively easy to assemble. Using ribs and transparent elements is actually a sensible solution.
However, for my personal taste, the effect was not quite convincing enough. The visible ribs occasionally reminded me that I was looking at a model rather than a stormy ocean, and in some places the lighting from the underwater section could be seen through the gaps. This certainly did not ruin the build, but it inspired me to see whether I could push the illusion a little further.
Using transparent plastic from food packaging, I cut custom sections that fit between the ribs. The material already had a slightly corrugated texture, making it a useful starting point. I shaped each section using gentle heat from a gas lighter and attached them to the framework using UV resin.
The goal was not to replace MiniCity’s concept but rather to build upon it and create a fuller water surface while preserving the original structure underneath.
Once the structure was complete, I covered it with water gel to create the final texture.
The rear section was completed first. After assembling the sides, I repeated the process on the front section.
For coloring, I used three shades of water gel: deep blue, medium blue, and white.
In reality, a stormy ocean would probably be darker, consisting mainly of deep blue water with white wave crests. However, the overall book nook already contains many dark tones, so I intentionally made the sea somewhat lighter and foamier to keep the model visually attractive when displayed between books.
The Mermaid Cliff
During the rebuilding process, I realized that I also disliked the structure supporting the small mermaid on the left side.
I was never entirely sure whether it was supposed to represent a wave, a rock formation, or something else.
So I removed it completely.
Using real stones, I built a small rocky cliff, added greenery between the rocks, and relocated the mermaid to her new position.
The result feels much more natural and believable.
Additional Details
Finally, I added floating debris to the ocean surface, including barrels and pieces of wood that would naturally be present if a ship were being destroyed during a storm.
The seabed also received additional attention.
I used fine and coarse real river sand to create a more realistic texture and incorporated the shells and decorative elements supplied with the kit.
These are relatively small modifications, but together they significantly enhance the realism of the finished scene.
Final Verdict


Song of Sirens is a kit built around an excellent idea.
The contrast between the storm above and the sirens below creates a unique visual story that immediately captures attention.
The standard kit already produces an attractive display piece, but it is also one of those projects that almost invites customization. The original lighting and ocean surface may leave room for additional improvements, depending on how realistic you want the final result to be.
For builders who simply want to assemble a book nook and place it on a shelf, it will look very good.
For builders who enjoy customization, however, this kit is an absolute treasure.
During this project, I learned how to program a Digispark controller, created my first custom lightning system, installed my first standalone sound module, built custom audio tracks in Audacity, and experimented extensively with large-scale water effects.
And yes, I must honestly admit that ChatGPT was an invaluable assistant throughout the process. Without AI helping me solve programming and electronics challenges, many of these modifications would have taken considerably longer.
Ratings
Concept & Story: 9/10
Original Design: 7.5/10
Instructions: 4/5
Build Experience: 8/10
Customization Potential: 10/10
Would I Recommend It?
Absolutely.
If you enjoy building kits exactly as they come from the box, Song of Sirens will still provide a very attractive display piece.
But if you are the type of builder who sees a kit as a starting point rather than a finished product, this is one of the best customization platforms I have encountered so far. The possibilities are almost endless, and that is exactly what made this build so enjoyable for me.


Leave a Reply